Anything sent across the belt passes through this junction sooner or later. Down on the freight line, cargo lifts and guarded ducts keep CoCoMan busy. Every now and then he catches a glimpse of another way through. Imagine knowing this place as well as the parcels do.
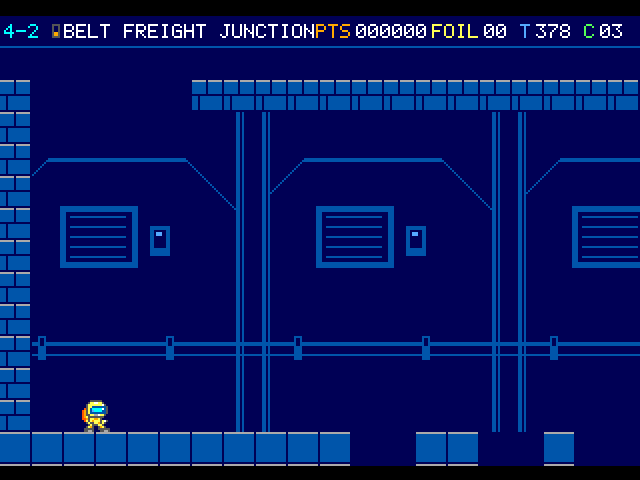
The underground freight junction opens on a blue deck beneath a high grating. The courier stands to the left of a break in the floor.
On the flight
The Hull Louse rides low enough for its plate to shield it from ordinary sparks. In the lift bay, watch the freight tread approach and land on it from above.
Course map
Belt Freight Junction
A freight lift brings its own landing surface. A Hull Louse brings armor. Watch the tread under the pilot and the shape of the machine ahead.
Tunnel drop. Column 2.5, row 3. You come down from the forecourt. Take control as the arrival finishes. Locate landmark 1
Descending freight deck. Column 58.75, row 5.5. Catch its top on the way down. Leave while the deck is within reach, before it wraps to its starting height. Locate landmark 2
Hull Louse arrival. Column 83, row 12. Wrist sparks glance off the armored shell. Come down on it from above to fold it. Locate landmark 3
Parcel Roller. Column 43, row 8. This marks an encounter position. Moving hazards can leave this point during play. Locate landmark 4
Parcel Roller. Column 44, row 8. This marks an encounter position. Moving hazards can leave this point during play. Locate landmark 5
Parcel Roller. Column 46, row 8. This marks an encounter position. Moving hazards can leave this point during play. Locate landmark 6
Duct Tap. Column 72, row 10. This marks an encounter position. Moving hazards can leave this point during play. Locate landmark 7
Freight Drum. Column 77, row 12. This marks an encounter position. Moving hazards can leave this point during play. Locate landmark 8
Duct Tap. Column 78, row 6. This marks an encounter position. Moving hazards can leave this point during play. Locate landmark 9
Duct Tap. Column 84, row 10. This marks an encounter position. Moving hazards can leave this point during play. Locate landmark 10
Hull Louse. Column 88, row 12. This marks an encounter position. Moving hazards can leave this point during play. Locate landmark 11
Duct Tap. Column 89, row 10. This marks an encounter position. Moving hazards can leave this point during play. Locate landmark 12
Freight Drum. Column 100, row 12. This marks an encounter position. Moving hazards can leave this point during play. Locate landmark 13
Freight Drum. Column 101, row 12. This marks an encounter position. Moving hazards can leave this point during play. Locate landmark 14
Duct Tap. Column 107, row 9. This marks an encounter position. Moving hazards can leave this point during play. Locate landmark 15
Descending deck. Column 114, row 5. Watch the surface move before boarding. Locate landmark 16
Descending deck. Column 114, row 12. Watch the surface move before boarding. Locate landmark 17
Rising deck. Column 123, row 2. Watch the surface move before boarding. Locate landmark 18
Rising deck. Column 123, row 9. Watch the surface move before boarding. Locate landmark 19
Duct Tap. Column 131, row 11. This marks an encounter position. Moving hazards can leave this point during play. Locate landmark 20
Freight Drum. Column 137, row 12. This marks an encounter position. Moving hazards can leave this point during play. Locate landmark 21
Duct Tap. Column 138, row 10. This marks an encounter position. Moving hazards can leave this point during play. Locate landmark 22
Duct Tap. Column 142, row 9. This marks an encounter position. Moving hazards can leave this point during play. Locate landmark 23
Hull Louse. Column 154, row 9. This marks an encounter position. Moving hazards can leave this point during play. Locate landmark 24
Descending deck. Column 155, row 5. Watch the surface move before boarding. Locate landmark 25
Descending deck. Column 155, row 12. Watch the surface move before boarding. Locate landmark 26
Freight Drum. Column 168, row 12. This marks an encounter position. Moving hazards can leave this point during play. Locate landmark 27
Freight Drum. Column 169, row 12. This marks an encounter position. Moving hazards can leave this point during play. Locate landmark 28
Hull Louse. Column 179, row 12. This marks an encounter position. Moving hazards can leave this point during play. Locate landmark 29
Duct Tap. Column 180, row 6. This marks an encounter position. Moving hazards can leave this point during play. Locate landmark 30
Belt Freight Junction · panel 1 of 5 · columns 0–45
235 columns by 15 rows. Full room at the start of a flight. Brown tile marks soil, brick or steps. A gold-topped tread is a platform. Green mouths mark ducts. Amber dots mark encounters.
Belt Freight Junction · panel 2 of 5 · columns 45–93
235 columns by 15 rows. Full room at the start of a flight. Brown tile marks soil, brick or steps. A gold-topped tread is a platform. Green mouths mark ducts. Amber dots mark encounters.
2. Descending freight deck · 3. Hull Louse arrival · 6. Parcel Roller · 7. Duct Tap · 8. Freight Drum · 9. Duct Tap · 10. Duct Tap · 11. Hull Louse · 12. Duct Tap
Belt Freight Junction · panel 3 of 5 · columns 93–140
235 columns by 15 rows. Full room at the start of a flight. Brown tile marks soil, brick or steps. A gold-topped tread is a platform. Green mouths mark ducts. Amber dots mark encounters.
Belt Freight Junction · panel 4 of 5 · columns 140–188
235 columns by 15 rows. Full room at the start of a flight. Brown tile marks soil, brick or steps. A gold-topped tread is a platform. Green mouths mark ducts. Amber dots mark encounters.
Belt Freight Junction · panel 5 of 5 · columns 188–234
235 columns by 15 rows. Full room at the start of a flight. Brown tile marks soil, brick or steps. A gold-topped tread is a platform. Green mouths mark ducts. Amber dots mark encounters.
Open the scenery view
Belt Freight Junction · scenery
This room has its own starting column in the Belt art bank. The background is shown before foreground machinery is painted.
24 columns by 15 rows. Full room at the start of a flight. Brown tile marks soil, brick or steps. A gold-topped tread is a platform. Green mouths mark ducts. Amber dots mark encounters.
1. Dispatch walk · 2. Entry shoulder
Open the scenery view
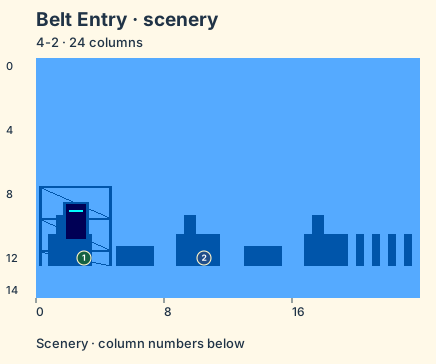
Belt Entry · scenery
This room has its own starting column in the Belt art bank. The background is shown before foreground machinery is painted.
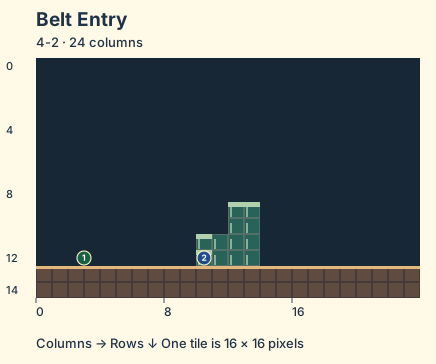
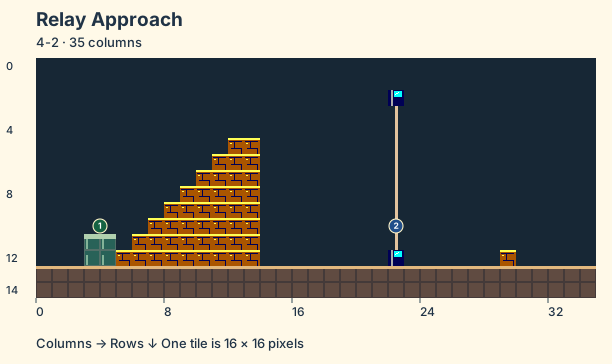
Daylight collar. Column 3.5, row 10. The Duct Tap pauses for the forced rise. Once the pilot is clear, take a look at the rim before stepping away. Locate landmark 1
Foundry relay. Column 22, row 10. Catch the pennant to tally the clock and leave for the Foundry with the equipment you brought out. Locate landmark 2
35 columns by 15 rows. Full room at the start of a flight. Brown tile marks soil, brick or steps. A gold-topped tread is a platform. Green mouths mark ducts. Amber dots mark encounters.
1. Daylight collar · 2. Foundry relay
Open the scenery view
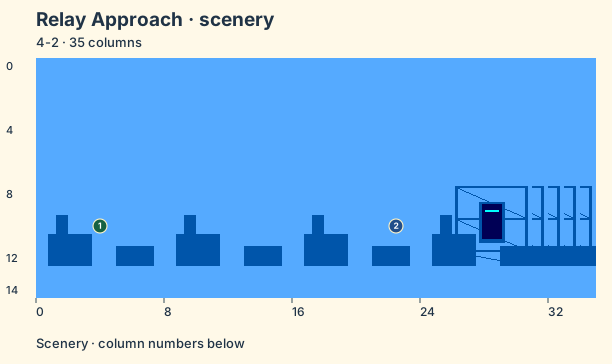
Relay Approach · scenery
This room has its own starting column in the Belt art bank. The background is shown before foreground machinery is painted.
Daylight collar. Column 3.5, row 10. The Duct Tap pauses for the forced rise. Once the pilot is clear, take a look at the rim before stepping away. Locate landmark 1
Foundry relay. Column 22, row 10. Catch the pennant to tally the clock and leave for the Foundry with the equipment you brought out. Locate landmark 2
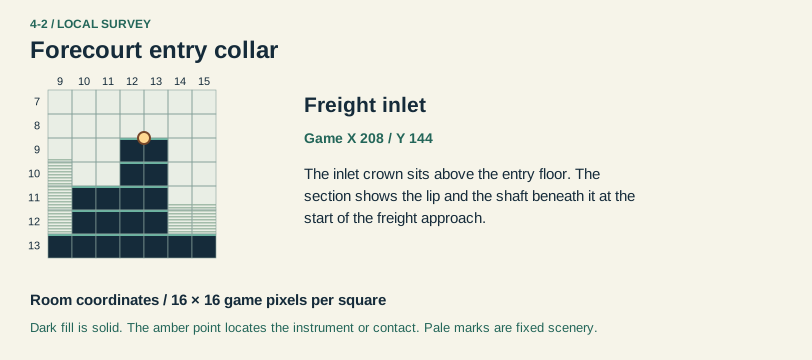
Freight inlet. The inlet crown sits above the entry floor. The section shows the lip and the shaft beneath it at the start of the freight approach. Locate landmark 1
Forecourt entry collar · local section · panel 1 of 1
1
Local section, columns 9–15, rows 7–13. One grid square corresponds to 16 by 16 game pixels. The inlet crown sits above the entry floor. The section shows the lip and the shaft beneath it at the start of the freight approach.
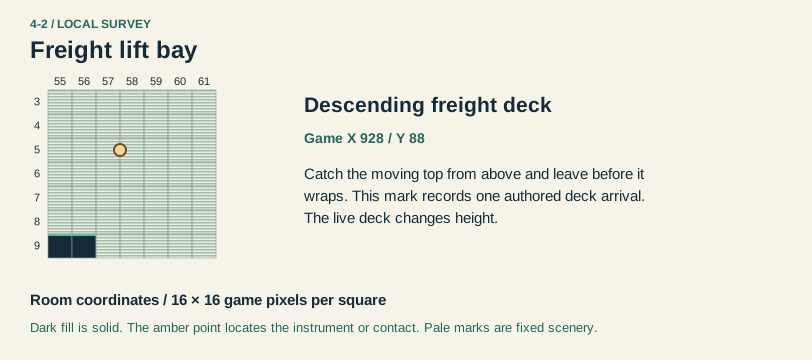
Descending freight deck. Catch the moving top from above and leave before it wraps. This mark records one authored deck arrival. The live deck changes height. Locate landmark 1
Freight lift bay · local section · panel 1 of 1
1
Local section, columns 55–61, rows 3–9. One grid square corresponds to 16 by 16 game pixels. Catch the moving top from above and leave before it wraps. This mark records one authored deck arrival. The live deck changes height.
1. Descending freight deck
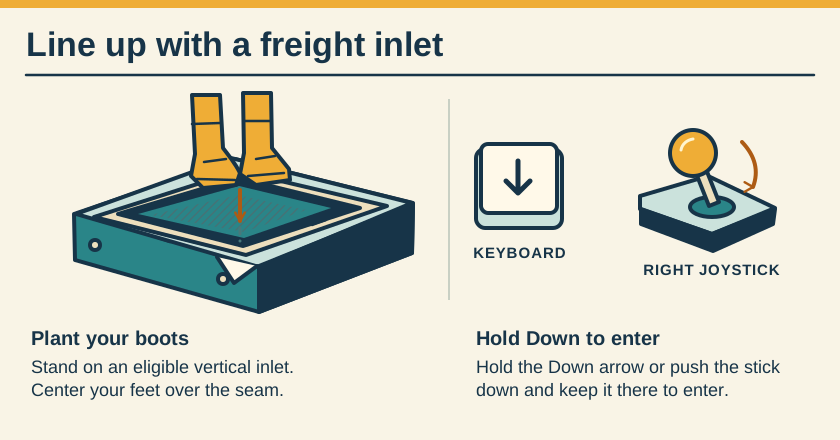
Line up with a freight inlet
Equipment study. A pair of work boots sits centered over the seam of an eligible freight inlet. A Down key and a right-port joystick show two ways to give the same entry command.
Inlet seam. On an eligible vertical freight inlet, stand over the middle of the seam before giving the entry command.
Down command. Hold the Down arrow on the keyboard, or push the right-port joystick down while the courier is centered on the inlet.
Landmarks to recognize
Plate sled
A descending stomp folds the Hull Louse and gives you room to pass.
Freight board
Read the destination before choosing an onward dispatch. The ordinary relay continues the refinery run.
Give me a hint
An overhead dispatch can take you off the refinery run. To continue in course order, choose the ordinary outdoor relay.
Routes and discoveries
This link leads to an optional part of the flight. Open the section below to continue.Continue to the linked placeThis link leads to an optional part of the flight. Open the section below to continue.Continue to the linked place
The freight drops out of daylight here. CoCoMan follows it to the mouth of the junction, where an ordinary-looking entrance leads under the belt. He's used to delivering parcels. For the next stretch he gets to travel their way.
Entry
Start in the dry approach and let the freight entrance carry you underground.
Return or onward flight
Once you have control in the main tunnel, watch the deck motion before stepping into the lift bay.
Follow this transfer
Follow the automatic entry into Belt Freight Junction.
This link leads to an optional part of the flight. Open the section below to continue.Continue to the linked placeThis link leads to an optional part of the flight. Open the section below to continue.Continue to the linked placeThis link leads to an optional part of the flight. Open the section below to continue.Continue to the linked placeThis link leads to an optional part of the flight. Open the section below to continue.Continue to the linked place
Belt Freight Junction · transfer points · panel 1 of 5 · columns 0–45
Only the selected route’s transfer positions are marked with numbered amber diamonds.
Belt Freight Junction · transfer points · panel 2 of 5 · columns 45–93
Only the selected route’s transfer positions are marked with numbered amber diamonds.
Belt Freight Junction · transfer points · panel 3 of 5 · columns 93–140
Only the selected route’s transfer positions are marked with numbered amber diamonds.
Belt Freight Junction · transfer points · panel 4 of 5 · columns 140–188
1
Only the selected route’s transfer positions are marked with numbered amber diamonds.
1. Relay transfer
Belt Freight Junction · transfer points · panel 5 of 5 · columns 188–234
Only the selected route’s transfer positions are marked with numbered amber diamonds.
This link leads to an optional part of the flight. Open the section below to continue.Continue to the linked placeThis link leads to an optional part of the flight. Open the section below to continue.Continue to the linked placeThis link leads to an optional part of the flight. Open the section below to continue.Continue to the linked placeThis link leads to an optional part of the flight. Open the section below to continue.Continue to the linked placeThis link leads to an optional part of the flight. Open the section below to continue.Continue to the linked placeThis link leads to an optional part of the flight. Open the section below to continue.Continue to the linked placeThis link leads to an optional part of the flight. Open the section below to continue.Continue to the linked placeThis link leads to an optional part of the flight. Open the section below to continue.Continue to the linked placeThis link leads to an optional part of the flight. Open the section below to continue.Continue to the linked placeThis link leads to an optional part of the flight. Open the section below to continue.Continue to the linked placeThis link leads to an optional part of the flight. Open the section below to continue.Continue to the linked placeThis link leads to an optional part of the flight. Open the section below to continue.Continue to the linked placeThis link leads to an optional part of the flight. Open the section below to continue.Continue to the linked placeThis link leads to an optional part of the flight. Open the section below to continue.Continue to the linked placeThis link leads to an optional part of the flight. Open the section below to continue.Continue to the linked placeThis link leads to an optional part of the flight. Open the section below to continue.Continue to the linked placeThis link leads to an optional part of the flight. Open the section below to continue.Continue to the linked placeThis link leads to an optional part of the flight. Open the section below to continue.Continue to the linked placeThis link leads to an optional part of the flight. Open the section below to continue.Continue to the linked placeThis link leads to an optional part of the flight. Open the section below to continue.Continue to the linked place
This is where the refinery keeps its samples. Quite a few of them look like pocket-sized foils, which makes CoCoMan just the fellow to inspect the collection. There’s time for a little rummaging before the outlet sends him back to the line.
Entry
When the guard clears the inlet, use Down on its lip to enter the cellar. There are ten loose foils and a timed dispenser.
Return or onward flight
The outlet returns you to the main yard. If you visit again, the dispenser and the foils remember what they have paid.
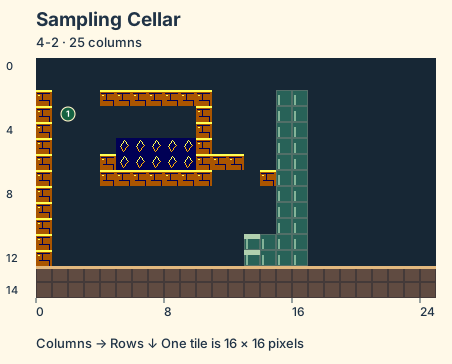
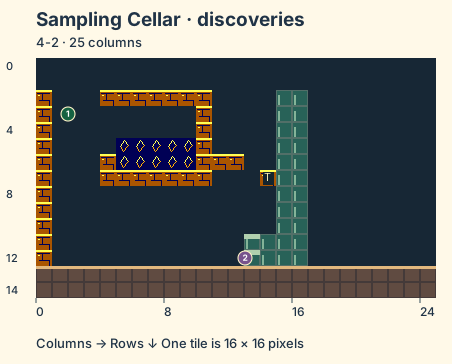
Sampling drop. Column 1.5, row 3. You arrive falling. Each loose foil and the dispenser remember what they have paid on a return visit. Locate landmark 1
Sampling Cellar · panel 1 of 1 · columns 0–24
25 columns by 15 rows. Full room at the start of a flight. Brown tile marks soil, brick or steps. A gold-topped tread is a platform. Green mouths mark ducts. Amber dots mark encounters.
1. Sampling drop
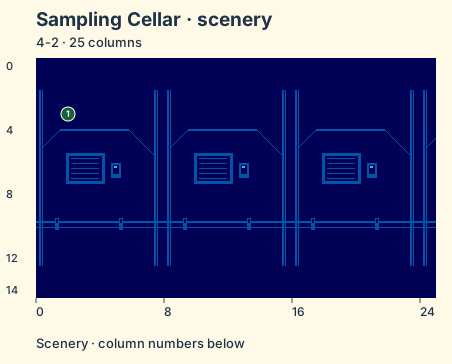
Open the scenery view
Sampling Cellar · scenery
This room has its own starting column in the Belt art bank. The background is shown before foreground machinery is painted.
Sampling drop. Column 1.5, row 3. You arrive falling. Each loose foil and the dispenser remember what they have paid on a return visit. Locate landmark 1
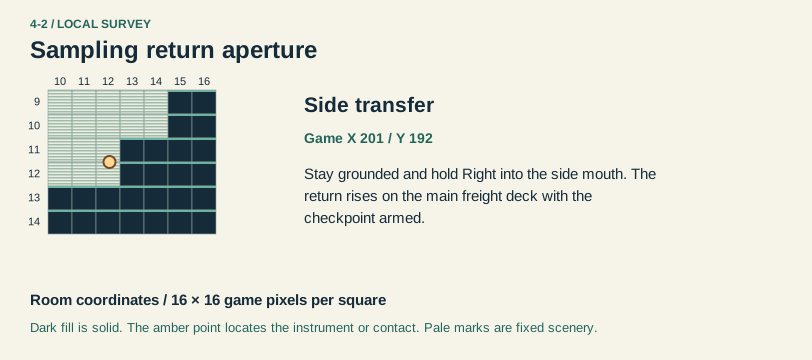
Side transfer. Stay grounded and hold Right into the side mouth. The return rises on the main freight deck with the checkpoint armed. Locate landmark 1
Sampling return aperture · local section · panel 1 of 1
1
Local section, columns 10–16, rows 9–14. One grid square corresponds to 16 by 16 game pixels. Stay grounded and hold Right into the side mouth. The return rises on the main freight deck with the checkpoint armed.
Sampling return collar. Column 131.5, row 10. The cellar brings you up on this collar with the checkpoint armed. The guard pauses for the forced rise. Locate landmark 2
Belt Freight Junction · transfer points · panel 1 of 5 · columns 0–45
Only the selected route’s transfer positions are marked with numbered amber diamonds.
Belt Freight Junction · transfer points · panel 2 of 5 · columns 45–93
1
Only the selected route’s transfer positions are marked with numbered amber diamonds.
1. Sampling Cellar inlet
Belt Freight Junction · transfer points · panel 3 of 5 · columns 93–140
2
Only the selected route’s transfer positions are marked with numbered amber diamonds.
2. Sampling return collar
Belt Freight Junction · transfer points · panel 4 of 5 · columns 140–188
Only the selected route’s transfer positions are marked with numbered amber diamonds.
Belt Freight Junction · transfer points · panel 5 of 5 · columns 188–234
Only the selected route’s transfer positions are marked with numbered amber diamonds.
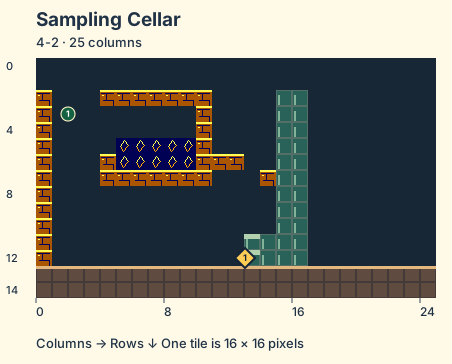
Sampling outlet. Column 12.5625, row 12. From the floor, hold Right into the side mouth. You rise back into the main tunnel with its checkpoint armed. Locate landmark 1
Sampling Cellar · transfer points · panel 1 of 1 · columns 0–24
1
Only the selected route’s transfer positions are marked with numbered amber diamonds.
1. Sampling outlet
This link leads to an optional part of the flight. Open the section below to continue.Continue to the linked placeThis link leads to an optional part of the flight. Open the section below to continue.Continue to the linked placeThis link leads to an optional part of the flight. Open the section below to continue.Continue to the linked placeThis link leads to an optional part of the flight. Open the section below to continue.Continue to the linked placeThis link leads to an optional part of the flight. Open the section below to continue.Continue to the linked place
At the far end of the tunnel, the local freight spur offers a tempting change of itinerary. CoCoMan came here looking for the next relay. Now he has to decide whether his delivery could use a bit of express service.
Entry
Read the local freight board before choosing the express service. This spur serves World 5.
Return or onward flight
Taking the dispatch starts a new leg with the suit, lives, score and foil you brought. Use the ordinary relay to stay on the refinery run.
Follow this transfer
Use the World 5 dispatch on the tunnel roof to start Ice on the Conveyors.
Near Exchange dispatch. Column 214.5, row 10. Follow the roof past the exchange sensor. At the dispatch mouth marked World 5, center your boots and hold Down to leave for Ice on the Conveyors. Locate landmark 1
Belt Freight Junction · transfer points · panel 1 of 5 · columns 0–45
Only the selected route’s transfer positions are marked with numbered amber diamonds.
Belt Freight Junction · transfer points · panel 2 of 5 · columns 45–93
Only the selected route’s transfer positions are marked with numbered amber diamonds.
Belt Freight Junction · transfer points · panel 3 of 5 · columns 93–140
Only the selected route’s transfer positions are marked with numbered amber diamonds.
Belt Freight Junction · transfer points · panel 4 of 5 · columns 140–188
Only the selected route’s transfer positions are marked with numbered amber diamonds.
Belt Freight Junction · transfer points · panel 5 of 5 · columns 188–234
1
Only the selected route’s transfer positions are marked with numbered amber diamonds.
1. Near Exchange dispatch
This link leads to an optional part of the flight. Open the section below to continue.Continue to the linked placeThis link leads to an optional part of the flight. Open the section below to continue.Continue to the linked placeThis link leads to an optional part of the flight. Open the section below to continue.Continue to the linked placeThis link leads to an optional part of the flight. Open the section below to continue.Continue to the linked placeThis link leads to an optional part of the flight. Open the section below to continue.Continue to the linked placeThis link leads to an optional part of the flight. Open the section below to continue.Continue to the linked placeThis link leads to an optional part of the flight. Open the section below to continue.Continue to the linked placeThis link leads to an optional part of the flight. Open the section below to continue.Continue to the linked placeThis link leads to an optional part of the flight. Open the section below to continue.Continue to the linked placeThis link leads to an optional part of the flight. Open the section below to continue.Continue to the linked placeThis link leads to an optional part of the flight. Open the section below to continue.Continue to the linked placeThis link leads to an optional part of the flight. Open the section below to continue.Continue to the linked placeThis link leads to an optional part of the flight. Open the section below to continue.Continue to the linked placeThis link leads to an optional part of the flight. Open the section below to continue.Continue to the linked placeThis link leads to an optional part of the flight. Open the section below to continue.Continue to the linked placeThis link leads to an optional part of the flight. Open the section below to continue.Continue to the linked placeThis link leads to an optional part of the flight. Open the section below to continue.Continue to the linked placeThis link leads to an optional part of the flight. Open the section below to continue.Continue to the linked placeThis link leads to an optional part of the flight. Open the section below to continue.Continue to the linked placeThis link leads to an optional part of the flight. Open the section below to continue.Continue to the linked placeThis link leads to an optional part of the flight. Open the section below to continue.Continue to the linked placeThis link leads to an optional part of the flight. Open the section below to continue.Continue to the linked place
High over the freight junction, three ducts serve the far end of the mail route. It's an awfully small platform for a decision this big. On a run like this, even a courier ought to get sent express once in a while.
Entry
Use the deployed tether for the overhead freight exchange. Read the world names before boarding.
Return or onward flight
The chosen board dispatches you to its world with your current equipment and bank. It leaves the ordinary Foundry itinerary behind.
Tether sleeve. Column 3.5, row 13. Wait through the automatic climb and step-off before steering toward the board. Locate landmark 1
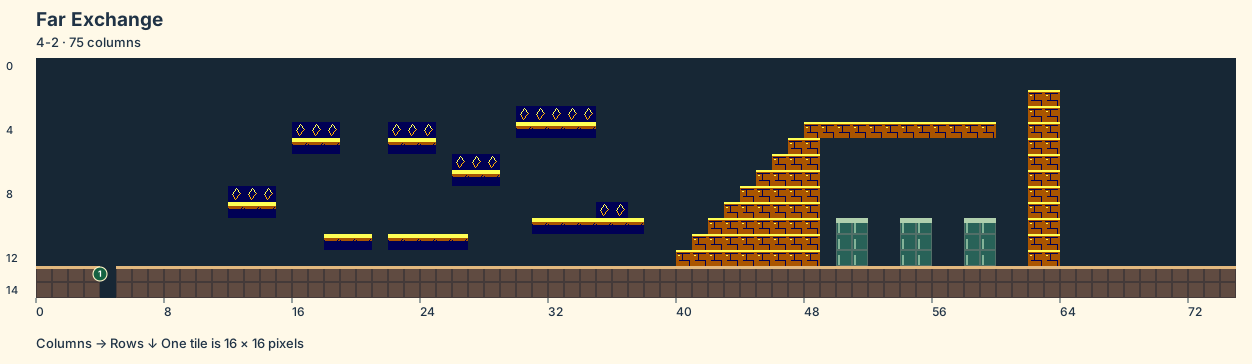
Far Exchange · panel 1 of 2 · columns 0–36
75 columns by 15 rows. Full room at the start of a flight. Brown tile marks soil, brick or steps. A gold-topped tread is a platform. Green mouths mark ducts. Amber dots mark encounters.
1. Tether sleeve
Far Exchange · panel 2 of 2 · columns 36–74
75 columns by 15 rows. Full room at the start of a flight. Brown tile marks soil, brick or steps. A gold-topped tread is a platform. Green mouths mark ducts. Amber dots mark encounters.
Open the scenery view
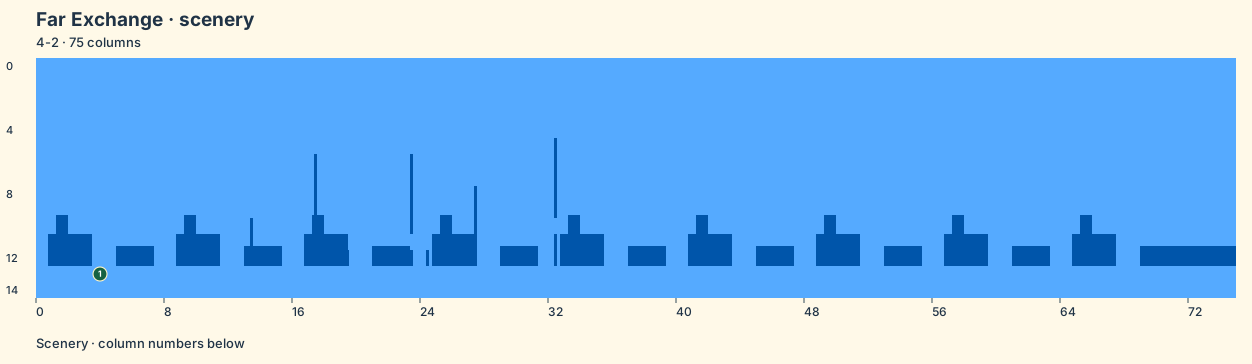
Far Exchange · scenery
This room has its own starting column in the Belt art bank. The background is shown before foreground machinery is painted.
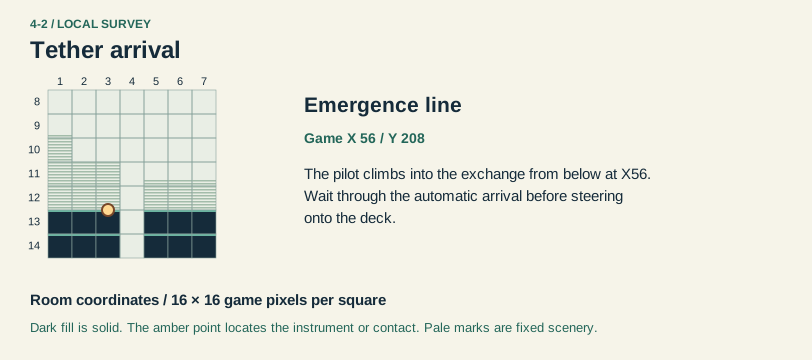
Emergence line. The pilot climbs into the exchange from below at X56. Wait through the automatic arrival before steering onto the deck. Locate landmark 1
Tether arrival · local section · panel 1 of 1
1
Local section, columns 1–7, rows 8–14. One grid square corresponds to 16 by 16 game pixels. The pilot climbs into the exchange from below at X56. Wait through the automatic arrival before steering onto the deck.
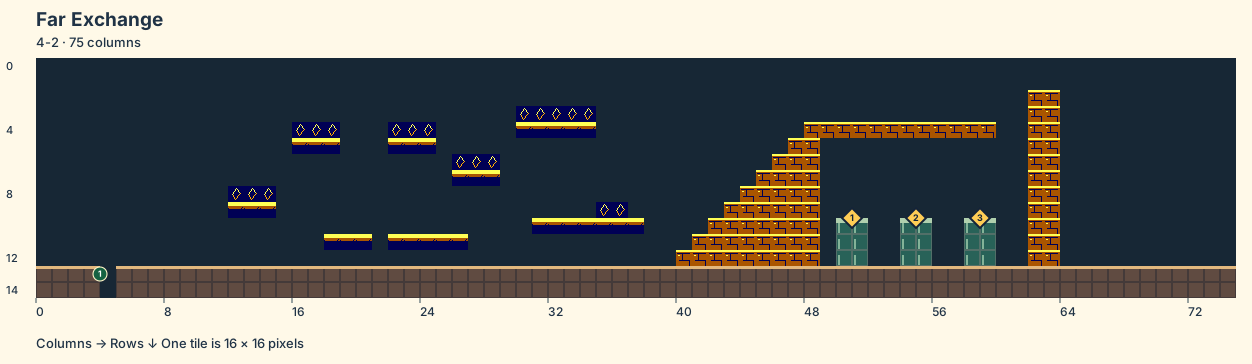
Far Exchange · transfer points · panel 1 of 2 · columns 0–36
Only the selected route’s transfer positions are marked with numbered amber diamonds.
Far Exchange · transfer points · panel 2 of 2 · columns 36–74
123
Only the selected route’s transfer positions are marked with numbered amber diamonds.
1. World 8 dispatch mouth · 2. World 7 dispatch mouth · 3. World 6 dispatch mouth
This link leads to an optional part of the flight. Open the section below to continue.Continue to the linked placeThis link leads to an optional part of the flight. Open the section below to continue.Continue to the linked placeThis link leads to an optional part of the flight. Open the section below to continue.Continue to the linked placeThis link leads to an optional part of the flight. Open the section below to continue.Continue to the linked placeThis link leads to an optional part of the flight. Open the section below to continue.Continue to the linked place
There's the sky again and, farther along, the top of a relay mast. CoCoMan has come through the freight junction with his boots still on. One more run outside will put him on the road to the foundry.
Entry
Use the ordinary side outlet to return to daylight. Take a moment to read the mast footing after the lifts.
Return or onward flight
Catch the mast to advance to Counterweight Foundry.
Follow this transfer
Catch the daylight relay to reach Counterweight Foundry.
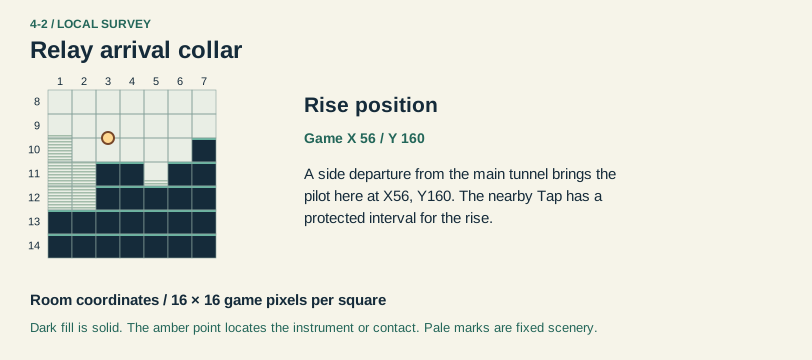
Rise position. A side departure from the main tunnel brings the pilot here at X56, Y160. The nearby Tap has a protected interval for the rise. Locate landmark 1
Relay arrival collar · local section · panel 1 of 1
1
Local section, columns 1–7, rows 8–14. One grid square corresponds to 16 by 16 game pixels. A side departure from the main tunnel brings the pilot here at X56, Y160. The nearby Tap has a protected interval for the rise.
1. Rise position
This link leads to an optional part of the flight. Open the section below to continue.Continue to the linked placeThis link leads to an optional part of the flight. Open the section below to continue.Continue to the linked placeThis link leads to an optional part of the flight. Open the section below to continue.Continue to the linked placeThis link leads to an optional part of the flight. Open the section below to continue.Continue to the linked placeThis link leads to an optional part of the flight. Open the section below to continue.Continue to the linked placeThis link leads to an optional part of the flight. Open the section below to continue.Continue to the linked placeThis link leads to an optional part of the flight. Open the section below to continue.Continue to the linked placeThis link leads to an optional part of the flight. Open the section below to continue.Continue to the linked placeThis link leads to an optional part of the flight. Open the section below to continue.Continue to the linked placeThis link leads to an optional part of the flight. Open the section below to continue.Continue to the linked placeThis link leads to an optional part of the flight. Open the section below to continue.Continue to the linked placeThis link leads to an optional part of the flight. Open the section below to continue.Continue to the linked placeThis link leads to an optional part of the flight. Open the section below to continue.Continue to the linked placeThis link leads to an optional part of the flight. Open the section below to continue.Continue to the linked placeThis link leads to an optional part of the flight. Open the section below to continue.Continue to the linked placeThis link leads to an optional part of the flight. Open the section below to continue.Continue to the linked placeThis link leads to an optional part of the flight. Open the section below to continue.Continue to the linked placeThis link leads to an optional part of the flight. Open the section below to continue.Continue to the linked placeThis link leads to an optional part of the flight. Open the section below to continue.Continue to the linked placeThis link leads to an optional part of the flight. Open the section below to continue.Continue to the linked placeThis link leads to an optional part of the flight. Open the section below to continue.Continue to the linked placeThis link leads to an optional part of the flight. Open the section below to continue.Continue to the linked placeThis link leads to an optional part of the flight. Open the section below to continue.Continue to the linked placeThis link leads to an optional part of the flight. Open the section below to continue.Continue to the linked placeThis link leads to an optional part of the flight. Open the section below to continue.Continue to the linked placeThis link leads to an optional part of the flight. Open the section below to continue.Continue to the linked placeThis link leads to an optional part of the flight. Open the section below to continue.Continue to the linked placeThis link leads to an optional part of the flight. Open the section below to continue.Continue to the linked placeThis link leads to an optional part of the flight. Open the section below to continue.Continue to the linked placeThis link leads to an optional part of the flight. Open the section below to continue.Continue to the linked placeThis link leads to an optional part of the flight. Open the section below to continue.Continue to the linked placeThis link leads to an optional part of the flight. Open the section below to continue.Continue to the linked placeThis link leads to an optional part of the flight. Open the section below to continue.Continue to the linked placeThis link leads to an optional part of the flight. Open the section below to continue.Continue to the linked placeThis link leads to an optional part of the flight. Open the section below to continue.Continue to the linked placeThis link leads to an optional part of the flight. Open the section below to continue.Continue to the linked placeThis link leads to an optional part of the flight. Open the section below to continue.Continue to the linked placeThis link leads to an optional part of the flight. Open the section below to continue.Continue to the linked placeThis link leads to an optional part of the flight. Open the section below to continue.Continue to the linked placeThis link leads to an optional part of the flight. Open the section below to continue.Continue to the linked placeThis link leads to an optional part of the flight. Open the section below to continue.Continue to the linked placeThis link leads to an optional part of the flight. Open the section below to continue.Continue to the linked placeThis link leads to an optional part of the flight. Open the section below to continue.Continue to the linked placeThis link leads to an optional part of the flight. Open the section below to continue.Continue to the linked placeThis link leads to an optional part of the flight. Open the section below to continue.Continue to the linked placeThis link leads to an optional part of the flight. Open the section below to continue.Continue to the linked placeThis link leads to an optional part of the flight. Open the section below to continue.Continue to the linked placeThis link leads to an optional part of the flight. Open the section below to continue.Continue to the linked placeThis link leads to an optional part of the flight. Open the section below to continue.Continue to the linked placeThis link leads to an optional part of the flight. Open the section below to continue.Continue to the linked placeThis link leads to an optional part of the flight. Open the section below to continue.Continue to the linked placeThis link leads to an optional part of the flight. Open the section below to continue.Continue to the linked placeThis link leads to an optional part of the flight. Open the section below to continue.Continue to the linked placeThis link leads to an optional part of the flight. Open the section below to continue.Continue to the linked placeThis link leads to an optional part of the flight. Open the section below to continue.Continue to the linked placeThis link leads to an optional part of the flight. Open the section below to continue.Continue to the linked placeThis link leads to an optional part of the flight. Open the section below to continue.Continue to the linked placeThis link leads to an optional part of the flight. Open the section below to continue.Continue to the linked placeThis link leads to an optional part of the flight. Open the section below to continue.Continue to the linked placeThis link leads to an optional part of the flight. Open the section below to continue.Continue to the linked placeThis link leads to an optional part of the flight. Open the section below to continue.Continue to the linked placeThis link leads to an optional part of the flight. Open the section below to continue.Continue to the linked placeThis link leads to an optional part of the flight. Open the section below to continue.Continue to the linked placeThis link leads to an optional part of the flight. Open the section below to continue.Continue to the linked placeThis link leads to an optional part of the flight. Open the section below to continue.Continue to the linked placeThis link leads to an optional part of the flight. Open the section below to continue.Continue to the linked placeThis link leads to an optional part of the flight. Open the section below to continue.Continue to the linked place
Tunnel drop. Column 2.5, row 3. You come down from the forecourt. Take control as the arrival finishes. Locate landmark 1
Descending freight deck. Column 58.75, row 5.5. Catch its top on the way down. Leave while the deck is within reach, before it wraps to its starting height. Locate landmark 2
Hull Louse arrival. Column 83, row 12. Wrist sparks glance off the armored shell. Come down on it from above to fold it. Locate landmark 3
Sampling return collar. Column 131.5, row 10. The cellar brings you up on this collar with the checkpoint armed. The guard pauses for the forced rise. Locate landmark 4
Near Exchange dispatch. Column 214.5, row 10. Follow the roof past the exchange sensor. At the dispatch mouth marked World 5, center your boots and hold Down to leave for Ice on the Conveyors. Locate landmark 5
Relay transfer. Column 186.5, row 9. Enter the side mouth while grounded to ride out to the daylight relay. Locate landmark 6
Parcel Roller. Column 43, row 8. This marks an encounter position. Moving hazards can leave this point during play. Locate landmark 7
Parcel Roller. Column 44, row 8. This marks an encounter position. Moving hazards can leave this point during play. Locate landmark 8
Parcel Roller. Column 46, row 8. This marks an encounter position. Moving hazards can leave this point during play. Locate landmark 9
Duct Tap. Column 72, row 10. This marks an encounter position. Moving hazards can leave this point during play. Locate landmark 10
Freight Drum. Column 77, row 12. This marks an encounter position. Moving hazards can leave this point during play. Locate landmark 11
Duct Tap. Column 78, row 6. This marks an encounter position. Moving hazards can leave this point during play. Locate landmark 12
Duct Tap. Column 84, row 10. This marks an encounter position. Moving hazards can leave this point during play. Locate landmark 13
Hull Louse. Column 88, row 12. This marks an encounter position. Moving hazards can leave this point during play. Locate landmark 14
Duct Tap. Column 89, row 10. This marks an encounter position. Moving hazards can leave this point during play. Locate landmark 15
Freight Drum. Column 100, row 12. This marks an encounter position. Moving hazards can leave this point during play. Locate landmark 16
Freight Drum. Column 101, row 12. This marks an encounter position. Moving hazards can leave this point during play. Locate landmark 17
Duct Tap. Column 107, row 9. This marks an encounter position. Moving hazards can leave this point during play. Locate landmark 18
Descending deck. Column 114, row 5. Watch the surface move before boarding. Locate landmark 19
Descending deck. Column 114, row 12. Watch the surface move before boarding. Locate landmark 20
Rising deck. Column 123, row 2. Watch the surface move before boarding. Locate landmark 21
Rising deck. Column 123, row 9. Watch the surface move before boarding. Locate landmark 22
Duct Tap. Column 131, row 11. This marks an encounter position. Moving hazards can leave this point during play. Locate landmark 23
Freight Drum. Column 137, row 12. This marks an encounter position. Moving hazards can leave this point during play. Locate landmark 24
Duct Tap. Column 138, row 10. This marks an encounter position. Moving hazards can leave this point during play. Locate landmark 25
Duct Tap. Column 142, row 9. This marks an encounter position. Moving hazards can leave this point during play. Locate landmark 26
Hull Louse. Column 154, row 9. This marks an encounter position. Moving hazards can leave this point during play. Locate landmark 27
Descending deck. Column 155, row 5. Watch the surface move before boarding. Locate landmark 28
Descending deck. Column 155, row 12. Watch the surface move before boarding. Locate landmark 29
Freight Drum. Column 168, row 12. This marks an encounter position. Moving hazards can leave this point during play. Locate landmark 30
Freight Drum. Column 169, row 12. This marks an encounter position. Moving hazards can leave this point during play. Locate landmark 31
Hull Louse. Column 179, row 12. This marks an encounter position. Moving hazards can leave this point during play. Locate landmark 32
Duct Tap. Column 180, row 6. This marks an encounter position. Moving hazards can leave this point during play. Locate landmark 33
Belt Freight Junction · discoveries · panel 1 of 5 · columns 0–45
235 columns by 15 rows. Full room with marked rewards and optional landmarks. Brown tile marks soil, brick or steps. A gold-topped tread is a platform. Green mouths mark ducts. Amber dots mark encounters.
Belt Freight Junction · discoveries · panel 2 of 5 · columns 45–93
235 columns by 15 rows. Full room with marked rewards and optional landmarks. Brown tile marks soil, brick or steps. A gold-topped tread is a platform. Green mouths mark ducts. Amber dots mark encounters.
2. Descending freight deck · 3. Hull Louse arrival · 9. Parcel Roller · 10. Duct Tap · 11. Freight Drum · 12. Duct Tap · 13. Duct Tap · 14. Hull Louse · 15. Duct Tap
Belt Freight Junction · discoveries · panel 3 of 5 · columns 93–140
235 columns by 15 rows. Full room with marked rewards and optional landmarks. Brown tile marks soil, brick or steps. A gold-topped tread is a platform. Green mouths mark ducts. Amber dots mark encounters.
Belt Freight Junction · discoveries · panel 4 of 5 · columns 140–188
235 columns by 15 rows. Full room with marked rewards and optional landmarks. Brown tile marks soil, brick or steps. A gold-topped tread is a platform. Green mouths mark ducts. Amber dots mark encounters.
Belt Freight Junction · discoveries · panel 5 of 5 · columns 188–234
235 columns by 15 rows. Full room with marked rewards and optional landmarks. Brown tile marks soil, brick or steps. A gold-topped tread is a platform. Green mouths mark ducts. Amber dots mark encounters.
5. Near Exchange dispatch
This link leads to an optional part of the flight. Open the section below to continue.Continue to the linked placeThis link leads to an optional part of the flight. Open the section below to continue.Continue to the linked placeThis link leads to an optional part of the flight. Open the section below to continue.Continue to the linked placeThis link leads to an optional part of the flight. Open the section below to continue.Continue to the linked placeThis link leads to an optional part of the flight. Open the section below to continue.Continue to the linked place
Sampling drop. Column 1.5, row 3. You arrive falling. Each loose foil and the dispenser remember what they have paid on a return visit. Locate landmark 1
Sampling outlet. Column 12.5625, row 12. From the floor, hold Right into the side mouth. You rise back into the main tunnel with its checkpoint armed. Locate landmark 2
25 columns by 15 rows. Full room with marked rewards and optional landmarks. Brown tile marks soil, brick or steps. A gold-topped tread is a platform. Green mouths mark ducts. Amber dots mark encounters.
1. Sampling drop · 2. Sampling outlet
This link leads to an optional part of the flight. Open the section below to continue.Continue to the linked placeThis link leads to an optional part of the flight. Open the section below to continue.Continue to the linked placeThis link leads to an optional part of the flight. Open the section below to continue.Continue to the linked placeThis link leads to an optional part of the flight. Open the section below to continue.Continue to the linked placeThis link leads to an optional part of the flight. Open the section below to continue.Continue to the linked place
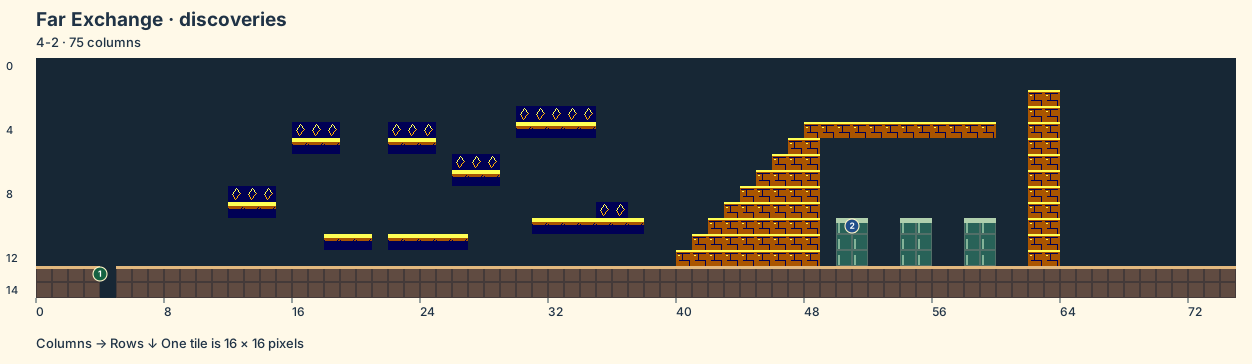
Tether sleeve. Column 3.5, row 13. Wait through the automatic climb and step-off before steering toward the board. Locate landmark 1
Numbered dispatch bay. Column 50.5, row 10. When the destination numbers appear, read the one over your chosen bay. A departure starts a new flight leg. Locate landmark 2
Far Exchange · discoveries · panel 1 of 2 · columns 0–36
75 columns by 15 rows. Full room with marked rewards and optional landmarks. Brown tile marks soil, brick or steps. A gold-topped tread is a platform. Green mouths mark ducts. Amber dots mark encounters.
1. Tether sleeve
Far Exchange · discoveries · panel 2 of 2 · columns 36–74
75 columns by 15 rows. Full room with marked rewards and optional landmarks. Brown tile marks soil, brick or steps. A gold-topped tread is a platform. Green mouths mark ducts. Amber dots mark encounters.
 To Titan and Back