
Back to VCC Plus Games
CoCoManTo Titan and Back
Course 7-1

The Return-Line Battery

A light blinks on the shore battery. Then a Dart tears across the deck, straight through the space CoCoMan was about to run into. The working decks are still ahead, and the Riggers up there have forks of their own.

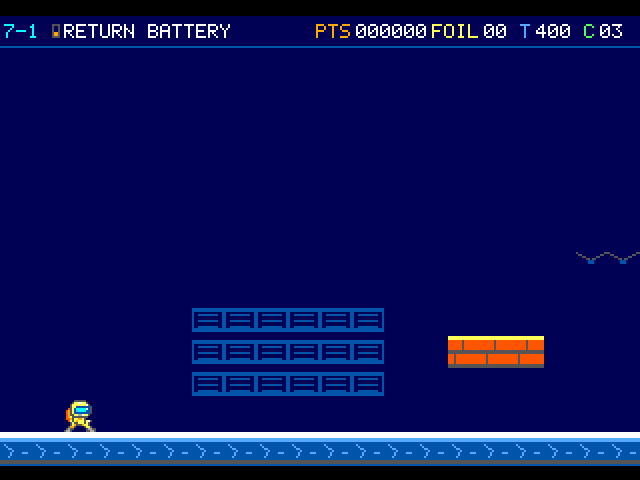
An orange brick ledge stands out against the blue battery wall. The courier is still on the uninterrupted shore deck.

On the flight

Read the battery's warning light before crossing the shot lane. The staggered Rigger decks add another moving hazard. A free fork finishes its arc even after the jack that threw it is gone.

Course map

Shore battery

Open the full-size illustration

  1. Arrival. Column 2, row 12. The pilot first takes control in this part of the room. Locate landmark 1
  2. Mass Driver. Column 25, row 11. Encounter reference. A moving threat can leave this position during play. Locate landmark 2
  3. Courier Dart. Column 31, row 11. Encounter reference. A moving threat can leave this position during play. Locate landmark 3
  4. Parcel Roller. Column 36, row 11. Encounter reference. A moving threat can leave this position during play. Locate landmark 4
  5. Rigger. Column 46, row 10. Encounter reference. A moving threat can leave this position during play. Locate landmark 5
  6. Rigger · 2. Column 50, row 8. Encounter reference. A moving threat can leave this position during play. Locate landmark 6
  7. Torque Fork. Column 50, row 8. Encounter reference. A moving threat can leave this position during play. Locate landmark 7
  8. Shore restart. Column 76, row 12. The paid halfway restart leaves the next approach clear. Locate landmark 8
  9. Parcel Roller · 2. Column 92, row 12. Encounter reference. A moving threat can leave this position during play. Locate landmark 9
  10. Rigger · 3. Column 98, row 10. Encounter reference. A moving threat can leave this position during play. Locate landmark 10
  11. Torque Fork · 2. Column 104, row 8. Encounter reference. A moving threat can leave this position during play. Locate landmark 11
  12. Spring Deck. Column 112, row 12. Watch the moving tread before boarding. Its position changes during play. Locate landmark 12

    Follow the optional transfer

  13. Rigger · 4. Column 115, row 7. Encounter reference. A moving threat can leave this position during play. Locate landmark 13
  14. Mass Driver · 2. Column 125, row 11. Encounter reference. A moving threat can leave this position during play. Locate landmark 14
  15. Courier Dart · 2. Column 128, row 11. Encounter reference. A moving threat can leave this position during play. Locate landmark 15
  16. Relay Mast. Column 137, row 12. Approach this relay to finish the room. Locate landmark 16

    Continue to 7-2 · Arrival

Landmarks to recognize

Battery mouth
Watch the housing's directional warning to see which straight lane the Dart will take.
Spring step
Land on the spring and watch its compression. A fresh press of Jump partway through the squeeze gives a higher rebound.
Give me a hint

A low shore route works for a Small pilot. Try the high rebound if you want to approach the lake with an extra supply.

Routes and discoveries

This link leads to an optional part of the flight. Open the section below to continue.Continue to the linked place

Shore battery

Entry

Cross the warned Dart lanes and approach each Rigger deck with room to avoid a released fork. The low line goes through to the relay in any suit.

Return or onward flight

Use the shore mast to enter Kraken Mare. All 24 Choir foils carried through Cal can arm a spare here. Collect the core before losing a life once you have exposed its seam.

This link leads to an optional part of the flight. Open the section below to continue.Continue to the linked placeThis link leads to an optional part of the flight. Open the section below to continue.Continue to the linked placeThis link leads to an optional part of the flight. Open the section below to continue.Continue to the linked placeThis link leads to an optional part of the flight. Open the section below to continue.Continue to the linked placeThis link leads to an optional part of the flight. Open the section below to continue.Continue to the linked placeThis link leads to an optional part of the flight. Open the section below to continue.Continue to the linked placeThis link leads to an optional part of the flight. Open the section below to continue.Continue to the linked placeThis link leads to an optional part of the flight. Open the section below to continue.Continue to the linked placeThis link leads to an optional part of the flight. Open the section below to continue.Continue to the linked placeThis link leads to an optional part of the flight. Open the section below to continue.Continue to the linked placeThis link leads to an optional part of the flight. Open the section below to continue.Continue to the linked placeThis link leads to an optional part of the flight. Open the section below to continue.Continue to the linked place

Signal Shelter

Inside the bay, the Darts are finally somebody else’s problem. CoCoMan has time to look for loose foils and see what the timed dispenser will give a passing courier.

Entry

Center the pilot over the shore inlet and hold Down. Twelve loose foils and a timed dispenser wait inside the bay.

Return or onward flight

Use Down on the outlet collar near the far end. It rises onto the clear shore apron beyond the inlet. Your haul remains banked, and the room remembers it on a return visit.

Read this room’s map

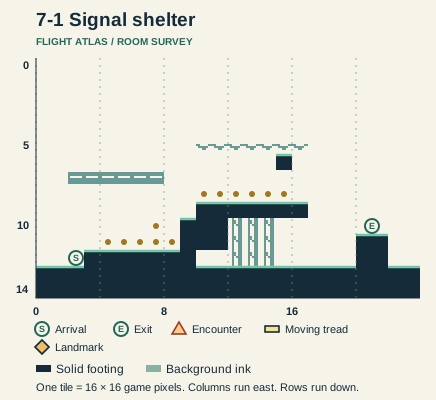
Signal shelter

Open the full-size illustration

  1. Arrival. Column 2, row 12. Enter the sheltered room from the west end. Locate landmark 1
  2. Shore return. Column 20.5, row 10. Hold Down on the outlet to return to shore columns 82–83. Locate landmark 2

    Return to the surface · Shelter return

Shore battery · transfer points

Open the full-size illustration

  1. Shelter inlet. Column 57.5, row 10. Enter by holding Down on the collar. Locate landmark 1

    Enter the side room · Arrival

  2. Shelter return. Column 82.5, row 10. The local outlet rises to this shoreline collar. Locate landmark 2

    Revisit from the surface · Shelter inlet

This link leads to an optional part of the flight. Open the section below to continue.Continue to the linked placeThis link leads to an optional part of the flight. Open the section below to continue.Continue to the linked placeThis link leads to an optional part of the flight. Open the section below to continue.Continue to the linked placeThis link leads to an optional part of the flight. Open the section below to continue.Continue to the linked placeThis link leads to an optional part of the flight. Open the section below to continue.Continue to the linked placeThis link leads to an optional part of the flight. Open the section below to continue.Continue to the linked placeThis link leads to an optional part of the flight. Open the section below to continue.Continue to the linked place

Upper Supply Route

There’s a spring near the shore and a supply deck high overhead. If CoCoMan gets enough height, he can head into Kraken Mare with fresh gear.

Entry

Use a fresh Jump during spring compression to reach the supply deck overhead. A rebound with Jump already held gives the ordinary lift.

Return or onward flight

After taking the supply, descend to the shore route and continue towards the relay and Kraken Mare.

Shore battery · transfer points

Open the full-size illustration

  1. Upper shore shelf. Column 114, row 8. This is the transfer position on this route. Locate landmark 1

    Drop back onto the shore · Ordinary shore floor

  2. Ordinary shore floor. Column 117, row 13. This is the transfer position on this route. Locate landmark 2
This link leads to an optional part of the flight. Open the section below to continue.Continue to the linked placeThis link leads to an optional part of the flight. Open the section below to continue.Continue to the linked placeThis link leads to an optional part of the flight. Open the section below to continue.Continue to the linked placeThis link leads to an optional part of the flight. Open the section below to continue.Continue to the linked placeThis link leads to an optional part of the flight. Open the section below to continue.Continue to the linked placeThis link leads to an optional part of the flight. Open the section below to continue.Continue to the linked placeThis link leads to an optional part of the flight. Open the section below to continue.Continue to the linked placeThis link leads to an optional part of the flight. Open the section below to continue.Continue to the linked placeThis link leads to an optional part of the flight. Open the section below to continue.Continue to the linked placeThis link leads to an optional part of the flight. Open the section below to continue.Continue to the linked placeThis link leads to an optional part of the flight. Open the section below to continue.Continue to the linked placeThis link leads to an optional part of the flight. Open the section below to continue.Continue to the linked placeThis link leads to an optional part of the flight. Open the section below to continue.Continue to the linked placeThis link leads to an optional part of the flight. Open the section below to continue.Continue to the linked placeThis link leads to an optional part of the flight. Open the section below to continue.Continue to the linked placeThis link leads to an optional part of the flight. Open the section below to continue.Continue to the linked placeThis link leads to an optional part of the flight. Open the section below to continue.Continue to the linked placeThis link leads to an optional part of the flight. Open the section below to continue.Continue to the linked placeThis link leads to an optional part of the flight. Open the section below to continue.Continue to the linked placeThis link leads to an optional part of the flight. Open the section below to continue.Continue to the linked placeThis link leads to an optional part of the flight. Open the section below to continue.Continue to the linked placeThis link leads to an optional part of the flight. Open the section below to continue.Continue to the linked placeThis link leads to an optional part of the flight. Open the section below to continue.Continue to the linked placeThis link leads to an optional part of the flight. Open the section below to continue.Continue to the linked placeThis link leads to an optional part of the flight. Open the section below to continue.Continue to the linked placeThis link leads to an optional part of the flight. Open the section below to continue.Continue to the linked placeThis link leads to an optional part of the flight. Open the section below to continue.Continue to the linked placeThis link leads to an optional part of the flight. Open the section below to continue.Continue to the linked placeThis link leads to an optional part of the flight. Open the section below to continue.Continue to the linked placeThis link leads to an optional part of the flight. Open the section below to continue.Continue to the linked placeThis link leads to an optional part of the flight. Open the section below to continue.Continue to the linked placeThis link leads to an optional part of the flight. Open the section below to continue.Continue to the linked placeThis link leads to an optional part of the flight. Open the section below to continue.Continue to the linked placeThis link leads to an optional part of the flight. Open the section below to continue.Continue to the linked placeThis link leads to an optional part of the flight. Open the section below to continue.Continue to the linked placeThis link leads to an optional part of the flight. Open the section below to continue.Continue to the linked placeThis link leads to an optional part of the flight. Open the section below to continue.Continue to the linked place

Shore battery · detour entries and returns

Open the full-size illustration

  1. Arrival. Column 2, row 12. The pilot first takes control in this part of the room. Locate landmark 1
  2. Mass Driver. Column 25, row 11. Encounter reference. A moving threat can leave this position during play. Locate landmark 2
  3. Courier Dart. Column 31, row 11. Encounter reference. A moving threat can leave this position during play. Locate landmark 3
  4. Parcel Roller. Column 36, row 11. Encounter reference. A moving threat can leave this position during play. Locate landmark 4
  5. Rigger. Column 46, row 10. Encounter reference. A moving threat can leave this position during play. Locate landmark 5
  6. Rigger · 2. Column 50, row 8. Encounter reference. A moving threat can leave this position during play. Locate landmark 6
  7. Torque Fork. Column 50, row 8. Encounter reference. A moving threat can leave this position during play. Locate landmark 7
  8. Shelter inlet. Column 57.5, row 10. Enter by holding Down on the collar. Locate landmark 8
  9. Shore restart. Column 76, row 12. The paid halfway restart leaves the next approach clear. Locate landmark 9
  10. Shelter return. Column 82.5, row 10. The local outlet rises to this shoreline collar. Locate landmark 10
  11. Parcel Roller · 2. Column 92, row 12. Encounter reference. A moving threat can leave this position during play. Locate landmark 11
  12. Rigger · 3. Column 98, row 10. Encounter reference. A moving threat can leave this position during play. Locate landmark 12
  13. Torque Fork · 2. Column 104, row 8. Encounter reference. A moving threat can leave this position during play. Locate landmark 13
  14. Spring Deck. Column 112, row 12. Watch the moving tread before boarding. Its position changes during play. Locate landmark 14
  15. Rigger · 4. Column 115, row 7. Encounter reference. A moving threat can leave this position during play. Locate landmark 15
  16. Mass Driver · 2. Column 125, row 11. Encounter reference. A moving threat can leave this position during play. Locate landmark 16
  17. Courier Dart · 2. Column 128, row 11. Encounter reference. A moving threat can leave this position during play. Locate landmark 17
  18. Relay Mast. Column 137, row 12. Approach this relay to finish the room. Locate landmark 18