
Back to VCC Plus Games
CoCoManTo Titan and Back
Course 5-1

Ice on the Conveyors

A flash from the Mass Driver turns an ordinary loading deck into a firing lane. CoCoMan picks his way across broken spans with Courier Darts skimming the lower deck and shooting across it from higher up.

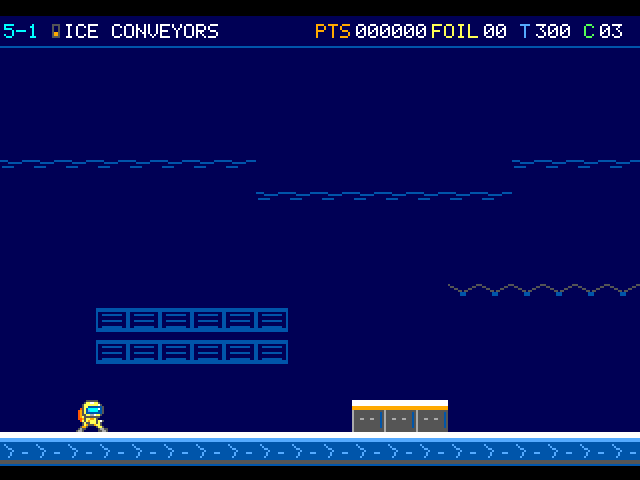
The courier stands on an ice-blue conveyor. Recessed panel lines sit behind the small raised freight platform.

On the flight

The ice looks slick, but your boots brake and jump the same way as on a dry deck. A square Mass Driver flashes before it fires. Once its Courier Dart is in flight, its height and direction are set.

Course map

Ring-ice loading line

Open the full-size illustration

  1. Arrival. Column 2, row 12. The pilot first takes control in this part of the room. Locate landmark 1
  2. Parcel Roller. Column 16, row 12. Encounter reference. A moving threat can leave this position during play. Locate landmark 2
  3. Parcel Roller · 2. Column 20, row 12. Encounter reference. A moving threat can leave this position during play. Locate landmark 3
  4. Freight Drum. Column 24, row 12. Encounter reference. A moving threat can leave this position during play. Locate landmark 4
  5. Mass Driver. Column 56, row 11. Encounter reference. A moving threat can leave this position during play. Locate landmark 5
  6. Courier Dart. Column 59, row 11. Encounter reference. A moving threat can leave this position during play. Locate landmark 6
  7. Parcel Roller · 3. Column 73, row 12. Encounter reference. A moving threat can leave this position during play. Locate landmark 7
  8. Sheltered apron. Column 96, row 12. Cross the apron to arm the checkpoint. Locate landmark 8
  9. Mass Driver · 2. Column 115, row 8. Encounter reference. A moving threat can leave this position during play. Locate landmark 9
  10. Courier Dart · 2. Column 117, row 8. Encounter reference. A moving threat can leave this position during play. Locate landmark 10
  11. Mass Driver · 3. Column 129, row 11. Encounter reference. A moving threat can leave this position during play. Locate landmark 11
  12. Courier Dart · 3. Column 131, row 11. Encounter reference. A moving threat can leave this position during play. Locate landmark 12
  13. Spring Sail. Column 134, row 9. Encounter reference. A moving threat can leave this position during play. Locate landmark 13
  14. Relay Mast. Column 139, row 12. Approach this relay to finish the room. Locate landmark 14

    Continue to 5-2 · Arrival

Landmarks to recognize

Flashing muzzle
Read the warning before crossing the shot lane. If you move behind the warning in time, the Driver cancels its shot.
Sheltered apron
The raised collar and broad footing give you room to settle beyond the inspection bay.
Give me a hint

The high Driver and the low Driver cover different lines. Watch the square housing for the warning and use the broad takeoff before the broken span.

Routes and discoveries

This link leads to an optional part of the flight. Open the section below to continue.Continue to the linked place

Ring-ice loading line

Entry

Cross the broken spans and look at the Driver's firing height before jumping. You can land on a Dart from above. A side hit hurts, and an Arc spark passes through it.

Return or onward flight

The sheltered apron earns the checkpoint. Continue past the final Driver and Spring Sail to the mast for The Diver and the Rigger. The Foundry's full foil sweep qualifies a spare in this inspection bay.

This link leads to an optional part of the flight. Open the section below to continue.Continue to the linked placeThis link leads to an optional part of the flight. Open the section below to continue.Continue to the linked placeThis link leads to an optional part of the flight. Open the section below to continue.Continue to the linked placeThis link leads to an optional part of the flight. Open the section below to continue.Continue to the linked placeThis link leads to an optional part of the flight. Open the section below to continue.Continue to the linked placeThis link leads to an optional part of the flight. Open the section below to continue.Continue to the linked placeThis link leads to an optional part of the flight. Open the section below to continue.Continue to the linked placeThis link leads to an optional part of the flight. Open the section below to continue.Continue to the linked placeThis link leads to an optional part of the flight. Open the section below to continue.Continue to the linked placeThis link leads to an optional part of the flight. Open the section below to continue.Continue to the linked placeThis link leads to an optional part of the flight. Open the section below to continue.Continue to the linked placeThis link leads to an optional part of the flight. Open the section below to continue.Continue to the linked place

Pan 5A Foil Vault

The racket of the loading line fades inside Pan 5A. There are rows of foils within jumping reach, and there’s a timed dispenser if CoCoMan wants to see how many he can pocket before he heads back.

Entry

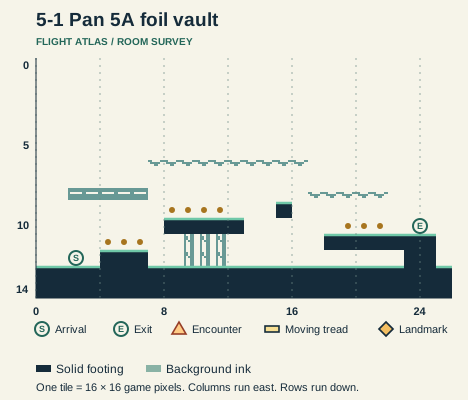
Stand on the elevated inlet and hold Down to enter. Ten foils are loose in the vault. Hit the timed dispenser from below for its extra payout.

Return or onward flight

Hold Down on the marked outlet collar to rise onto the sheltered apron and earn the checkpoint. Spent foils and the dispenser keep their state on a same-life return.

Read this room’s map

Pan 5A foil vault

Open the full-size illustration

  1. Arrival. Column 2, row 12. Begin on the west floor. Locate landmark 1
  2. Surface return. Column 23.5, row 10. Hold Down over the collar seam to emerge on the sheltered apron. Locate landmark 2

    Return to the surface · Pan 5A return

Ring-ice loading line · transfer points

Open the full-size illustration

  1. Pan 5A inlet. Column 85.5, row 8. Down on the elevated collar enters the vault. Locate landmark 1

    Enter the side room · Arrival

  2. Pan 5A return. Column 104.5, row 10. The vault outlet brings you back onto the sheltered apron. Locate landmark 2

    Revisit from the surface · Pan 5A inlet

This link leads to an optional part of the flight. Open the section below to continue.Continue to the linked placeThis link leads to an optional part of the flight. Open the section below to continue.Continue to the linked placeThis link leads to an optional part of the flight. Open the section below to continue.Continue to the linked placeThis link leads to an optional part of the flight. Open the section below to continue.Continue to the linked placeThis link leads to an optional part of the flight. Open the section below to continue.Continue to the linked placeThis link leads to an optional part of the flight. Open the section below to continue.Continue to the linked placeThis link leads to an optional part of the flight. Open the section below to continue.Continue to the linked placeThis link leads to an optional part of the flight. Open the section below to continue.Continue to the linked placeThis link leads to an optional part of the flight. Open the section below to continue.Continue to the linked placeThis link leads to an optional part of the flight. Open the section below to continue.Continue to the linked placeThis link leads to an optional part of the flight. Open the section below to continue.Continue to the linked placeThis link leads to an optional part of the flight. Open the section below to continue.Continue to the linked placeThis link leads to an optional part of the flight. Open the section below to continue.Continue to the linked placeThis link leads to an optional part of the flight. Open the section below to continue.Continue to the linked placeThis link leads to an optional part of the flight. Open the section below to continue.Continue to the linked placeThis link leads to an optional part of the flight. Open the section below to continue.Continue to the linked placeThis link leads to an optional part of the flight. Open the section below to continue.Continue to the linked placeThis link leads to an optional part of the flight. Open the section below to continue.Continue to the linked placeThis link leads to an optional part of the flight. Open the section below to continue.Continue to the linked placeThis link leads to an optional part of the flight. Open the section below to continue.Continue to the linked placeThis link leads to an optional part of the flight. Open the section below to continue.Continue to the linked placeThis link leads to an optional part of the flight. Open the section below to continue.Continue to the linked placeThis link leads to an optional part of the flight. Open the section below to continue.Continue to the linked placeThis link leads to an optional part of the flight. Open the section below to continue.Continue to the linked placeThis link leads to an optional part of the flight. Open the section below to continue.Continue to the linked placeThis link leads to an optional part of the flight. Open the section below to continue.Continue to the linked placeThis link leads to an optional part of the flight. Open the section below to continue.Continue to the linked placeThis link leads to an optional part of the flight. Open the section below to continue.Continue to the linked placeThis link leads to an optional part of the flight. Open the section below to continue.Continue to the linked placeThis link leads to an optional part of the flight. Open the section below to continue.Continue to the linked placeThis link leads to an optional part of the flight. Open the section below to continue.Continue to the linked placeThis link leads to an optional part of the flight. Open the section below to continue.Continue to the linked placeThis link leads to an optional part of the flight. Open the section below to continue.Continue to the linked place

Ring-ice loading line · detour entries and returns

Open the full-size illustration

  1. Arrival. Column 2, row 12. The pilot first takes control in this part of the room. Locate landmark 1
  2. Parcel Roller. Column 16, row 12. Encounter reference. A moving threat can leave this position during play. Locate landmark 2
  3. Parcel Roller · 2. Column 20, row 12. Encounter reference. A moving threat can leave this position during play. Locate landmark 3
  4. Freight Drum. Column 24, row 12. Encounter reference. A moving threat can leave this position during play. Locate landmark 4
  5. Mass Driver. Column 56, row 11. Encounter reference. A moving threat can leave this position during play. Locate landmark 5
  6. Courier Dart. Column 59, row 11. Encounter reference. A moving threat can leave this position during play. Locate landmark 6
  7. Parcel Roller · 3. Column 73, row 12. Encounter reference. A moving threat can leave this position during play. Locate landmark 7
  8. Pan 5A inlet. Column 85.5, row 8. Down on the elevated collar enters the vault. Locate landmark 8
  9. Sheltered apron. Column 96, row 12. Cross the apron to arm the checkpoint. Locate landmark 9
  10. Pan 5A return. Column 104.5, row 10. The vault outlet brings you back onto the sheltered apron. Locate landmark 10
  11. Mass Driver · 2. Column 115, row 8. Encounter reference. A moving threat can leave this position during play. Locate landmark 11
  12. Courier Dart · 2. Column 117, row 8. Encounter reference. A moving threat can leave this position during play. Locate landmark 12
  13. Mass Driver · 3. Column 129, row 11. Encounter reference. A moving threat can leave this position during play. Locate landmark 13
  14. Courier Dart · 3. Column 131, row 11. Encounter reference. A moving threat can leave this position during play. Locate landmark 14
  15. Spring Sail. Column 134, row 9. Encounter reference. A moving threat can leave this position during play. Locate landmark 15
  16. Relay Mast. Column 139, row 12. Approach this relay to finish the room. Locate landmark 16