


Back to VCC Plus Games
CoCoManTo Titan and Back
Course 4-4

Two-Key Refinery

CoCoMan is quite sure he's passed that piece of machinery before. The refinery sorts freight by the path it takes, and it keeps sending this particular courier back for another try. Tess is counting on him to read the gates, get past the Rivet Count Warden and break out of the loop.

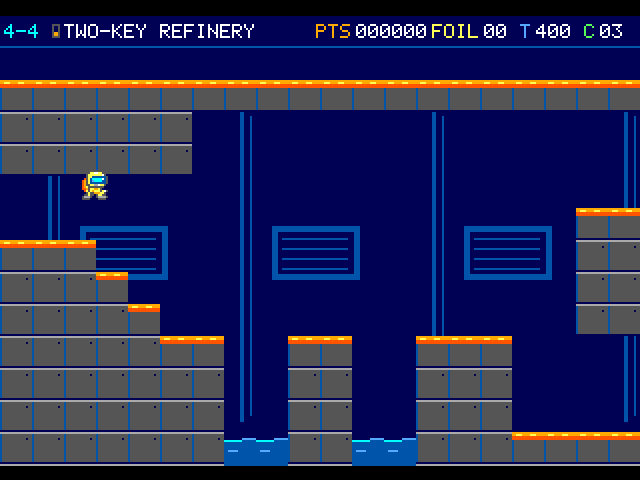
The courier is above the first gray steps inside the refinery. Large blue wall vents sit behind the orange-edged working surfaces.

On the flight

The Refinery keeps sending freight around the same circuit. At each junction, pay attention to which floor your boots touch. At the bridge, leave room for the rotor and the Vent Pulse before crossing.

Course map

Two-Key Refinery

This station reads the surface under your boots. If the same machinery comes around again, your equipment and bank carry over while the clock keeps running.

Open the scenery view

Open the full-size illustration

  1. Refinery intake. Column 2.5, row 6. A lost life returns you here with a 400 clock. Watch the floor you land on at each junction. Locate landmark 1
  2. Bridge Vent Pulse. Column 165.5, row 12. Watch the pulse rise out of the vent, then check the separate plasma lane before moving into the opening. Locate landmark 2
  3. Rivet Count. Column 167, row 8. Four shoes and the open tally rack identify the Warden over the bridge. Locate landmark 3
  4. Thermal rotor pivot. Column 53, row 6. This marks an encounter position. Moving hazards can leave this point during play. Locate landmark 4
  5. Thermal rotor pivot. Column 60, row 9. This marks an encounter position. Moving hazards can leave this point during play. Locate landmark 5
  6. Thermal rotor pivot. Column 115, row 6. This marks an encounter position. Moving hazards can leave this point during play. Locate landmark 6
  7. Thermal rotor pivot. Column 122, row 10. This marks an encounter position. Moving hazards can leave this point during play. Locate landmark 7
  8. Thermal rotor pivot. Column 162, row 10. This marks an encounter position. Moving hazards can leave this point during play. Locate landmark 8
Open the scenery view

Two-Key Refinery · scenery

Wall panels and instrument lights extend behind the Refinery’s route. The native picture bank holds scenery separately from the foreground.

Open the terrain view

Open the full-size illustration

  1. Refinery intake. Column 2.5, row 6. A lost life returns you here with a 400 clock. Watch the floor you land on at each junction. Locate landmark 1

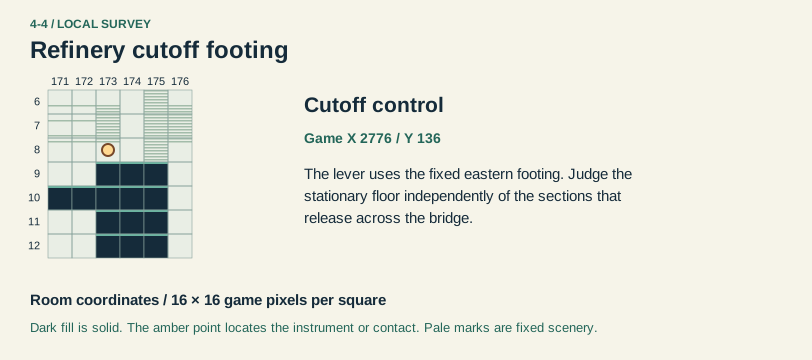
Refinery cutoff footing · local section

Local map · columns 171–176, rows 6–12.

Open the full-size illustration

  1. Cutoff control. The lever uses the fixed eastern footing. Judge the stationary floor independently of the sections that release across the bridge. Locate landmark 1

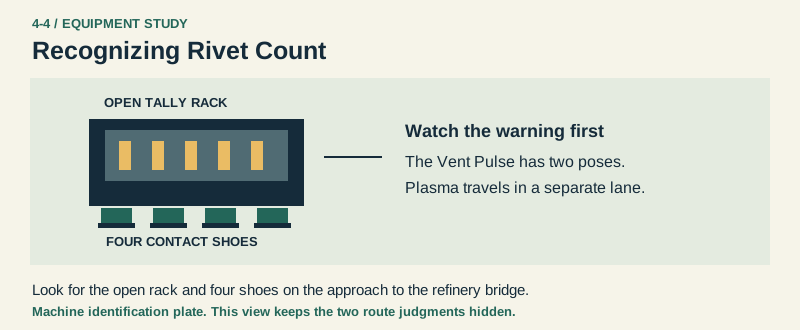
Recognizing Rivet Count

Open rack, Four shoes, Separate hazards.
Schematic identification plate of the refinery Warden showing an open tally rack and four contact shoes.

Open the original-size illustration

  • Open rack. The open tally rack distinguishes the refinery Warden.
  • Four shoes. Count the shoes below the chassis to recognize Rivet Count.
  • Separate hazards. Track the Vent Pulse and plasma lane independently of the chassis.

Landmarks to recognize

Junction floors
A corridor you can walk through offers a different kind of choice from an opening you can jump through.
Tally rack
Look for the open rack and four shoes above the bridge. They belong to Rivet Count.

See which beam supports the courier

Give me a hint

If the same machinery comes around again, try crossing the next junction with both feet planted. The clock keeps running through a repeat.

See the marked fork screenshot

Routes and discoveries

This link leads to an optional part of the flight. Open the section below to continue.Continue to the linked placeThis link leads to an optional part of the flight. Open the section below to continue.Continue to the linked placeThis link leads to an optional part of the flight. Open the section below to continue.Continue to the linked placeThis link leads to an optional part of the flight. Open the section below to continue.Continue to the linked placeThis link leads to an optional part of the flight. Open the section below to continue.Continue to the linked placeThis link leads to an optional part of the flight. Open the section below to continue.Continue to the linked placeThis link leads to an optional part of the flight. Open the section below to continue.Continue to the linked placeThis link leads to an optional part of the flight. Open the section below to continue.Continue to the linked placeThis link leads to an optional part of the flight. Open the section below to continue.Continue to the linked placeThis link leads to an optional part of the flight. Open the section below to continue.Continue to the linked placeThis link leads to an optional part of the flight. Open the section below to continue.Continue to the linked placeThis link leads to an optional part of the flight. Open the section below to continue.Continue to the linked placeThis link leads to an optional part of the flight. Open the section below to continue.Continue to the linked placeThis link leads to an optional part of the flight. Open the section below to continue.Continue to the linked place

Two-Key Refinery

Entry

Walk across the high floor at the first judgment, then across the lowest floor at the second. Stay grounded as you cross each one. An airborne pass sends you back around, even at the right height.

Return or onward flight

A repeat keeps your suit, lives, score and foil. At the bridge you can reach the cutoff past the live Warden, or land five Arc sparks to reveal a Burr Jack and earn 5,000. Follow the bridge through to Tess for the Saturn dispatch.

Watch the optional route demonstration

Two-Key Refinery · transfer points

Open the full-size illustration

  1. First judgment · airborne example. Column 64.1875, row 4.875. This is the transfer position on this route. Locate landmark 1

    An airborne crossing at the first judgment repeats the passage. Follow this flight 64 columns back. · First judgment · repeat position

  2. First judgment · repeat position. Column 0.1875, row 4.875. This is the transfer position on this route. Locate landmark 2
  3. Second judgment · airborne example. Column 128.312, row 11.25. This is the transfer position on this route. Locate landmark 3

    An airborne crossing at the second judgment repeats its passage. Follow this flight 64 columns back. · Second judgment · repeat position

  4. Second judgment · repeat position. Column 64.3125, row 11.25. This is the transfer position on this route. Locate landmark 4
  5. Refinery cutoff. Column 173.5, row 8.5. Land on the cutoff to release the working bridge. Tess waits at the crew lock with the dispatch for Ice on the Conveyors. Locate landmark 5

    Reach the cutoff and follow the cleared crossing to Tess. · Tess’s station

  6. Tess’s station. Column 185, row 11.5. This is the transfer position on this route. Locate landmark 6

    Take Tess’s dispatch to Ice on the Conveyors. · Arrival

This link leads to an optional part of the flight. Open the section below to continue.Continue to the linked placeThis link leads to an optional part of the flight. Open the section below to continue.Continue to the linked placeThis link leads to an optional part of the flight. Open the section below to continue.Continue to the linked placeThis link leads to an optional part of the flight. Open the section below to continue.Continue to the linked placeThis link leads to an optional part of the flight. Open the section below to continue.Continue to the linked placeThis link leads to an optional part of the flight. Open the section below to continue.Continue to the linked placeThis link leads to an optional part of the flight. Open the section below to continue.Continue to the linked placeThis link leads to an optional part of the flight. Open the section below to continue.Continue to the linked placeThis link leads to an optional part of the flight. Open the section below to continue.Continue to the linked placeThis link leads to an optional part of the flight. Open the section below to continue.Continue to the linked placeThis link leads to an optional part of the flight. Open the section below to continue.Continue to the linked placeThis link leads to an optional part of the flight. Open the section below to continue.Continue to the linked placeThis link leads to an optional part of the flight. Open the section below to continue.Continue to the linked placeThis link leads to an optional part of the flight. Open the section below to continue.Continue to the linked placeThis link leads to an optional part of the flight. Open the section below to continue.Continue to the linked placeThis link leads to an optional part of the flight. Open the section below to continue.Continue to the linked placeThis link leads to an optional part of the flight. Open the section below to continue.Continue to the linked placeThis link leads to an optional part of the flight. Open the section below to continue.Continue to the linked placeThis link leads to an optional part of the flight. Open the section below to continue.Continue to the linked place

Two-Key Refinery · discoveries

This station reads the surface under your boots. If the same machinery comes around again, your equipment and bank carry over while the clock keeps running.

Open the full-size illustration

  1. Refinery intake. Column 2.5, row 6. A lost life returns you here with a 400 clock. Watch the floor you land on at each junction. Locate landmark 1
  2. Bridge Vent Pulse. Column 165.5, row 12. Watch the pulse rise out of the vent, then check the separate plasma lane before moving into the opening. Locate landmark 2
  3. Rivet Count. Column 167, row 8. Four shoes and the open tally rack identify the Warden over the bridge. Locate landmark 3
  4. Refinery cutoff. Column 173.5, row 8.5. Land on the cutoff to release the working bridge. Tess waits at the crew lock with the dispatch for Ice on the Conveyors. Locate landmark 4
  5. Thermal rotor pivot. Column 53, row 6. This marks an encounter position. Moving hazards can leave this point during play. Locate landmark 5
  6. Thermal rotor pivot. Column 60, row 9. This marks an encounter position. Moving hazards can leave this point during play. Locate landmark 6
  7. Thermal rotor pivot. Column 115, row 6. This marks an encounter position. Moving hazards can leave this point during play. Locate landmark 7
  8. Thermal rotor pivot. Column 122, row 10. This marks an encounter position. Moving hazards can leave this point during play. Locate landmark 8
  9. Thermal rotor pivot. Column 162, row 10. This marks an encounter position. Moving hazards can leave this point during play. Locate landmark 9
