


Back to VCC Plus Games
CoCoManTo Titan and Back
Course 4-3

Counterweight Foundry

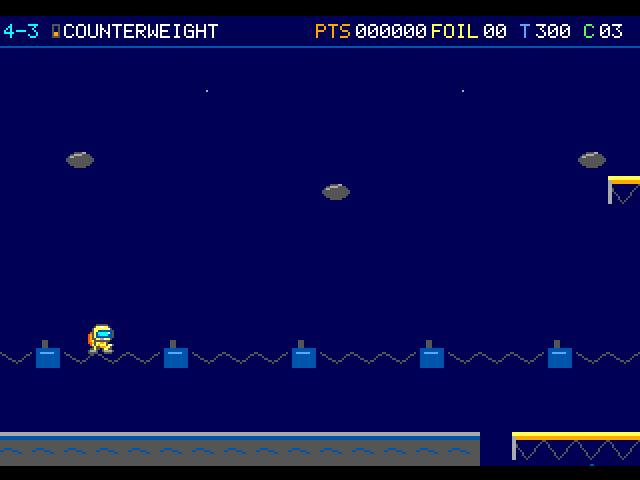
The tops of the survey platforms stick up out of the asteroid cut like little islands. The first high ledge is just the sort of place that makes CoCoMan wish his boots could fly. Ahead, two cargo pans hang from one cable. Which one will be high enough when he needs it?

A line of cable supports runs behind the airborne courier. Bright yellow edges pick out the first foundry treads.

On the flight

Watch what moves under your boots. Some freight caps rise and fall on their own. Others have a partner across the gap. Stand on a cap long enough to see which one you have before you jump.

Course map

Counterweight Foundry

Four counterweight pairs and three independently moving decks can look alike. Pause on a tread and watch what answers your weight.

Open the scenery view

Open the full-size illustration

  1. Foundry intake. Column 2.5, row 12. The ordinary crossing works in the Small suit. If you bring Arc gear, an optional high landing gives you a place to practise the assist. Locate landmark 1
  2. Small-suit takeoff. Column 28.875, row 8.5. Run right along the broad middle cap. Near its right lip, tap Jump once and release it as your boots lift. Keep holding right and Run. Locate landmark 2
  3. Small-suit landing. Column 35.875, row 11.5. Pass below the little high cap. Meet the near end of the broad tread farther right, three tile rows lower than your takeoff. Locate landmark 3
  4. Arc high cap. Column 33.5, row 4. Enable the Arc assist with J. Jump, release and press jump again in the air while steering. Set both boots on the cap for half a second to recharge. Locate landmark 4
  5. Counterweight pan. Column 48, row 4.875. Your weight lowers one pan and raises its partner. If a pair breaks, its 1,000-point award arrives after a short delay and pays once. Locate landmark 5
  6. Independent vertical deck. Column 58, row 6. This deck rises and falls on its own. Follow its top edge to judge your landing. Locate landmark 6
  7. Refinery relay. Column 147, row 10. The relay sends your surviving suit and bank into Two-Key Refinery. Locate landmark 7

    Catch the relay to reach Two-Key Refinery. · Refinery intake

  8. Rim Surveyor. Column 29, row 8. This marks an encounter position. Moving hazards can leave this point during play. Locate landmark 8
  9. Lift Sail. Column 36, row 3. Watch the surface move before boarding. Locate landmark 9
  10. Rim Surveyor. Column 39, row 11. This marks an encounter position. Moving hazards can leave this point during play. Locate landmark 10
  11. Counterweight pan. Column 55, row 7. Watch the surface move before boarding. Locate landmark 11
  12. Vertical lift. Column 62, row 4. Watch the surface move before boarding. Locate landmark 12
  13. Rim Surveyor. Column 68, row 12. This marks an encounter position. Moving hazards can leave this point during play. Locate landmark 13
  14. Rim Surveyor. Column 78, row 4. This marks an encounter position. Moving hazards can leave this point during play. Locate landmark 14
  15. Counterweight pan. Column 80, row 4. Watch the surface move before boarding. Locate landmark 15
  16. Counterweight pan. Column 88, row 8. Watch the surface move before boarding. Locate landmark 16
  17. Counterweight pan. Column 91, row 4. Watch the surface move before boarding. Locate landmark 17
  18. Counterweight pan. Column 96, row 8. Watch the surface move before boarding. Locate landmark 18
  19. Counterweight pan. Column 102, row 4. Watch the surface move before boarding. Locate landmark 19
  20. Counterweight pan. Column 108, row 8. Watch the surface move before boarding. Locate landmark 20
  21. Vertical lift. Column 136, row 5. Watch the surface move before boarding. Locate landmark 21
Open the scenery view

Counterweight Foundry · scenery

This is the native foundry background. The counterweights and moving treads are drawn separately during play.

Open the terrain view

Open the full-size illustration

  1. Foundry intake. Column 2.5, row 12. The ordinary crossing works in the Small suit. If you bring Arc gear, an optional high landing gives you a place to practise the assist. Locate landmark 1
  2. Small-suit takeoff. Column 28.875, row 8.5. Run right along the broad middle cap. Near its right lip, tap Jump once and release it as your boots lift. Keep holding right and Run. Locate landmark 2
  3. Small-suit landing. Column 35.875, row 11.5. Pass below the little high cap. Meet the near end of the broad tread farther right, three tile rows lower than your takeoff. Locate landmark 3
  4. Arc high cap. Column 33.5, row 4. Enable the Arc assist with J. Jump, release and press jump again in the air while steering. Set both boots on the cap for half a second to recharge. Locate landmark 4
  5. Refinery relay. Column 147, row 10. The relay sends your surviving suit and bank into Two-Key Refinery. Locate landmark 5

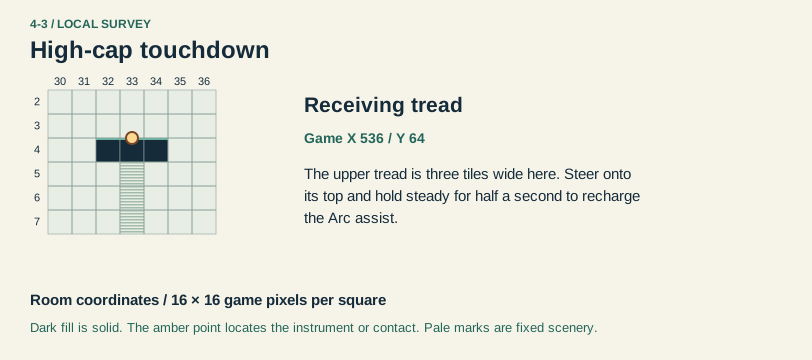
High-cap touchdown · local section

Local map · columns 30–36, rows 2–7.

Open the full-size illustration

  1. Receiving tread. The upper tread is three tiles wide here. Steer onto its top and hold steady for half a second to recharge the Arc assist. Locate landmark 1

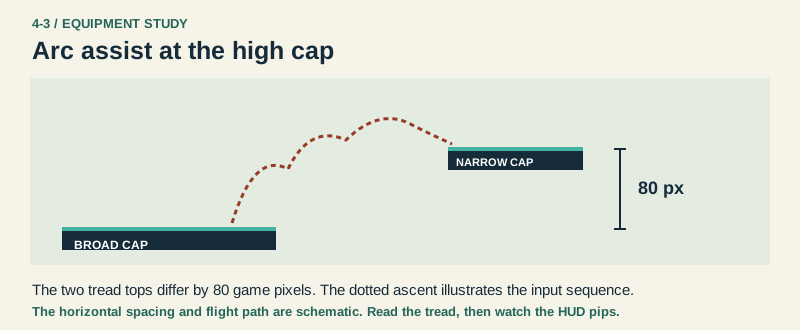
Arc assist at the high cap

Takeoff, Fresh taps, Touchdown.
Two tread sections differ in elevation by 80 game pixels. The rising dashed line illustrates repeated airborne taps.

Open the original-size illustration

  • Takeoff. Equip Arc, press J and jump normally from the broad tread.
  • Fresh taps. Release Jump and tap again about two or three times per second while steering.
  • Touchdown. Stay supported for half a second to refill the three HUD pips.

Landmarks to recognize

Bright treads
Aim both boots at the bright top of a pan. The sheaves and hanging rope show how the pans work.
Broad middle cap
This gives you room to stop, look up and let the jetpack recharge if you have the Arc suit.

Try the ordinary Small-suit jump

Try the Arc-assisted jump · Watch the high-ledge lesson

Give me a hint

On a linked pair, your weight does half the work. Look across the gap while the pan beneath you sinks.

Routes and discoveries

This link leads to an optional part of the flight. Open the section below to continue.Continue to the linked place

Counterweight Foundry

Entry

Lower one pan to bring its partner up to jumping height. The main crossing is possible in any suit. For the high ledge in Arc, switch on J, jump from the broad middle cap, release Jump and tap it again in the air. Steer toward the tread as you gain height.

Return or onward flight

Stay on the high cap until the fuel pips refill. Rejoin the moving treads and take them toward the relay. A broken pair stays broken for this life, even if you turn back. Collect all 27 loose foils in one life to arm a reserve for World 5.

This link leads to an optional part of the flight. Open the section below to continue.Continue to the linked placeThis link leads to an optional part of the flight. Open the section below to continue.Continue to the linked placeThis link leads to an optional part of the flight. Open the section below to continue.Continue to the linked placeThis link leads to an optional part of the flight. Open the section below to continue.Continue to the linked placeThis link leads to an optional part of the flight. Open the section below to continue.Continue to the linked placeThis link leads to an optional part of the flight. Open the section below to continue.Continue to the linked placeThis link leads to an optional part of the flight. Open the section below to continue.Continue to the linked placeThis link leads to an optional part of the flight. Open the section below to continue.Continue to the linked placeThis link leads to an optional part of the flight. Open the section below to continue.Continue to the linked placeThis link leads to an optional part of the flight. Open the section below to continue.Continue to the linked placeThis link leads to an optional part of the flight. Open the section below to continue.Continue to the linked placeThis link leads to an optional part of the flight. Open the section below to continue.Continue to the linked placeThis link leads to an optional part of the flight. Open the section below to continue.Continue to the linked placeThis link leads to an optional part of the flight. Open the section below to continue.Continue to the linked placeThis link leads to an optional part of the flight. Open the section below to continue.Continue to the linked placeThis link leads to an optional part of the flight. Open the section below to continue.Continue to the linked placeThis link leads to an optional part of the flight. Open the section below to continue.Continue to the linked placeThis link leads to an optional part of the flight. Open the section below to continue.Continue to the linked placeThis link leads to an optional part of the flight. Open the section below to continue.Continue to the linked placeThis link leads to an optional part of the flight. Open the section below to continue.Continue to the linked placeThis link leads to an optional part of the flight. Open the section below to continue.Continue to the linked placeThis link leads to an optional part of the flight. Open the section below to continue.Continue to the linked placeThis link leads to an optional part of the flight. Open the section below to continue.Continue to the linked placeThis link leads to an optional part of the flight. Open the section below to continue.Continue to the linked placeThis link leads to an optional part of the flight. Open the section below to continue.Continue to the linked placeThis link leads to an optional part of the flight. Open the section below to continue.Continue to the linked placeThis link leads to an optional part of the flight. Open the section below to continue.Continue to the linked placeThis link leads to an optional part of the flight. Open the section below to continue.Continue to the linked placeThis link leads to an optional part of the flight. Open the section below to continue.Continue to the linked placeThis link leads to an optional part of the flight. Open the section below to continue.Continue to the linked placeThis link leads to an optional part of the flight. Open the section below to continue.Continue to the linked placeThis link leads to an optional part of the flight. Open the section below to continue.Continue to the linked placeThis link leads to an optional part of the flight. Open the section below to continue.Continue to the linked placeThis link leads to an optional part of the flight. Open the section below to continue.Continue to the linked placeThis link leads to an optional part of the flight. Open the section below to continue.Continue to the linked placeThis link leads to an optional part of the flight. Open the section below to continue.Continue to the linked placeThis link leads to an optional part of the flight. Open the section below to continue.Continue to the linked placeThis link leads to an optional part of the flight. Open the section below to continue.Continue to the linked placeThis link leads to an optional part of the flight. Open the section below to continue.Continue to the linked placeThis link leads to an optional part of the flight. Open the section below to continue.Continue to the linked placeThis link leads to an optional part of the flight. Open the section below to continue.Continue to the linked placeThis link leads to an optional part of the flight. Open the section below to continue.Continue to the linked placeThis link leads to an optional part of the flight. Open the section below to continue.Continue to the linked place

Counterweight Foundry · discoveries

Four counterweight pairs and three independently moving decks can look alike. Pause on a tread and watch what answers your weight.

Open the full-size illustration

  1. Foundry intake. Column 2.5, row 12. The ordinary crossing works in the Small suit. If you bring Arc gear, an optional high landing gives you a place to practise the assist. Locate landmark 1
  2. Small-suit takeoff. Column 28.875, row 8.5. Run right along the broad middle cap. Near its right lip, tap Jump once and release it as your boots lift. Keep holding right and Run. Locate landmark 2
  3. Small-suit landing. Column 35.875, row 11.5. Pass below the little high cap. Meet the near end of the broad tread farther right, three tile rows lower than your takeoff. Locate landmark 3
  4. Arc high cap. Column 33.5, row 4. Enable the Arc assist with J. Jump, release and press jump again in the air while steering. Set both boots on the cap for half a second to recharge. Locate landmark 4
  5. Counterweight pan. Column 48, row 4.875. Your weight lowers one pan and raises its partner. If a pair breaks, its 1,000-point award arrives after a short delay and pays once. Locate landmark 5
  6. Independent vertical deck. Column 58, row 6. This deck rises and falls on its own. Follow its top edge to judge your landing. Locate landmark 6
  7. Refinery relay. Column 147, row 10. The relay sends your surviving suit and bank into Two-Key Refinery. Locate landmark 7
  8. Rim Surveyor. Column 29, row 8. This marks an encounter position. Moving hazards can leave this point during play. Locate landmark 8
  9. Lift Sail. Column 36, row 3. Watch the surface move before boarding. Locate landmark 9
  10. Rim Surveyor. Column 39, row 11. This marks an encounter position. Moving hazards can leave this point during play. Locate landmark 10
  11. Counterweight pan. Column 55, row 7. Watch the surface move before boarding. Locate landmark 11
  12. Vertical lift. Column 62, row 4. Watch the surface move before boarding. Locate landmark 12
  13. Rim Surveyor. Column 68, row 12. This marks an encounter position. Moving hazards can leave this point during play. Locate landmark 13
  14. Rim Surveyor. Column 78, row 4. This marks an encounter position. Moving hazards can leave this point during play. Locate landmark 14
  15. Counterweight pan. Column 80, row 4. Watch the surface move before boarding. Locate landmark 15
  16. Counterweight pan. Column 88, row 8. Watch the surface move before boarding. Locate landmark 16
  17. Counterweight pan. Column 91, row 4. Watch the surface move before boarding. Locate landmark 17
  18. Counterweight pan. Column 96, row 8. Watch the surface move before boarding. Locate landmark 18
  19. Counterweight pan. Column 102, row 4. Watch the surface move before boarding. Locate landmark 19
  20. Counterweight pan. Column 108, row 8. Watch the surface move before boarding. Locate landmark 20
  21. Vertical lift. Column 136, row 5. Watch the surface move before boarding. Locate landmark 21