
Back to VCC Plus Games
CoCoManTo Titan and Back
Course 5-2

The Diver and the Rigger

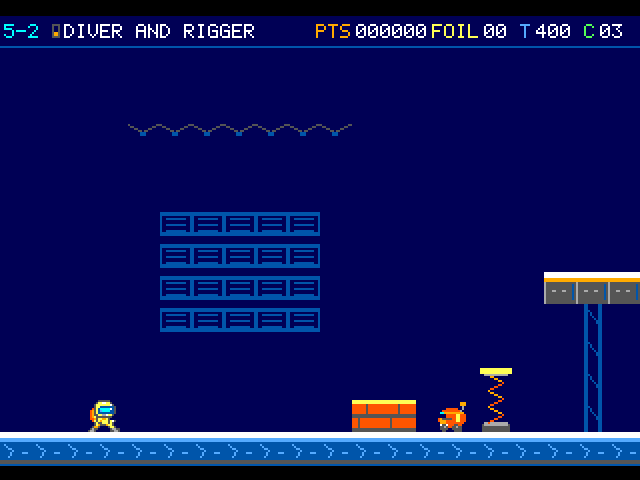
A Spanner Rigger lifts a fork on one deck. Another waits on the deck above, and the gantry gives both of them a good angle. CoCoMan would like to get through the ballast plant without finding out how hard a fork hits.

An orange cargo block and a compressed spring stand ahead of the courier. A small moving machine is on the deck beside them.

On the flight

The ballast plant has a dry route past the spring and the paired Rigger gantry. Keep an eye on the floor jack as the fork rises. Once released, a fork keeps flying even if you knock out its Rigger.

Course map

Ballast plant

Open the full-size illustration

  1. Arrival. Column 2, row 12. The pilot first takes control in this part of the room. Locate landmark 1
  2. Parcel Roller. Column 14, row 12. Encounter reference. A moving threat can leave this position during play. Locate landmark 2
  3. Sprung Buffer. Column 15, row 11. Hold Jump for the regular rebound or press again partway through compression. Locate landmark 3
  4. Spring Sail. Column 30, row 12. Encounter reference. A moving threat can leave this position during play. Locate landmark 4
  5. Spanner Rigger. Column 39, row 8. Encounter reference. A moving threat can leave this position during play. Locate landmark 5
  6. Duct Tap. Column 48, row 11. Wait clear of the rim until the bellows retract. Locate landmark 6
  7. Checkpoint. Column 78, row 12. Cross at ground level. A retry starts slightly west of this crossing. Locate landmark 7
  8. Spanner Rigger · 2. Column 93, row 9. Encounter reference. A moving threat can leave this position during play. Locate landmark 8
  9. Spanner Rigger · 3. Column 102, row 6. Encounter reference. A moving threat can leave this position during play. Locate landmark 9
  10. Hull Louse. Column 136, row 12. Encounter reference. A moving threat can leave this position during play. Locate landmark 10
  11. Relay Mast. Column 151, row 12. Approach this relay to finish the room. Locate landmark 11

    Continue to 5-3 · Arrival

Landmarks to recognize

Paired gantry
Crossing the middle changes which jack can start a throw. Check the second deck before you jump.
Low passage
A tall pilot can crouch through the lower passage. The helmet is a good guide to the clearance.

Watch the right-joystick encounter

Give me a hint

One detour goes below the plant and one goes over it. Both bring you back to the dry route, on different sides of the gantry.

Routes and discoveries

This link leads to an optional part of the flight. Open the section below to continue.Continue to the linked place

Ballast plant

Entry

Follow the spring and dry footing towards the paired gantry. Clear any flying fork before approaching the next jack. On the right joystick, steer with the stick and press the primary button for Jump.

Return or onward flight

A grounded crossing of the checkpoint terrace earns a quiet retry before the gantry. Pass the machines and take the relay to Shepherd Moons.

This link leads to an optional part of the flight. Open the section below to continue.Continue to the linked placeThis link leads to an optional part of the flight. Open the section below to continue.Continue to the linked placeThis link leads to an optional part of the flight. Open the section below to continue.Continue to the linked placeThis link leads to an optional part of the flight. Open the section below to continue.Continue to the linked placeThis link leads to an optional part of the flight. Open the section below to continue.Continue to the linked placeThis link leads to an optional part of the flight. Open the section below to continue.Continue to the linked placeThis link leads to an optional part of the flight. Open the section below to continue.Continue to the linked placeThis link leads to an optional part of the flight. Open the section below to continue.Continue to the linked placeThis link leads to an optional part of the flight. Open the section below to continue.Continue to the linked placeThis link leads to an optional part of the flight. Open the section below to continue.Continue to the linked placeThis link leads to an optional part of the flight. Open the section below to continue.Continue to the linked placeThis link leads to an optional part of the flight. Open the section below to continue.Continue to the linked placeThis link leads to an optional part of the flight. Open the section below to continue.Continue to the linked placeThis link leads to an optional part of the flight. Open the section below to continue.Continue to the linked placeThis link leads to an optional part of the flight. Open the section below to continue.Continue to the linked placeThis link leads to an optional part of the flight. Open the section below to continue.Continue to the linked placeThis link leads to an optional part of the flight. Open the section below to continue.Continue to the linked placeThis link leads to an optional part of the flight. Open the section below to continue.Continue to the linked place

Training Tank

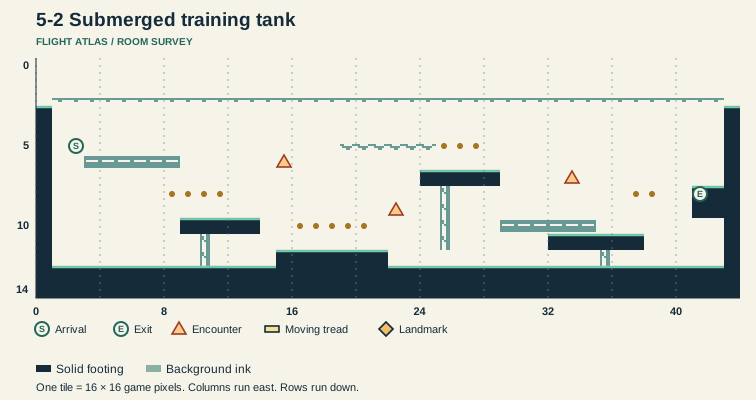
A Gauge Minnow cruises high, another slips below it, and a Veil Probe moves between the shelves. The foils are scattered through the depths, so CoCoMan will be sharing the tank with all three if he wants the lot.

Entry

Wait for the inlet guard to retract, stand on its seam and hold Down. Stroke through the tank at different depths for fourteen foils. A high Minnow, low Minnow and Veil Probe share the water.

Return or onward flight

Swim Right into the open side tube. You emerge dry on the lip before the gantry.

Read this room’s map

Submerged training tank

Open the full-size illustration

  1. Dive arrival. Column 2, row 5. The west pocket gives you space for a first stroke. Locate landmark 1
  2. Veil Probe. Column 15, row 6. Encounter reference. A moving threat can leave this position during play. Locate landmark 2
  3. Gauge Minnow. Column 22, row 9. Its horizontal swim can cross your stroke. Change height to pass. Locate landmark 3
  4. Gauge Minnow · 2. Column 33, row 7. Its horizontal swim can cross your stroke. Change height to pass. Locate landmark 4
  5. Side tube. Column 41, row 8. Swim Right against the mouth to rejoin the plant at X1160. Locate landmark 5

    Return to the surface · Plant return collar

Ballast plant · transfer points

Open the full-size illustration

  1. Guarded tank inlet. Column 48.5, row 10. This is the transfer position on this route. Locate landmark 1

    Enter the side room · Dive arrival

  2. Plant return collar. Column 72.5, row 10. This is the transfer position on this route. Locate landmark 2

    Revisit from the surface · Guarded tank inlet

This link leads to an optional part of the flight. Open the section below to continue.Continue to the linked placeThis link leads to an optional part of the flight. Open the section below to continue.Continue to the linked placeThis link leads to an optional part of the flight. Open the section below to continue.Continue to the linked placeThis link leads to an optional part of the flight. Open the section below to continue.Continue to the linked placeThis link leads to an optional part of the flight. Open the section below to continue.Continue to the linked placeThis link leads to an optional part of the flight. Open the section below to continue.Continue to the linked placeThis link leads to an optional part of the flight. Open the section below to continue.Continue to the linked placeThis link leads to an optional part of the flight. Open the section below to continue.Continue to the linked placeThis link leads to an optional part of the flight. Open the section below to continue.Continue to the linked placeThis link leads to an optional part of the flight. Open the section below to continue.Continue to the linked placeThis link leads to an optional part of the flight. Open the section below to continue.Continue to the linked placeThis link leads to an optional part of the flight. Open the section below to continue.Continue to the linked placeThis link leads to an optional part of the flight. Open the section below to continue.Continue to the linked placeThis link leads to an optional part of the flight. Open the section below to continue.Continue to the linked placeThis link leads to an optional part of the flight. Open the section below to continue.Continue to the linked place

Service Truss

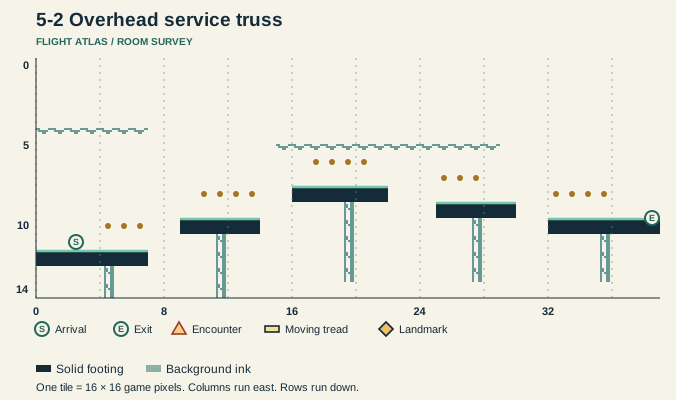
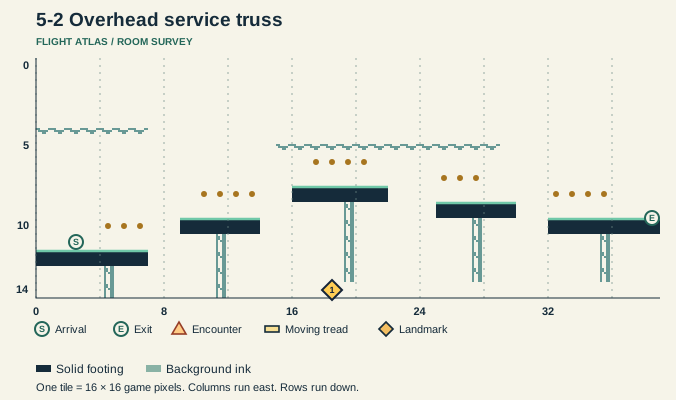
From up on the truss, there’s a lot of plant floor to look down on and very little deck to land on. The foils mark out a crossing, as long as CoCoMan remembers to look at the gaps too.

Entry

Strike the high latch from the platform and climb the extended rungs. Five truss decks hold eighteen foils. Aim at their treads between jumps.

Return or onward flight

Reach the east stripe or fall early while time remains. Both put you on the broad permanent deck beyond the gantry.

Read this room’s map

Overhead service truss

Open the full-size illustration

  1. Truss arrival. Column 2, row 11. Stand on the western deck. Locate landmark 1
  2. Return stripe. Column 38, row 9.5. Cross the end or drop with time remaining to land on the plant deck at X1880. Locate landmark 2

    Return to the surface · Truss recovery deck

Ballast plant · transfer points

Open the full-size illustration

  1. Truss latch. Column 62, row 6. Bump the tether latch and climb from the raised shelf. Locate landmark 1

    Enter the side room · Truss arrival

  2. Truss recovery deck. Column 117, row 9. This is the transfer position on this route. Locate landmark 2

    Revisit from the surface · Truss latch

Overhead service truss · transfer points

Open the full-size illustration

  1. Fall below the decks. Column 18, row 14. This is the transfer position on this route. Locate landmark 1

    Return after a drop · Truss recovery deck

This link leads to an optional part of the flight. Open the section below to continue.Continue to the linked placeThis link leads to an optional part of the flight. Open the section below to continue.Continue to the linked placeThis link leads to an optional part of the flight. Open the section below to continue.Continue to the linked placeThis link leads to an optional part of the flight. Open the section below to continue.Continue to the linked placeThis link leads to an optional part of the flight. Open the section below to continue.Continue to the linked placeThis link leads to an optional part of the flight. Open the section below to continue.Continue to the linked placeThis link leads to an optional part of the flight. Open the section below to continue.Continue to the linked placeThis link leads to an optional part of the flight. Open the section below to continue.Continue to the linked placeThis link leads to an optional part of the flight. Open the section below to continue.Continue to the linked placeThis link leads to an optional part of the flight. Open the section below to continue.Continue to the linked placeThis link leads to an optional part of the flight. Open the section below to continue.Continue to the linked placeThis link leads to an optional part of the flight. Open the section below to continue.Continue to the linked placeThis link leads to an optional part of the flight. Open the section below to continue.Continue to the linked placeThis link leads to an optional part of the flight. Open the section below to continue.Continue to the linked placeThis link leads to an optional part of the flight. Open the section below to continue.Continue to the linked placeThis link leads to an optional part of the flight. Open the section below to continue.Continue to the linked placeThis link leads to an optional part of the flight. Open the section below to continue.Continue to the linked placeThis link leads to an optional part of the flight. Open the section below to continue.Continue to the linked placeThis link leads to an optional part of the flight. Open the section below to continue.Continue to the linked placeThis link leads to an optional part of the flight. Open the section below to continue.Continue to the linked placeThis link leads to an optional part of the flight. Open the section below to continue.Continue to the linked placeThis link leads to an optional part of the flight. Open the section below to continue.Continue to the linked placeThis link leads to an optional part of the flight. Open the section below to continue.Continue to the linked placeThis link leads to an optional part of the flight. Open the section below to continue.Continue to the linked placeThis link leads to an optional part of the flight. Open the section below to continue.Continue to the linked placeThis link leads to an optional part of the flight. Open the section below to continue.Continue to the linked placeThis link leads to an optional part of the flight. Open the section below to continue.Continue to the linked placeThis link leads to an optional part of the flight. Open the section below to continue.Continue to the linked placeThis link leads to an optional part of the flight. Open the section below to continue.Continue to the linked placeThis link leads to an optional part of the flight. Open the section below to continue.Continue to the linked placeThis link leads to an optional part of the flight. Open the section below to continue.Continue to the linked place

Ballast plant · detour entries and returns

Open the full-size illustration

  1. Arrival. Column 2, row 12. The pilot first takes control in this part of the room. Locate landmark 1
  2. Parcel Roller. Column 14, row 12. Encounter reference. A moving threat can leave this position during play. Locate landmark 2
  3. Sprung Buffer. Column 15, row 11. Hold Jump for the regular rebound or press again partway through compression. Locate landmark 3
  4. Spring Sail. Column 30, row 12. Encounter reference. A moving threat can leave this position during play. Locate landmark 4
  5. Spanner Rigger. Column 39, row 8. Encounter reference. A moving threat can leave this position during play. Locate landmark 5
  6. Duct Tap. Column 48, row 11. Wait clear of the rim until the bellows retract. Locate landmark 6
  7. Tank inlet. Column 48.5, row 10. Center the pilot here and hold Down while the Tap is retracted. Locate landmark 7
  8. Truss latch. Column 62, row 6. Bump the tether latch and climb from the raised shelf. Locate landmark 8
  9. Tank return. Column 72.5, row 10. The east underwater tube rises to this lip. Locate landmark 9
  10. Checkpoint. Column 78, row 12. Cross at ground level. A retry starts slightly west of this crossing. Locate landmark 10
  11. Spanner Rigger · 2. Column 93, row 9. Encounter reference. A moving threat can leave this position during play. Locate landmark 11
  12. Spanner Rigger · 3. Column 102, row 6. Encounter reference. A moving threat can leave this position during play. Locate landmark 12
  13. Truss return. Column 117, row 9. The end stripe and an early drop both lead to this deck. Locate landmark 13
  14. Hull Louse. Column 136, row 12. Encounter reference. A moving threat can leave this position during play. Locate landmark 14
  15. Relay Mast. Column 151, row 12. Approach this relay to finish the room. Locate landmark 15