
Back to VCC Plus Games
CoCoManTo Titan and Back
Course 6-2

Four Ways Through the Brineworks

There’s a dry road right through the middle of the frozen yard, and the Hull Louse seems to think it owns it. CoCoMan needs that road to reach the relay, but the brineworks gives a curious courier four more ways to spend a shift.

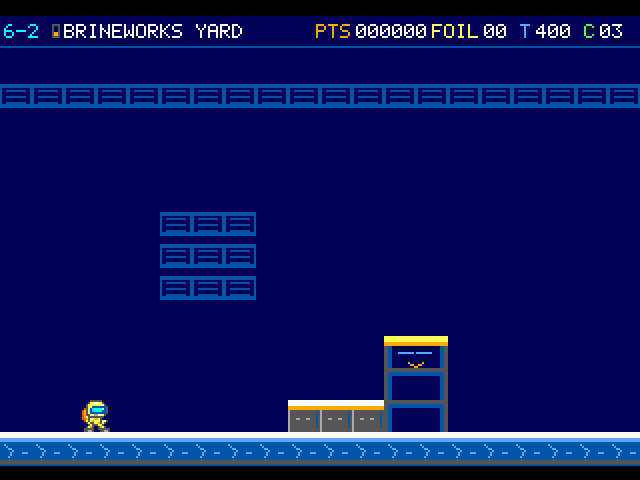
The courier stands near the start of the dry brineworks yard. A low step and a dark, yellow-rimmed collar rise ahead.

On the flight

The service yard has a dry through-route. You can follow it all the way or visit a second corner of the Brineworks and come back to the yard. A collar under your boots and an opening at your shoulder call for different controls.

Course map

Brineworks Service Yard

Open the full-size illustration

  1. Arrival. Column 2, row 12. The pilot first takes control in this part of the room. Locate landmark 1
  2. Duct Tap. Column 45, row 10. Wait clear of the rim until the bellows retract. Locate landmark 2
  3. Hull Louse. Column 52, row 12. Encounter reference. A moving threat can leave this position during play. Locate landmark 3
  4. Duct Tap · 2. Column 151, row 10. Wait clear of the rim until the bellows retract. Locate landmark 4
  5. Relay Mast. Column 166, row 12. Approach this relay to finish the room. Locate landmark 5

    Continue to the Counterweight Choir · Arrival

Landmarks to recognize

Yard collars
Stand in the middle of a collar and let your boots settle before using Down.
Recovery deck
Find dry footing and take a moment to reorient after a room change. You can walk back towards an earlier entrance.
Give me a hint

Inspect the yard at more than one height. The foils you have already collected stay collected on a same-life return.

Routes and discoveries

This link leads to an optional part of the flight. Open the section below to continue.Continue to the linked place

Brineworks Service Yard

Entry

Stay on the dry surface to skip all four detours. If you leave to explore, notice the collar, raised shelf or deck where you rejoin the yard.

Return or onward flight

You can turn back from every rejoin. Both the direct crossing and a visit to all four rooms lead on to the Counterweight Choir.

This link leads to an optional part of the flight. Open the section below to continue.Continue to the linked placeThis link leads to an optional part of the flight. Open the section below to continue.Continue to the linked placeThis link leads to an optional part of the flight. Open the section below to continue.Continue to the linked placeThis link leads to an optional part of the flight. Open the section below to continue.Continue to the linked placeThis link leads to an optional part of the flight. Open the section below to continue.Continue to the linked placeThis link leads to an optional part of the flight. Open the section below to continue.Continue to the linked placeThis link leads to an optional part of the flight. Open the section below to continue.Continue to the linked placeThis link leads to an optional part of the flight. Open the section below to continue.Continue to the linked placeThis link leads to an optional part of the flight. Open the section below to continue.Continue to the linked placeThis link leads to an optional part of the flight. Open the section below to continue.Continue to the linked placeThis link leads to an optional part of the flight. Open the section below to continue.Continue to the linked placeThis link leads to an optional part of the flight. Open the section below to continue.Continue to the linked place

Early Foil Store

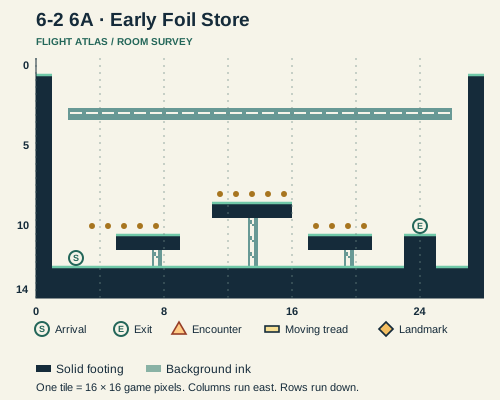
Three shelves hold the early store’s amber foils. The first row comes easily enough. Once CoCoMan has those in his pockets, the foils on the top shelf look a little harder to leave behind.

Entry

Stand on the seam of the early collar and hold Down. Inside, three ledges carry five, five and four foils.

Return or onward flight

Stand on the far collar and hold Down to rise onto the first return apron. The other store has its own supply.

Read this room’s map

6A · Early Foil Store

Open the full-size illustration

  1. Arrival. Column 2, row 12. The pilot first takes control in this part of the room. Locate landmark 1
  2. Yard return. Column 23.5, row 10. Hold Down on the exit seam. You emerge at X456 on the yard collar. Locate landmark 2

    Return to the yard · Early store return

Brineworks Service Yard · transfer points

Open the full-size illustration

  1. Early store inlet. Column 12.5, row 10. Hold Down on the seam to enter the Early Foil Store. Locate landmark 1

    Enter this detour · Arrival

  2. Early store return. Column 28.5, row 10. The first store rejoins the yard here. Locate landmark 2

    Walk back to the entrance · Early store inlet

This link leads to an optional part of the flight. Open the section below to continue.Continue to the linked placeThis link leads to an optional part of the flight. Open the section below to continue.Continue to the linked placeThis link leads to an optional part of the flight. Open the section below to continue.Continue to the linked placeThis link leads to an optional part of the flight. Open the section below to continue.Continue to the linked placeThis link leads to an optional part of the flight. Open the section below to continue.Continue to the linked placeThis link leads to an optional part of the flight. Open the section below to continue.Continue to the linked placeThis link leads to an optional part of the flight. Open the section below to continue.Continue to the linked placeThis link leads to an optional part of the flight. Open the section below to continue.Continue to the linked placeThis link leads to an optional part of the flight. Open the section below to continue.Continue to the linked placeThis link leads to an optional part of the flight. Open the section below to continue.Continue to the linked placeThis link leads to an optional part of the flight. Open the section below to continue.Continue to the linked placeThis link leads to an optional part of the flight. Open the section below to continue.Continue to the linked placeThis link leads to an optional part of the flight. Open the section below to continue.Continue to the linked placeThis link leads to an optional part of the flight. Open the section below to continue.Continue to the linked placeThis link leads to an optional part of the flight. Open the section below to continue.Continue to the linked placeThis link leads to an optional part of the flight. Open the section below to continue.Continue to the linked placeThis link leads to an optional part of the flight. Open the section below to continue.Continue to the linked placeThis link leads to an optional part of the flight. Open the section below to continue.Continue to the linked placeThis link leads to an optional part of the flight. Open the section below to continue.Continue to the linked placeThis link leads to an optional part of the flight. Open the section below to continue.Continue to the linked placeThis link leads to an optional part of the flight. Open the section below to continue.Continue to the linked placeThis link leads to an optional part of the flight. Open the section below to continue.Continue to the linked place

Settling Tank

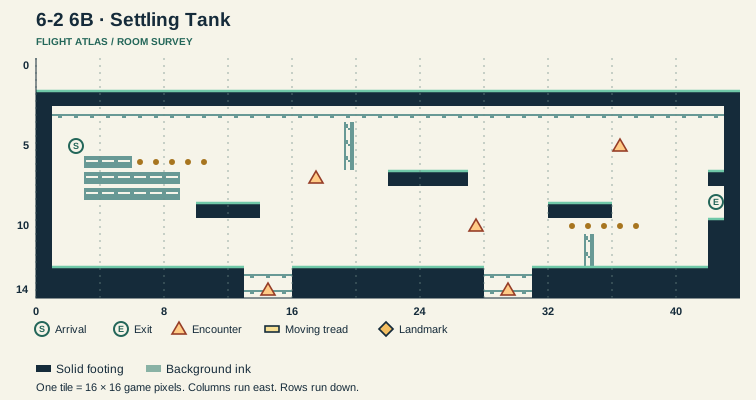
The water looks still from the intake. Then a current tugs CoCoMan toward the floor, and a Gauge Minnow crosses the way he meant to swim. There are foils at more than one depth, so he’ll need to get comfortable down here if he wants them all.

Entry

Hold Down at the tank collar. Take short strokes to work up to the high west pocket, then come down for the east foil band. Watch the two current wells and the crossing swimmers.

Return or onward flight

Move Right into the open side of the east aperture. Dry controls resume as you come out on the apron.

Read this room’s map

6B · Settling Tank

Open the full-size illustration

  1. Arrival. Column 2, row 5. The pilot first takes control in this part of the room. Locate landmark 1
  2. Intake Vortex. Column 14, row 14. Stroke past the baffle and stay out of the low mouth. Locate landmark 2
  3. Veil Probe. Column 17, row 7. Encounter reference. A moving threat can leave this position during play. Locate landmark 3
  4. Gauge Minnow. Column 27, row 10. Its horizontal swim can cross your stroke. Change height to pass. Locate landmark 4
  5. Intake Vortex · 2. Column 29, row 14. Stroke past the baffle and stay out of the low mouth. Locate landmark 5
  6. Gauge Minnow · 2. Column 36, row 5. Its horizontal swim can cross your stroke. Change height to pass. Locate landmark 6
  7. East aperture. Column 42, row 8.5. Swim Right into the opening. Dry control resumes at X1368 in the yard. Locate landmark 7

    Return to the yard · Settling tank return

Brineworks Service Yard · transfer points

Open the full-size illustration

  1. Settling tank inlet. Column 61.5, row 10. Hold Down to enter the tank’s west pocket. Locate landmark 1

    Enter this detour · Arrival

  2. Settling tank return. Column 85.5, row 10. The side aperture restores dry control on this collar. Locate landmark 2

    Walk back to the entrance · Settling tank inlet

This link leads to an optional part of the flight. Open the section below to continue.Continue to the linked placeThis link leads to an optional part of the flight. Open the section below to continue.Continue to the linked placeThis link leads to an optional part of the flight. Open the section below to continue.Continue to the linked placeThis link leads to an optional part of the flight. Open the section below to continue.Continue to the linked placeThis link leads to an optional part of the flight. Open the section below to continue.Continue to the linked placeThis link leads to an optional part of the flight. Open the section below to continue.Continue to the linked placeThis link leads to an optional part of the flight. Open the section below to continue.Continue to the linked placeThis link leads to an optional part of the flight. Open the section below to continue.Continue to the linked placeThis link leads to an optional part of the flight. Open the section below to continue.Continue to the linked placeThis link leads to an optional part of the flight. Open the section below to continue.Continue to the linked placeThis link leads to an optional part of the flight. Open the section below to continue.Continue to the linked placeThis link leads to an optional part of the flight. Open the section below to continue.Continue to the linked place

Overhead Survey Line

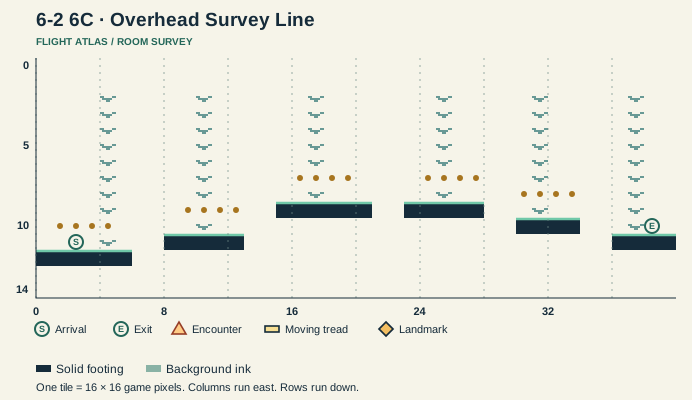
The yard looks different from above, where the survey decks climb like a staircase with the risers missing. The foils lead CoCoMan farther along the line, one landing at a time.

Entry

From the raised shelf, bump the overhead latch. Hold Up on the deployed rungs and climb. The first five decks each carry four foils.

Return or onward flight

Reach the end stripe, or drop off the line while time remains. Both routes put you on the same dry eastern recovery deck.

Read this room’s map

6C · Overhead Survey Line

Open the full-size illustration

  1. Arrival. Column 2, row 11. The pilot first takes control in this part of the room. Locate landmark 1
  2. Recovery stripe. Column 38, row 10. Reach the east stripe or drop with time remaining to return to the surface deck at X2312. Locate landmark 2

    Return to the yard · Survey line return

Brineworks Service Yard · transfer points

Open the full-size illustration

  1. Survey latch. Column 74, row 7. Strike the latch from below, then climb the deployed tether. Locate landmark 1

    Enter this detour · Arrival

  2. Survey line return. Column 144.5, row 10. Reaching the stripe or an early drop returns to this deck. Locate landmark 2

    Walk back to the entrance · Survey latch

This link leads to an optional part of the flight. Open the section below to continue.Continue to the linked placeThis link leads to an optional part of the flight. Open the section below to continue.Continue to the linked placeThis link leads to an optional part of the flight. Open the section below to continue.Continue to the linked placeThis link leads to an optional part of the flight. Open the section below to continue.Continue to the linked placeThis link leads to an optional part of the flight. Open the section below to continue.Continue to the linked placeThis link leads to an optional part of the flight. Open the section below to continue.Continue to the linked placeThis link leads to an optional part of the flight. Open the section below to continue.Continue to the linked placeThis link leads to an optional part of the flight. Open the section below to continue.Continue to the linked placeThis link leads to an optional part of the flight. Open the section below to continue.Continue to the linked placeThis link leads to an optional part of the flight. Open the section below to continue.Continue to the linked placeThis link leads to an optional part of the flight. Open the section below to continue.Continue to the linked placeThis link leads to an optional part of the flight. Open the section below to continue.Continue to the linked place

Late Foil Store

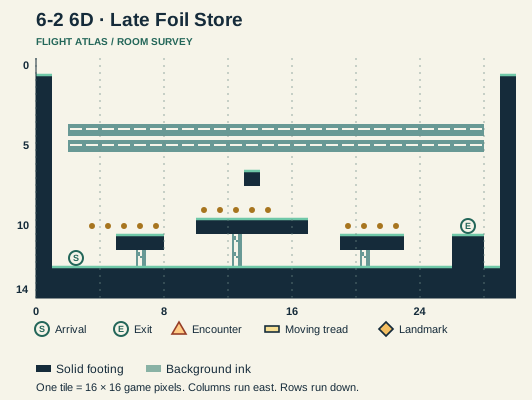
This store keeps its foils around a raised cargo deck. The find worth climbing for is a suit supply tucked up in the truss. Fresh gear would come in handy out in the cold.

Entry

Center yourself on the late collar and hold Down. Climb the central cargo deck for fourteen loose foils and check the suit box overhead.

Return or onward flight

Hold Down on the far collar to rise onto the later surface apron. A return visit remembers what you collected here.

Read this room’s map

6D · Late Foil Store

Open the full-size illustration

  1. Arrival. Column 2, row 12. The pilot first takes control in this part of the room. Locate landmark 1
  2. Yard return. Column 26.5, row 10. Hold Down over this seam to rise at X2056. Locate landmark 2

    Return to the yard · Late store return

Brineworks Service Yard · transfer points

Open the full-size illustration

  1. Late store inlet. Column 116.5, row 10. Hold Down over the seam to enter the Late Foil Store. Locate landmark 1

    Enter this detour · Arrival

  2. Late store return. Column 128.5, row 10. The store’s eastern outlet rises at this collar. Locate landmark 2

    Walk back to the entrance · Late store inlet

This link leads to an optional part of the flight. Open the section below to continue.Continue to the linked placeThis link leads to an optional part of the flight. Open the section below to continue.Continue to the linked placeThis link leads to an optional part of the flight. Open the section below to continue.Continue to the linked placeThis link leads to an optional part of the flight. Open the section below to continue.Continue to the linked placeThis link leads to an optional part of the flight. Open the section below to continue.Continue to the linked placeThis link leads to an optional part of the flight. Open the section below to continue.Continue to the linked placeThis link leads to an optional part of the flight. Open the section below to continue.Continue to the linked placeThis link leads to an optional part of the flight. Open the section below to continue.Continue to the linked placeThis link leads to an optional part of the flight. Open the section below to continue.Continue to the linked placeThis link leads to an optional part of the flight. Open the section below to continue.Continue to the linked placeThis link leads to an optional part of the flight. Open the section below to continue.Continue to the linked placeThis link leads to an optional part of the flight. Open the section below to continue.Continue to the linked placeThis link leads to an optional part of the flight. Open the section below to continue.Continue to the linked placeThis link leads to an optional part of the flight. Open the section below to continue.Continue to the linked placeThis link leads to an optional part of the flight. Open the section below to continue.Continue to the linked placeThis link leads to an optional part of the flight. Open the section below to continue.Continue to the linked placeThis link leads to an optional part of the flight. Open the section below to continue.Continue to the linked placeThis link leads to an optional part of the flight. Open the section below to continue.Continue to the linked placeThis link leads to an optional part of the flight. Open the section below to continue.Continue to the linked placeThis link leads to an optional part of the flight. Open the section below to continue.Continue to the linked placeThis link leads to an optional part of the flight. Open the section below to continue.Continue to the linked placeThis link leads to an optional part of the flight. Open the section below to continue.Continue to the linked placeThis link leads to an optional part of the flight. Open the section below to continue.Continue to the linked placeThis link leads to an optional part of the flight. Open the section below to continue.Continue to the linked placeThis link leads to an optional part of the flight. Open the section below to continue.Continue to the linked placeThis link leads to an optional part of the flight. Open the section below to continue.Continue to the linked placeThis link leads to an optional part of the flight. Open the section below to continue.Continue to the linked place

Brineworks Service Yard · detour entries and returns

Open the full-size illustration

  1. Arrival. Column 2, row 12. The pilot first takes control in this part of the room. Locate landmark 1
  2. Early store inlet. Column 12.5, row 10. Hold Down on the seam to enter the Early Foil Store. Locate landmark 2
  3. Early store return. Column 28.5, row 10. The first store rejoins the yard here. Locate landmark 3
  4. Duct Tap. Column 45, row 10. Wait clear of the rim until the bellows retract. Locate landmark 4
  5. Hull Louse. Column 52, row 12. Encounter reference. A moving threat can leave this position during play. Locate landmark 5
  6. Settling tank inlet. Column 61.5, row 10. Hold Down to enter the tank’s west pocket. Locate landmark 6
  7. Survey latch. Column 74, row 7. Strike the latch from below, then climb the deployed tether. Locate landmark 7
  8. Settling tank return. Column 85.5, row 10. The side aperture restores dry control on this collar. Locate landmark 8
  9. Late store inlet. Column 116.5, row 10. Hold Down over the seam to enter the Late Foil Store. Locate landmark 9
  10. Late store return. Column 128.5, row 10. The store’s eastern outlet rises at this collar. Locate landmark 10
  11. Survey line return. Column 144.5, row 10. Reaching the stripe or an early drop returns to this deck. Locate landmark 11
  12. Duct Tap · 2. Column 151, row 10. Wait clear of the rim until the bellows retract. Locate landmark 12
  13. Relay Mast. Column 166, row 12. Approach this relay to finish the room. Locate landmark 13