The kiln lights the dark side of Phobos one sweep at a time. A string of hot beads passes and the next patch of floor is his, briefly. CoCoMan follows the rhythm toward Noon's station, until something from the Warden's end of the bridge comes flying the other way.
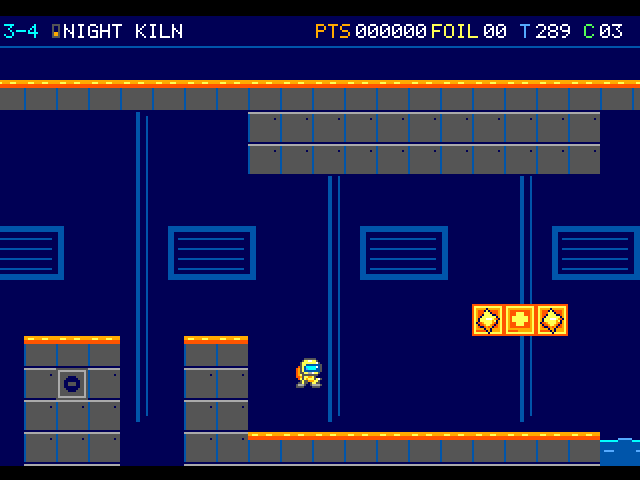
The pilot is just above an orange-edged floor inside the kiln. Two isolated columns and three lit boxes frame the room.
On the flight
In the dark kiln, read the hot beads against the bright fixed treads. The moving carrier has its own rhythm. A plasma burst can cross its path while you ride.
Course map
Night Kiln
In the dim kiln, watch the glow itself. A bead turns with its arm while a Vent Pulse rises out of an opening and falls back.
Kiln intake. Column 2.5, row 6. A lost life returns you to this entrance, even if you reached the bridge. Locate landmark 1
Vent Pulse. Column 97.5, row 12.375. Watch a complete rise and fall from a fixed tread. The bright pulse marks the moving danger. Locate landmark 2
Night Gauge. Column 135, row 8. The clock hood and winding fork belong to the Warden. Look out for plasma crossing the deck as you move. Locate landmark 3
Thermal rotor pivot. Column 19, row 11. This marks an encounter position. Moving hazards can leave this point during play. Locate landmark 4
Thermal rotor pivot. Column 24, row 11. This marks an encounter position. Moving hazards can leave this point during play. Locate landmark 5
Thermal rotor pivot. Column 29, row 11. This marks an encounter position. Moving hazards can leave this point during play. Locate landmark 6
Thermal rotor pivot. Column 54, row 5. This marks an encounter position. Moving hazards can leave this point during play. Locate landmark 7
Thermal rotor pivot. Column 54, row 11. This marks an encounter position. Moving hazards can leave this point during play. Locate landmark 8
Thermal rotor pivot. Column 64, row 5. This marks an encounter position. Moving hazards can leave this point during play. Locate landmark 9
Thermal rotor pivot. Column 64, row 11. This marks an encounter position. Moving hazards can leave this point during play. Locate landmark 10
Thermal rotor pivot. Column 80, row 5. This marks an encounter position. Moving hazards can leave this point during play. Locate landmark 11
Thermal rotor pivot. Column 80, row 11. This marks an encounter position. Moving hazards can leave this point during play. Locate landmark 12
Night Kiln · panel 1 of 4 · columns 0–39
164 columns by 15 rows. Full room at the start of a flight. Brown tile marks soil, brick or steps. A gold-topped tread is a platform. Green mouths mark ducts. Amber dots mark encounters.
164 columns by 15 rows. Full room at the start of a flight. Brown tile marks soil, brick or steps. A gold-topped tread is a platform. Green mouths mark ducts. Amber dots mark encounters.
164 columns by 15 rows. Full room at the start of a flight. Brown tile marks soil, brick or steps. A gold-topped tread is a platform. Green mouths mark ducts. Amber dots mark encounters.
2. Vent Pulse
Night Kiln · panel 4 of 4 · columns 123–163
164 columns by 15 rows. Full room at the start of a flight. Brown tile marks soil, brick or steps. A gold-topped tread is a platform. Green mouths mark ducts. Amber dots mark encounters.
3. Night Gauge
Open the scenery view
Night Kiln · scenery
These are the kiln’s original wall panels and indicators from its background layer.
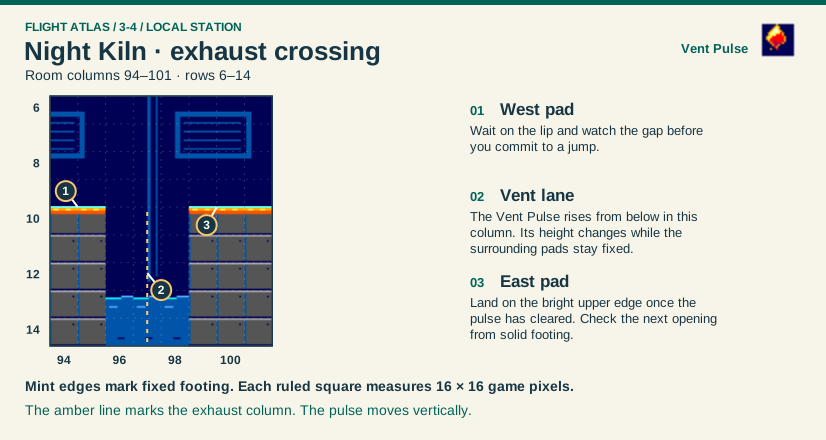
West pad. Column 95, row 10. Wait on the lip and watch the gap before you commit to a jump. Locate landmark 1
Vent lane. Column 97, row 12. The Vent Pulse rises from below in this column. Its height changes while the surrounding pads stay fixed. Locate landmark 2
East pad. Column 100, row 10. Land on the bright upper edge once the pulse has cleared. Check the next opening from solid footing. Locate landmark 3
Night Kiln · exhaust crossing · local map · panel 1 of 1
123
Night Kiln · exhaust crossing. Measured room excerpt, columns 94 to 101 and rows 6 to 14. Wait on the lip and watch the gap before you commit to a jump. The Vent Pulse rises from below in this column. Its height changes while the surrounding pads stay fixed. Land on the bright upper edge once the pulse has cleared. Check the next opening from solid footing.
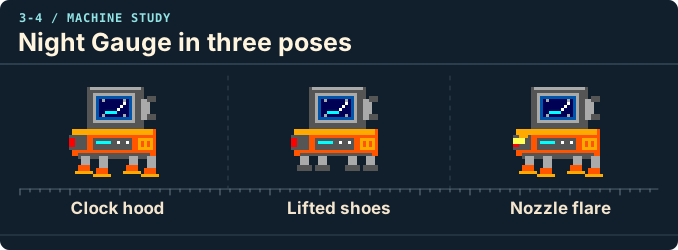
Clock hood. The square hood carries a clock face. Its winding fork sticks out at the side.
Lifted shoes. The shoes gather at the crest. Watch the pilot’s clearance beneath the chassis.
Nozzle flare. The bright mouth signals plasma. Track the projectile separately from the moving deck.
Landmarks to recognize
Exhaust pads
Pick a tread you can wait on while the next rotor turns.
Clock hood
The hood and winding fork identify Night Gauge at the bridge. Keep an eye on the plasma lane as you approach.
Give me a hint
You can reach the cutoff by the carrier or across the bridge. Decide which gives you a clear landing before leaving solid footing.
Routes and discoveries
This link leads to an optional part of the flight. Open the section below to continue.Continue to the linked placeThis link leads to an optional part of the flight. Open the section below to continue.Continue to the linked placeThis link leads to an optional part of the flight. Open the section below to continue.Continue to the linked placeThis link leads to an optional part of the flight. Open the section below to continue.Continue to the linked placeThis link leads to an optional part of the flight. Open the section below to continue.Continue to the linked placeThis link leads to an optional part of the flight. Open the section below to continue.Continue to the linked place
Cross the rotor gallery, then take the carrier or go across the bridge past the live Night Gauge. With Arc, five accepted sparks reveal a Hull Louse and award 5,000 before the cutoff.
Return or onward flight
Continue to Noon and the onward dispatch to Slag Rain. A lost life restarts at the intake. Any reserve earned in Tether Balance carries through the relay.
Bridge cutoff. Column 141.5, row 8.5. Land on the cutoff with Night Gauge still working to start the bridge release. The crew lock carries you on to Slag Rain. Locate landmark 1
Night Kiln · transfer points · panel 1 of 4 · columns 0–39
Only the selected route’s transfer positions are marked with numbered amber diamonds.
Night Kiln · transfer points · panel 2 of 4 · columns 39–81
Only the selected route’s transfer positions are marked with numbered amber diamonds.
Night Kiln · transfer points · panel 3 of 4 · columns 81–123
Only the selected route’s transfer positions are marked with numbered amber diamonds.
Night Kiln · transfer points · panel 4 of 4 · columns 123–163
12
Only the selected route’s transfer positions are marked with numbered amber diamonds.
1. Bridge cutoff · 2. Noon’s station
This link leads to an optional part of the flight. Open the section below to continue.Continue to the linked placeThis link leads to an optional part of the flight. Open the section below to continue.Continue to the linked placeThis link leads to an optional part of the flight. Open the section below to continue.Continue to the linked placeThis link leads to an optional part of the flight. Open the section below to continue.Continue to the linked placeThis link leads to an optional part of the flight. Open the section below to continue.Continue to the linked placeThis link leads to an optional part of the flight. Open the section below to continue.Continue to the linked placeThis link leads to an optional part of the flight. Open the section below to continue.Continue to the linked placeThis link leads to an optional part of the flight. Open the section below to continue.Continue to the linked placeThis link leads to an optional part of the flight. Open the section below to continue.Continue to the linked placeThis link leads to an optional part of the flight. Open the section below to continue.Continue to the linked placeThis link leads to an optional part of the flight. Open the section below to continue.Continue to the linked placeThis link leads to an optional part of the flight. Open the section below to continue.Continue to the linked placeThis link leads to an optional part of the flight. Open the section below to continue.Continue to the linked placeThis link leads to an optional part of the flight. Open the section below to continue.Continue to the linked placeThis link leads to an optional part of the flight. Open the section below to continue.Continue to the linked placeThis link leads to an optional part of the flight. Open the section below to continue.Continue to the linked placeThis link leads to an optional part of the flight. Open the section below to continue.Continue to the linked placeThis link leads to an optional part of the flight. Open the section below to continue.Continue to the linked placeThis link leads to an optional part of the flight. Open the section below to continue.Continue to the linked placeThis link leads to an optional part of the flight. Open the section below to continue.Continue to the linked placeThis link leads to an optional part of the flight. Open the section below to continue.Continue to the linked placeThis link leads to an optional part of the flight. Open the section below to continue.Continue to the linked placeThis link leads to an optional part of the flight. Open the section below to continue.Continue to the linked placeThis link leads to an optional part of the flight. Open the section below to continue.Continue to the linked placeThis link leads to an optional part of the flight. Open the section below to continue.Continue to the linked placeThis link leads to an optional part of the flight. Open the section below to continue.Continue to the linked placeThis link leads to an optional part of the flight. Open the section below to continue.Continue to the linked place
Kiln intake. Column 2.5, row 6. A lost life returns you to this entrance, even if you reached the bridge. Locate landmark 1
Vent Pulse. Column 97.5, row 12.375. Watch a complete rise and fall from a fixed tread. The bright pulse marks the moving danger. Locate landmark 2
Night Gauge. Column 135, row 8. The clock hood and winding fork belong to the Warden. Look out for plasma crossing the deck as you move. Locate landmark 3
Bridge cutoff. Column 141.5, row 8.5. Land on the cutoff with Night Gauge still working to start the bridge release. The crew lock carries you on to Slag Rain. Locate landmark 4
Thermal rotor pivot. Column 19, row 11. This marks an encounter position. Moving hazards can leave this point during play. Locate landmark 5
Thermal rotor pivot. Column 24, row 11. This marks an encounter position. Moving hazards can leave this point during play. Locate landmark 6
Thermal rotor pivot. Column 29, row 11. This marks an encounter position. Moving hazards can leave this point during play. Locate landmark 7
Thermal rotor pivot. Column 54, row 5. This marks an encounter position. Moving hazards can leave this point during play. Locate landmark 8
Thermal rotor pivot. Column 54, row 11. This marks an encounter position. Moving hazards can leave this point during play. Locate landmark 9
Thermal rotor pivot. Column 64, row 5. This marks an encounter position. Moving hazards can leave this point during play. Locate landmark 10
Thermal rotor pivot. Column 64, row 11. This marks an encounter position. Moving hazards can leave this point during play. Locate landmark 11
Thermal rotor pivot. Column 80, row 5. This marks an encounter position. Moving hazards can leave this point during play. Locate landmark 12
Thermal rotor pivot. Column 80, row 11. This marks an encounter position. Moving hazards can leave this point during play. Locate landmark 13
Night Kiln · discoveries · panel 1 of 4 · columns 0–39
164 columns by 15 rows. Full room with marked rewards and optional landmarks. Brown tile marks soil, brick or steps. A gold-topped tread is a platform. Green mouths mark ducts. Amber dots mark encounters.
Night Kiln · discoveries · panel 2 of 4 · columns 39–81
164 columns by 15 rows. Full room with marked rewards and optional landmarks. Brown tile marks soil, brick or steps. A gold-topped tread is a platform. Green mouths mark ducts. Amber dots mark encounters.
Night Kiln · discoveries · panel 3 of 4 · columns 81–123
164 columns by 15 rows. Full room with marked rewards and optional landmarks. Brown tile marks soil, brick or steps. A gold-topped tread is a platform. Green mouths mark ducts. Amber dots mark encounters.
2. Vent Pulse
Night Kiln · discoveries · panel 4 of 4 · columns 123–163
164 columns by 15 rows. Full room with marked rewards and optional landmarks. Brown tile marks soil, brick or steps. A gold-topped tread is a platform. Green mouths mark ducts. Amber dots mark encounters.
 To Titan and Back