


Back to VCC Plus Games
CoCoManTo Titan and Back
Course 3-3

Tether Balance

CoCoMan lands on one freight pan and the one across the gap rises, as if the moon has offered him a trade. He gets a higher landing over there for every moment he spends sinking over here. The cable won't hold an argument about it forever.

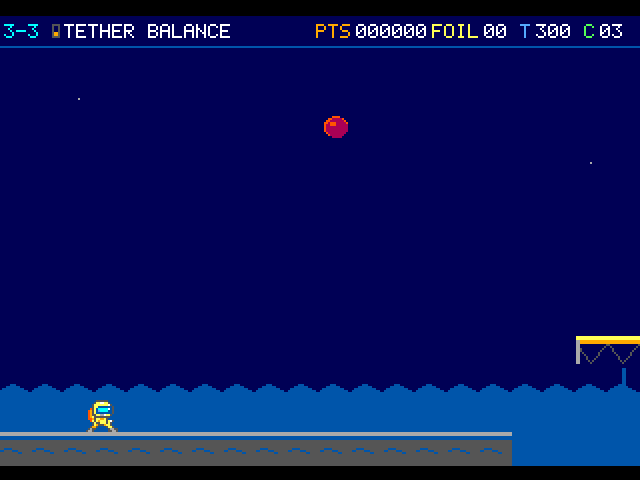
A red moon sits above the tether yard. The courier is on the broad starting deck while a small suspended pan appears at far right.

On the flight

Watch what your weight does on contact. Some pallets sink under you. On a linked pair, the pan across the gap rises while yours descends.

Course map

Tether Balance

Use the bright tops for landings. A thin stem or length of cable can pass behind the pilot without catching a fall.

Open the scenery view

Open the full-size illustration

  1. Tether intake. Column 2.5, row 12. A paid retry restores the 300 clock. Earning halfway moves that retry farther along the course. Locate landmark 1
  2. Sinking pallet. Column 60, row 6. Land on the top and feel it lower under your weight. Jump again while there is still height to spare. Locate landmark 2
  3. Linked pan. Column 81, row 5.875. Watch the pan across the gap while standing on this one. Staying aboard transfers height to the other side. Locate landmark 3
  4. Lift Sail. Column 114, row 5. A stomp strips the fan. Look for the walking chassis below before jumping down. Locate landmark 4
  5. Night Kiln relay. Column 151, row 10. The mast settles your clock and passes your equipment on to the kiln. Locate landmark 5

    Catch the relay to reach the Night Kiln. · Kiln intake

  6. Service deck. Column 30, row 4. Watch the surface move before boarding. Locate landmark 6
  7. Service deck. Column 33, row 8. Watch the surface move before boarding. Locate landmark 7
  8. Counterweight pan. Column 88, row 7. Watch the surface move before boarding. Locate landmark 8
  9. Service deck. Column 94, row 9. Watch the surface move before boarding. Locate landmark 9
  10. Service deck. Column 96, row 5. Watch the surface move before boarding. Locate landmark 10
  11. Service deck. Column 103, row 11. Watch the surface move before boarding. Locate landmark 11
  12. Service deck. Column 132, row 6. Watch the surface move before boarding. Locate landmark 12
  13. Counterweight pan. Column 136, row 4. Watch the surface move before boarding. Locate landmark 13
  14. Counterweight pan. Column 140, row 7. Watch the surface move before boarding. Locate landmark 14
Open the scenery view

Tether Balance · scenery

The red disc, stars and blue ridge repeat every 32 columns. The background follows the visible parts of that repeating mural behind the tether equipment.

Open the terrain view

Open the full-size illustration

  1. Tether intake. Column 2.5, row 12. A paid retry restores the 300 clock. Earning halfway moves that retry farther along the course. Locate landmark 1
  2. Night Kiln relay. Column 151, row 10. The mast settles your clock and passes your equipment on to the kiln. Locate landmark 2

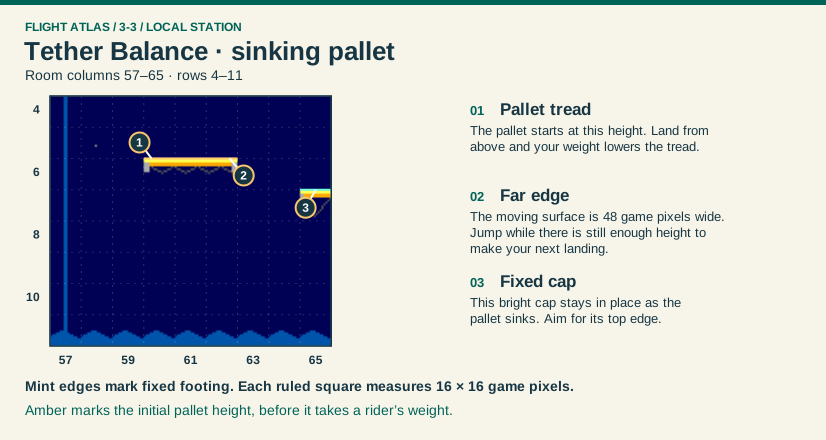
Tether Balance · sinking pallet · local map

Local map · columns 57–65, rows 4–11.

Open the full-size illustration

  1. Pallet tread. Column 60, row 6. The pallet starts at this height. Land from above and your weight lowers the tread. Locate landmark 1
  2. Far edge. Column 62, row 6. The moving surface is 48 game pixels wide. Jump while there is still enough height to make your next landing. Locate landmark 2
  3. Fixed cap. Column 65, row 7. This bright cap stays in place as the pallet sinks. Aim for its top edge. Locate landmark 3

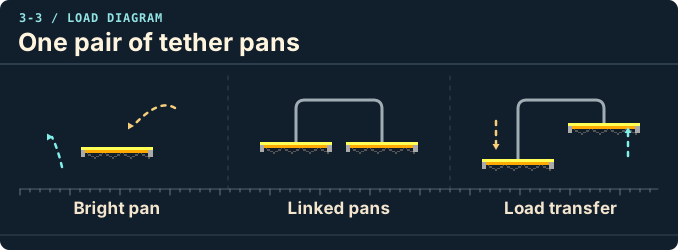
One pair of tether pans

Bright pan, Linked pans, Load transfer.

Open the original-size illustration

  • Bright pan. Land on the bright top. The slender cable and stem offer no foothold.
  • Linked pans. The two pans share a tether. Watch the other end before choosing where to land.
  • Load transfer. A standing pilot lowers one pan and raises its mate. Jump off before the loaded pan drops away.

Landmarks to recognize

Bright caps
Land on the cap or pan. The thin stem and rope leave space for the pilot to pass through.
Rim Surveyor
A Surveyor turns at a ledge. Give its return walk room on a narrow pan.
Give me a hint

A partner pan can be raised into jumping range. If the linkage breaks, it stays broken when you come back.

Routes and discoveries

This link leads to an optional part of the flight. Open the section below to continue.Continue to the linked place

Tether Balance

Entry

Move between supported caps and use your weight to bring up the opposite pans. The upper supply gives Small a Pressure Capsule or an equipped pilot an Arc Lens. A broken pair pays 1,000 once after a short wait.

Return or onward flight

Catch the mast to enter Night Kiln. All 22 loose foils in one life qualify the Slag Rain spare. After halfway, a paid retry starts Small at the earned landing with the bank you already built.

This link leads to an optional part of the flight. Open the section below to continue.Continue to the linked placeThis link leads to an optional part of the flight. Open the section below to continue.Continue to the linked placeThis link leads to an optional part of the flight. Open the section below to continue.Continue to the linked placeThis link leads to an optional part of the flight. Open the section below to continue.Continue to the linked placeThis link leads to an optional part of the flight. Open the section below to continue.Continue to the linked placeThis link leads to an optional part of the flight. Open the section below to continue.Continue to the linked placeThis link leads to an optional part of the flight. Open the section below to continue.Continue to the linked placeThis link leads to an optional part of the flight. Open the section below to continue.Continue to the linked placeThis link leads to an optional part of the flight. Open the section below to continue.Continue to the linked placeThis link leads to an optional part of the flight. Open the section below to continue.Continue to the linked placeThis link leads to an optional part of the flight. Open the section below to continue.Continue to the linked placeThis link leads to an optional part of the flight. Open the section below to continue.Continue to the linked placeThis link leads to an optional part of the flight. Open the section below to continue.Continue to the linked placeThis link leads to an optional part of the flight. Open the section below to continue.Continue to the linked placeThis link leads to an optional part of the flight. Open the section below to continue.Continue to the linked placeThis link leads to an optional part of the flight. Open the section below to continue.Continue to the linked placeThis link leads to an optional part of the flight. Open the section below to continue.Continue to the linked placeThis link leads to an optional part of the flight. Open the section below to continue.Continue to the linked placeThis link leads to an optional part of the flight. Open the section below to continue.Continue to the linked placeThis link leads to an optional part of the flight. Open the section below to continue.Continue to the linked placeThis link leads to an optional part of the flight. Open the section below to continue.Continue to the linked placeThis link leads to an optional part of the flight. Open the section below to continue.Continue to the linked placeThis link leads to an optional part of the flight. Open the section below to continue.Continue to the linked placeThis link leads to an optional part of the flight. Open the section below to continue.Continue to the linked placeThis link leads to an optional part of the flight. Open the section below to continue.Continue to the linked placeThis link leads to an optional part of the flight. Open the section below to continue.Continue to the linked placeThis link leads to an optional part of the flight. Open the section below to continue.Continue to the linked placeThis link leads to an optional part of the flight. Open the section below to continue.Continue to the linked placeThis link leads to an optional part of the flight. Open the section below to continue.Continue to the linked place

Tether Balance · discoveries

Use the bright tops for landings. A thin stem or length of cable can pass behind the pilot without catching a fall.

Open the full-size illustration

  1. Tether intake. Column 2.5, row 12. A paid retry restores the 300 clock. Earning halfway moves that retry farther along the course. Locate landmark 1
  2. Sinking pallet. Column 60, row 6. Land on the top and feel it lower under your weight. Jump again while there is still height to spare. Locate landmark 2
  3. Linked pan. Column 81, row 5.875. Watch the pan across the gap while standing on this one. Staying aboard transfers height to the other side. Locate landmark 3
  4. Lift Sail. Column 114, row 5. A stomp strips the fan. Look for the walking chassis below before jumping down. Locate landmark 4
  5. Night Kiln relay. Column 151, row 10. The mast settles your clock and passes your equipment on to the kiln. Locate landmark 5
  6. Service deck. Column 30, row 4. Watch the surface move before boarding. Locate landmark 6
  7. Service deck. Column 33, row 8. Watch the surface move before boarding. Locate landmark 7
  8. Counterweight pan. Column 88, row 7. Watch the surface move before boarding. Locate landmark 8
  9. Service deck. Column 94, row 9. Watch the surface move before boarding. Locate landmark 9
  10. Service deck. Column 96, row 5. Watch the surface move before boarding. Locate landmark 10
  11. Service deck. Column 103, row 11. Watch the surface move before boarding. Locate landmark 11
  12. Service deck. Column 132, row 6. Watch the surface move before boarding. Locate landmark 12
  13. Counterweight pan. Column 136, row 4. Watch the surface move before boarding. Locate landmark 13
  14. Counterweight pan. Column 140, row 7. Watch the surface move before boarding. Locate landmark 14