


Back to VCC Plus Games
CoCoManTo Titan and Back
Course 3-2

Shadow Convoy

An entire convoy has lined up along the oxygen line. Somebody up front must be going awfully slowly. A folded Freight Drum could get through that traffic in a hurry. If CoCoMan sends one rolling, he'd better remember how fast it can come back.

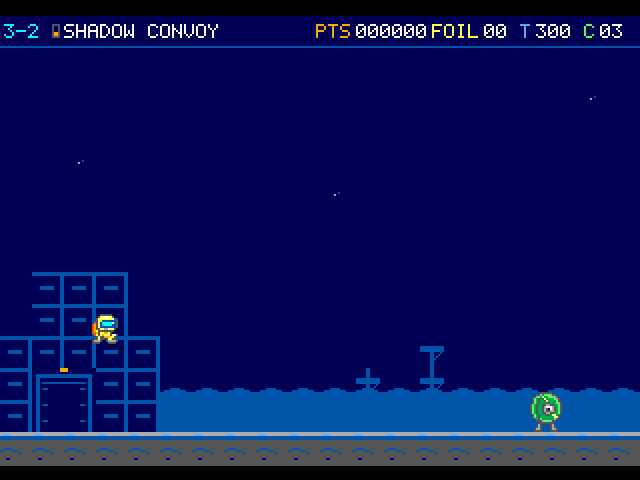
Blue stepped metalwork rises behind the courier. Across the level stretch of deck, a green drum rolls into view.

On the flight

Watch a kicked Freight Drum roll through a line of parcels. Follow at enough distance to jump clear when it hits the copper stop and rolls back.

Course map

Shadow Convoy

Shadow Convoy has a 300 clock of its own. A rolling Freight Drum can clear several machines before the same chassis comes back down the lane.

Open the scenery view

Open the full-size illustration

  1. Convoy dispatch. Column 2.5, row 12. Watch the next parcel crew enter as you move. Following a kicked Drum brings more targets into its path. Locate landmark 1
  2. Copper stop. Column 49, row 12.4. A rolling Drum rebounds here. Leave space for the returning chassis before you step back into the lane. Locate landmark 2
  3. Spring Sail. Column 92, row 12. Watch the moving Sail and its landing space before crossing its path. Locate landmark 3
  4. Convoy relay. Column 209, row 10. A low hop reaches the mast. The relay counts down your time and sends the pilot on to Tether Balance. Locate landmark 4

    Catch the convoy relay to reach Tether Balance. · Tether intake

  5. Freight Drum. Column 17, row 12. This marks an encounter position. Moving hazards can leave this point during play. Locate landmark 5
  6. Parcel Roller ×3. Column 27, row 12. This marks an encounter position. Moving hazards can leave this point during play. Locate landmark 6
  7. Freight Drum ×3. Column 36, row 12. This marks an encounter position. Moving hazards can leave this point during play. Locate landmark 7
  8. Freight Drum ×2. Column 46, row 12. This marks an encounter position. Moving hazards can leave this point during play. Locate landmark 8
  9. Freight Drum. Column 66, row 12. This marks an encounter position. Moving hazards can leave this point during play. Locate landmark 9
  10. Parcel Roller ×3. Column 74, row 12. This marks an encounter position. Moving hazards can leave this point during play. Locate landmark 10
  11. Freight Drum. Column 78, row 12. This marks an encounter position. Moving hazards can leave this point during play. Locate landmark 11
  12. Freight Drum. Column 111, row 12. This marks an encounter position. Moving hazards can leave this point during play. Locate landmark 12
  13. Parcel Roller ×3. Column 122, row 12. This marks an encounter position. Moving hazards can leave this point during play. Locate landmark 13
  14. Freight Drum. Column 134, row 12. This marks an encounter position. Moving hazards can leave this point during play. Locate landmark 14
  15. Freight Drum ×3. Column 143, row 12. This marks an encounter position. Moving hazards can leave this point during play. Locate landmark 15
  16. Freight Drum ×2. Column 153, row 12. This marks an encounter position. Moving hazards can leave this point during play. Locate landmark 16
  17. Freight Drum ×3. Column 165, row 12. This marks an encounter position. Moving hazards can leave this point during play. Locate landmark 17
  18. Duct Tap. Column 169, row 10. This marks an encounter position. Moving hazards can leave this point during play. Locate landmark 18
  19. Freight Drum. Column 175, row 12. This marks an encounter position. Moving hazards can leave this point during play. Locate landmark 19
  20. Parcel Roller ×3. Column 182, row 12. This marks an encounter position. Moving hazards can leave this point during play. Locate landmark 20
  21. Parcel Roller ×3. Column 191, row 12. This marks an encounter position. Moving hazards can leave this point during play. Locate landmark 21
Open the scenery view

Shadow Convoy · scenery

These room-local background columns come from the original Phobos and convoy art bank.

Open the terrain view

Open the full-size illustration

  1. Convoy dispatch. Column 2.5, row 12. Watch the next parcel crew enter as you move. Following a kicked Drum brings more targets into its path. Locate landmark 1
  2. Convoy relay. Column 209, row 10. A low hop reaches the mast. The relay counts down your time and sends the pilot on to Tether Balance. Locate landmark 2

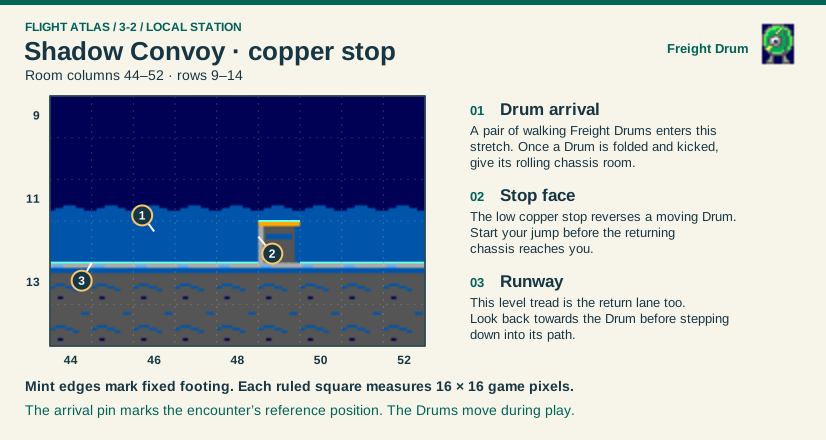
Shadow Convoy · copper stop · local map

Local map · columns 44–52, rows 9–14.

Open the full-size illustration

  1. Drum arrival. Column 46, row 12. A pair of walking Freight Drums enters this stretch. Once a Drum is folded and kicked, give its rolling chassis room. Locate landmark 1
  2. Stop face. Column 49, row 12. The low copper stop reverses a moving Drum. Start your jump before the returning chassis reaches you. Locate landmark 2
  3. Runway. Column 45, row 13. This level tread is the return lane too. Look back towards the Drum before stepping down into its path. Locate landmark 3

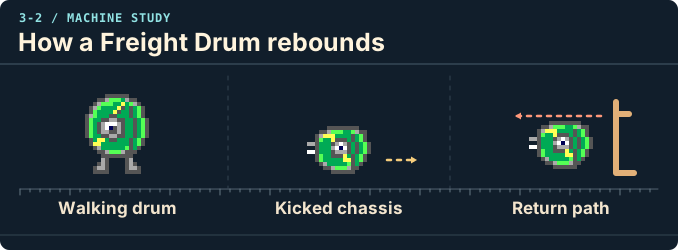
How a Freight Drum rebounds

Walking drum, Kicked chassis, Return path.

Open the original-size illustration

  • Walking drum. The walking machine has two clamp feet below the wound cable. Stomp it to fold them away.
  • Kicked chassis. Kick the folded steel rims into the convoy. Follow the drum to bring more parcels into play.
  • Return path. The copper stop sends the chassis back toward you. Leave yourself clearance for the rebound.

Landmarks to recognize

Copper stop
A Drum that reaches this stop reverses towards you.
Stone island
The fixed stone between the gaps is a place to brake, look ahead or turn back.
Give me a hint

If you want to keep the Drum working, move with it so more parcels come into play. The lower reward brick can also serve as a foothold.

Routes and discoveries

This link leads to an optional part of the flight. Open the section below to continue.Continue to the linked place

Shadow Convoy

Entry

Stomp the Freight Drum, kick it east and keep pace behind it. Six machine hits can bring the chain, including stomp and kick, to 13,900. Break away before the returning Drum reaches you.

Return or onward flight

Use the fixed island when retracing the convoy. The guarded duct stays closed. A low hop at the mast footing or a jump from the stairs takes you to Tether Balance.

This link leads to an optional part of the flight. Open the section below to continue.Continue to the linked placeThis link leads to an optional part of the flight. Open the section below to continue.Continue to the linked placeThis link leads to an optional part of the flight. Open the section below to continue.Continue to the linked placeThis link leads to an optional part of the flight. Open the section below to continue.Continue to the linked placeThis link leads to an optional part of the flight. Open the section below to continue.Continue to the linked placeThis link leads to an optional part of the flight. Open the section below to continue.Continue to the linked placeThis link leads to an optional part of the flight. Open the section below to continue.Continue to the linked placeThis link leads to an optional part of the flight. Open the section below to continue.Continue to the linked placeThis link leads to an optional part of the flight. Open the section below to continue.Continue to the linked placeThis link leads to an optional part of the flight. Open the section below to continue.Continue to the linked placeThis link leads to an optional part of the flight. Open the section below to continue.Continue to the linked placeThis link leads to an optional part of the flight. Open the section below to continue.Continue to the linked placeThis link leads to an optional part of the flight. Open the section below to continue.Continue to the linked placeThis link leads to an optional part of the flight. Open the section below to continue.Continue to the linked placeThis link leads to an optional part of the flight. Open the section below to continue.Continue to the linked placeThis link leads to an optional part of the flight. Open the section below to continue.Continue to the linked placeThis link leads to an optional part of the flight. Open the section below to continue.Continue to the linked placeThis link leads to an optional part of the flight. Open the section below to continue.Continue to the linked placeThis link leads to an optional part of the flight. Open the section below to continue.Continue to the linked placeThis link leads to an optional part of the flight. Open the section below to continue.Continue to the linked placeThis link leads to an optional part of the flight. Open the section below to continue.Continue to the linked placeThis link leads to an optional part of the flight. Open the section below to continue.Continue to the linked placeThis link leads to an optional part of the flight. Open the section below to continue.Continue to the linked placeThis link leads to an optional part of the flight. Open the section below to continue.Continue to the linked placeThis link leads to an optional part of the flight. Open the section below to continue.Continue to the linked placeThis link leads to an optional part of the flight. Open the section below to continue.Continue to the linked placeThis link leads to an optional part of the flight. Open the section below to continue.Continue to the linked placeThis link leads to an optional part of the flight. Open the section below to continue.Continue to the linked placeThis link leads to an optional part of the flight. Open the section below to continue.Continue to the linked placeThis link leads to an optional part of the flight. Open the section below to continue.Continue to the linked placeThis link leads to an optional part of the flight. Open the section below to continue.Continue to the linked placeThis link leads to an optional part of the flight. Open the section below to continue.Continue to the linked placeThis link leads to an optional part of the flight. Open the section below to continue.Continue to the linked placeThis link leads to an optional part of the flight. Open the section below to continue.Continue to the linked placeThis link leads to an optional part of the flight. Open the section below to continue.Continue to the linked placeThis link leads to an optional part of the flight. Open the section below to continue.Continue to the linked placeThis link leads to an optional part of the flight. Open the section below to continue.Continue to the linked placeThis link leads to an optional part of the flight. Open the section below to continue.Continue to the linked placeThis link leads to an optional part of the flight. Open the section below to continue.Continue to the linked placeThis link leads to an optional part of the flight. Open the section below to continue.Continue to the linked placeThis link leads to an optional part of the flight. Open the section below to continue.Continue to the linked placeThis link leads to an optional part of the flight. Open the section below to continue.Continue to the linked placeThis link leads to an optional part of the flight. Open the section below to continue.Continue to the linked place

Shadow Convoy · discoveries

Shadow Convoy has a 300 clock of its own. A rolling Freight Drum can clear several machines before the same chassis comes back down the lane.

Open the full-size illustration

  1. Convoy dispatch. Column 2.5, row 12. Watch the next parcel crew enter as you move. Following a kicked Drum brings more targets into its path. Locate landmark 1
  2. Copper stop. Column 49, row 12.4. A rolling Drum rebounds here. Leave space for the returning chassis before you step back into the lane. Locate landmark 2
  3. Spring Sail. Column 92, row 12. Watch the moving Sail and its landing space before crossing its path. Locate landmark 3
  4. Convoy relay. Column 209, row 10. A low hop reaches the mast. The relay counts down your time and sends the pilot on to Tether Balance. Locate landmark 4
  5. Freight Drum. Column 17, row 12. This marks an encounter position. Moving hazards can leave this point during play. Locate landmark 5
  6. Parcel Roller ×3. Column 27, row 12. This marks an encounter position. Moving hazards can leave this point during play. Locate landmark 6
  7. Freight Drum ×3. Column 36, row 12. This marks an encounter position. Moving hazards can leave this point during play. Locate landmark 7
  8. Freight Drum ×2. Column 46, row 12. This marks an encounter position. Moving hazards can leave this point during play. Locate landmark 8
  9. Freight Drum. Column 66, row 12. This marks an encounter position. Moving hazards can leave this point during play. Locate landmark 9
  10. Parcel Roller ×3. Column 74, row 12. This marks an encounter position. Moving hazards can leave this point during play. Locate landmark 10
  11. Freight Drum. Column 78, row 12. This marks an encounter position. Moving hazards can leave this point during play. Locate landmark 11
  12. Freight Drum. Column 111, row 12. This marks an encounter position. Moving hazards can leave this point during play. Locate landmark 12
  13. Parcel Roller ×3. Column 122, row 12. This marks an encounter position. Moving hazards can leave this point during play. Locate landmark 13
  14. Freight Drum. Column 134, row 12. This marks an encounter position. Moving hazards can leave this point during play. Locate landmark 14
  15. Freight Drum ×3. Column 143, row 12. This marks an encounter position. Moving hazards can leave this point during play. Locate landmark 15
  16. Freight Drum ×2. Column 153, row 12. This marks an encounter position. Moving hazards can leave this point during play. Locate landmark 16
  17. Freight Drum ×3. Column 165, row 12. This marks an encounter position. Moving hazards can leave this point during play. Locate landmark 17
  18. Duct Tap. Column 169, row 10. This marks an encounter position. Moving hazards can leave this point during play. Locate landmark 18
  19. Freight Drum. Column 175, row 12. This marks an encounter position. Moving hazards can leave this point during play. Locate landmark 19
  20. Parcel Roller ×3. Column 182, row 12. This marks an encounter position. Moving hazards can leave this point during play. Locate landmark 20
  21. Parcel Roller ×3. Column 191, row 12. This marks an encounter position. Moving hazards can leave this point during play. Locate landmark 21