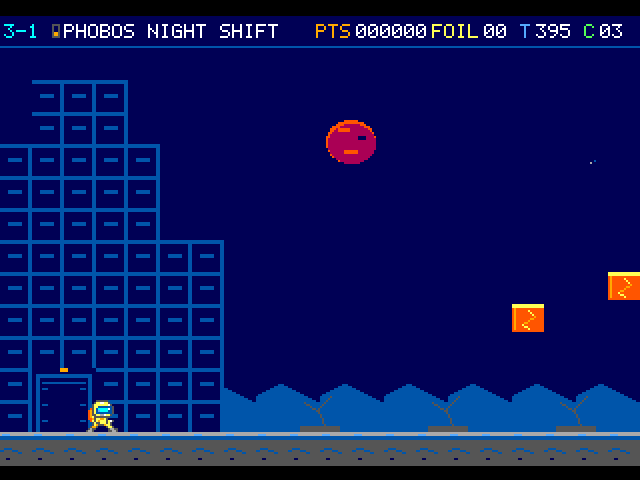
The bridge shows up in strips of light against the dark. Beyond the bridge, two Spanner Riggers occupy the brick decks. A fork sails past his helmet. He decides to wave hello from the far side of the gantry.
A red moon hangs above a dark Phobos structure. The courier stands below two separate amber boxes.
On the flight
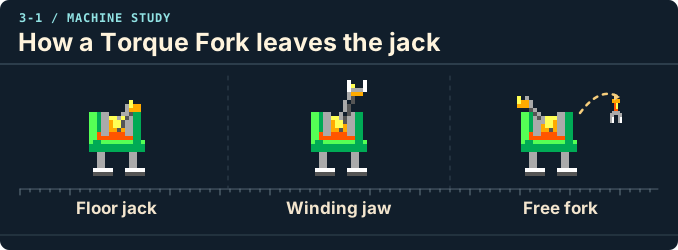
A Spanner Rigger lifts its fork before it throws. Keep watching the fork after it leaves the jack, even if you have already landed a stomp.
Course map
Phobos night yard
The night shift has two Spanner Riggers on separate jacks. Watch the jaw winding up and the fork already in flight.
Night shift begins. Column 2.5, row 12. The yard opens with a 400 clock. A paid retry starts Small at the entrance until you earn halfway. Locate landmark 1
Upper Spanner Rigger. Column 113.5, row 8.25. The jaw raises its fork before throwing it. A descending stomp on the jack earns 1,000. Locate landmark 2
Lower Spanner Rigger. Column 116.5, row 12.2. The second jack has its own timing. A fork that has left either jaw can still hit you after the jack falls. Locate landmark 3
Phobos relay. Column 200, row 10. A low grip works here, too. The pennant settles your clock before Shadow Convoy begins. Locate landmark 4
Spring Sail. Column 25, row 12. This marks an encounter position. Moving hazards can leave this point during play. Locate landmark 5
Spring Sail. Column 28, row 11. This marks an encounter position. Moving hazards can leave this point during play. Locate landmark 6
Duct Tap. Column 32, row 10. This marks an encounter position. Moving hazards can leave this point during play. Locate landmark 7
Parcel Roller. Column 37, row 12. This marks an encounter position. Moving hazards can leave this point during play. Locate landmark 8
Duct Tap. Column 38, row 9. This marks an encounter position. Moving hazards can leave this point during play. Locate landmark 9
Parcel Roller ×3. Column 56, row 12. This marks an encounter position. Moving hazards can leave this point during play. Locate landmark 10
Duct Tap. Column 57, row 10. This marks an encounter position. Moving hazards can leave this point during play. Locate landmark 11
Freight Drum. Column 65, row 12. This marks an encounter position. Moving hazards can leave this point during play. Locate landmark 12
Duct Tap. Column 67, row 11. This marks an encounter position. Moving hazards can leave this point during play. Locate landmark 13
Parcel Roller ×3. Column 85, row 8. This marks an encounter position. Moving hazards can leave this point during play. Locate landmark 14
Parcel Roller ×2. Column 97, row 12. This marks an encounter position. Moving hazards can leave this point during play. Locate landmark 15
Freight Drum. Column 101, row 12. This marks an encounter position. Moving hazards can leave this point during play. Locate landmark 16
Duct Tap. Column 103, row 9. This marks an encounter position. Moving hazards can leave this point during play. Locate landmark 17
Parcel Roller. Column 139, row 8. This marks an encounter position. Moving hazards can leave this point during play. Locate landmark 18
Parcel Roller. Column 140, row 7. This marks an encounter position. Moving hazards can leave this point during play. Locate landmark 19
Freight Drum. Column 149, row 12. This marks an encounter position. Moving hazards can leave this point during play. Locate landmark 20
Freight Drum. Column 152, row 4. This marks an encounter position. Moving hazards can leave this point during play. Locate landmark 21
Parcel Roller ×3. Column 157, row 12. This marks an encounter position. Moving hazards can leave this point during play. Locate landmark 22
Spring Sail. Column 165, row 12. This marks an encounter position. Moving hazards can leave this point during play. Locate landmark 23
Spring Sail. Column 168, row 11. This marks an encounter position. Moving hazards can leave this point during play. Locate landmark 24
Freight Drum. Column 170, row 7. This marks an encounter position. Moving hazards can leave this point during play. Locate landmark 25
Spring Sail. Column 171, row 12. This marks an encounter position. Moving hazards can leave this point during play. Locate landmark 26
Freight Drum. Column 188, row 6. This marks an encounter position. Moving hazards can leave this point during play. Locate landmark 27
Freight Drum. Column 191, row 4. This marks an encounter position. Moving hazards can leave this point during play. Locate landmark 28
Phobos night yard · panel 1 of 5 · columns 0–40
209 columns by 15 rows. Full room at the start of a flight. Brown tile marks soil, brick or steps. A gold-topped tread is a platform. Green mouths mark ducts. Amber dots mark encounters.
1. Night shift begins · 5. Spring Sail · 6. Spring Sail · 7. Duct Tap · 8. Parcel Roller · 9. Duct Tap
Phobos night yard · panel 2 of 5 · columns 40–82
209 columns by 15 rows. Full room at the start of a flight. Brown tile marks soil, brick or steps. A gold-topped tread is a platform. Green mouths mark ducts. Amber dots mark encounters.
10. Parcel Roller ×3 · 11. Duct Tap · 12. Freight Drum · 13. Duct Tap
Phobos night yard · panel 3 of 5 · columns 82–125
209 columns by 15 rows. Full room at the start of a flight. Brown tile marks soil, brick or steps. A gold-topped tread is a platform. Green mouths mark ducts. Amber dots mark encounters.
Phobos night yard · panel 4 of 5 · columns 125–167
209 columns by 15 rows. Full room at the start of a flight. Brown tile marks soil, brick or steps. A gold-topped tread is a platform. Green mouths mark ducts. Amber dots mark encounters.
Phobos night yard · panel 5 of 5 · columns 167–208
209 columns by 15 rows. Full room at the start of a flight. Brown tile marks soil, brick or steps. A gold-topped tread is a platform. Green mouths mark ducts. Amber dots mark encounters.
Night shift begins. Column 2.5, row 12. The yard opens with a 400 clock. A paid retry starts Small at the entrance until you earn halfway. Locate landmark 1
Phobos relay. Column 200, row 10. A low grip works here, too. The pennant settles your clock before Shadow Convoy begins. Locate landmark 2
Phobos night yard · scenery · panel 1 of 5 · columns 0–40
These room-local background columns come from the original Phobos and convoy art bank.
1. Night shift begins
Phobos night yard · scenery · panel 2 of 5 · columns 40–82
These room-local background columns come from the original Phobos and convoy art bank.
Phobos night yard · scenery · panel 3 of 5 · columns 82–125
These room-local background columns come from the original Phobos and convoy art bank.
Phobos night yard · scenery · panel 4 of 5 · columns 125–167
These room-local background columns come from the original Phobos and convoy art bank.
Phobos night yard · scenery · panel 5 of 5 · columns 167–208
These room-local background columns come from the original Phobos and convoy art bank.
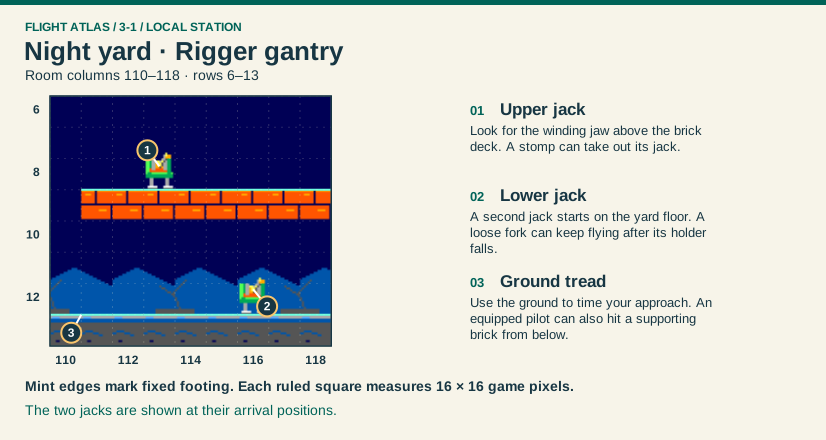
Upper jack. Column 113, row 8. Look for the winding jaw above the brick deck. A stomp can take out its jack. Locate landmark 1
Lower jack. Column 116, row 12. A second jack starts on the yard floor. A loose fork can keep flying after its holder falls. Locate landmark 2
Ground tread. Column 111, row 13. Use the ground to time your approach. An equipped pilot can also hit a supporting brick from below. Locate landmark 3
Night yard · Rigger gantry · local map · panel 1 of 1
123
Night yard · Rigger gantry. Measured room excerpt, columns 110 to 118 and rows 6 to 13. Look for the winding jaw above the brick deck. A stomp can take out its jack. A second jack starts on the yard floor. A loose fork can keep flying after its holder falls. Use the ground to time your approach. An equipped pilot can also hit a supporting brick from below.
Take the surface route to the paired gantry. Stomp the floor jack, or use a tall suit to break its supporting brick from below. Wait for any loose fork to clear.
Return or onward flight
Pass the gantry and take the mast to Shadow Convoy. Your suit and bank travel with you.
This link leads to an optional part of the flight. Open the section below to continue.Continue to the linked placeThis link leads to an optional part of the flight. Open the section below to continue.Continue to the linked placeThis link leads to an optional part of the flight. Open the section below to continue.Continue to the linked placeThis link leads to an optional part of the flight. Open the section below to continue.Continue to the linked placeThis link leads to an optional part of the flight. Open the section below to continue.Continue to the linked placeThis link leads to an optional part of the flight. Open the section below to continue.Continue to the linked placeThis link leads to an optional part of the flight. Open the section below to continue.Continue to the linked placeThis link leads to an optional part of the flight. Open the section below to continue.Continue to the linked placeThis link leads to an optional part of the flight. Open the section below to continue.Continue to the linked placeThis link leads to an optional part of the flight. Open the section below to continue.Continue to the linked placeThis link leads to an optional part of the flight. Open the section below to continue.Continue to the linked placeThis link leads to an optional part of the flight. Open the section below to continue.Continue to the linked placeThis link leads to an optional part of the flight. Open the section below to continue.Continue to the linked placeThis link leads to an optional part of the flight. Open the section below to continue.Continue to the linked placeThis link leads to an optional part of the flight. Open the section below to continue.Continue to the linked placeThis link leads to an optional part of the flight. Open the section below to continue.Continue to the linked placeThis link leads to an optional part of the flight. Open the section below to continue.Continue to the linked placeThis link leads to an optional part of the flight. Open the section below to continue.Continue to the linked placeThis link leads to an optional part of the flight. Open the section below to continue.Continue to the linked placeThis link leads to an optional part of the flight. Open the section below to continue.Continue to the linked placeThis link leads to an optional part of the flight. Open the section below to continue.Continue to the linked placeThis link leads to an optional part of the flight. Open the section below to continue.Continue to the linked placeThis link leads to an optional part of the flight. Open the section below to continue.Continue to the linked placeThis link leads to an optional part of the flight. Open the section below to continue.Continue to the linked placeThis link leads to an optional part of the flight. Open the section below to continue.Continue to the linked placeThis link leads to an optional part of the flight. Open the section below to continue.Continue to the linked placeThis link leads to an optional part of the flight. Open the section below to continue.Continue to the linked placeThis link leads to an optional part of the flight. Open the section below to continue.Continue to the linked placeThis link leads to an optional part of the flight. Open the section below to continue.Continue to the linked placeThis link leads to an optional part of the flight. Open the section below to continue.Continue to the linked placeThis link leads to an optional part of the flight. Open the section below to continue.Continue to the linked place
Even the foils look chilly in here. The Cold Locker has supplies tucked into the brickwork, enough to make CoCoMan linger awhile. When his pockets are full, the duct takes him back to the night shift.
Entry
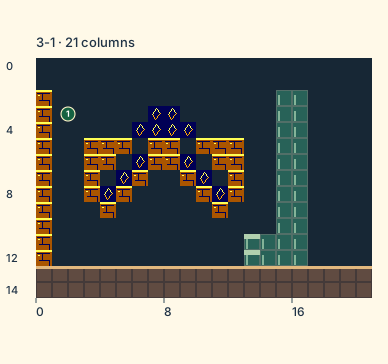
Hold Down at the entrance pipe. Look for twelve foils around the arch and a suit brick. A tall pilot can break ordinary bricks to reach the foil.
Return or onward flight
Walk into the side tube. You rise west of the checkpoint, so continue through the yard to earn it.
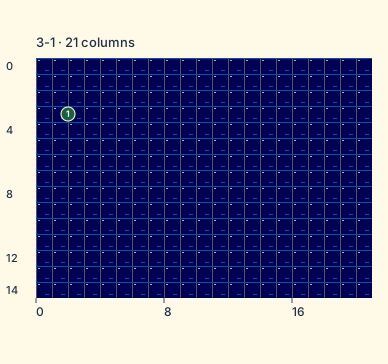
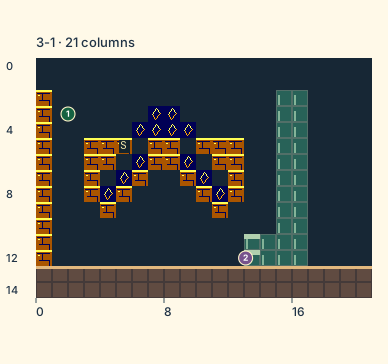
Locker drop. Column 1.5, row 3. You arrive already falling. Give yourself room to land before jumping for supplies. Locate landmark 1
Cold Locker · panel 1 of 1 · columns 0–20
21 columns by 15 rows. Full room at the start of a flight. Brown tile marks soil, brick or steps. A gold-topped tread is a platform. Green mouths mark ducts. Amber dots mark encounters.
1. Locker drop
Open the scenery view
Cold Locker · scenery
These room-local background columns come from the original Phobos and convoy art bank.
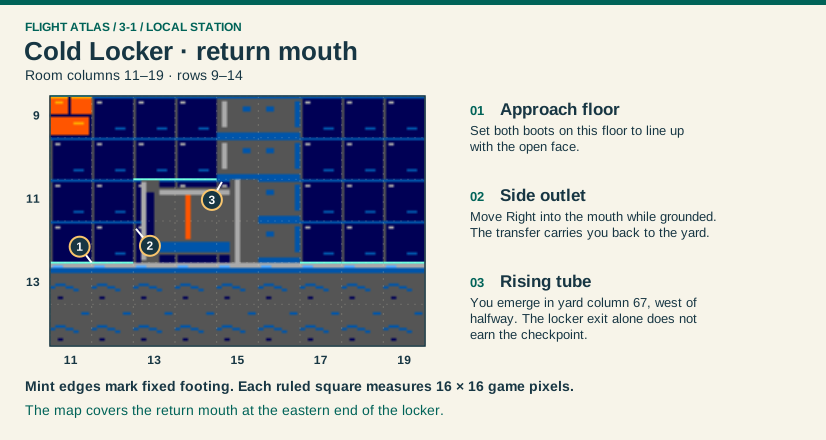
Approach floor. Column 12, row 13. Set both boots on this floor to line up with the open face. Locate landmark 1
Side outlet. Column 13, row 12. Move Right into the mouth while grounded. The transfer carries you back to the yard. Locate landmark 2
Rising tube. Column 15, row 11. You emerge in yard column 67, west of halfway. The locker exit alone does not earn the checkpoint. Locate landmark 3
Cold Locker · return mouth · local map · panel 1 of 1
123
Cold Locker · return mouth. Measured room excerpt, columns 11 to 19 and rows 9 to 14. Set both boots on this floor to line up with the open face. Move Right into the mouth while grounded. The transfer carries you back to the yard. You emerge in yard column 67, west of halfway. The locker exit alone does not earn the checkpoint.
Locker outlet. Column 12.6, row 12. Stand on the floor and walk Right into the open side. You rise in the yard west of halfway. The checkpoint is still ahead if this was your first detour. Locate landmark 1
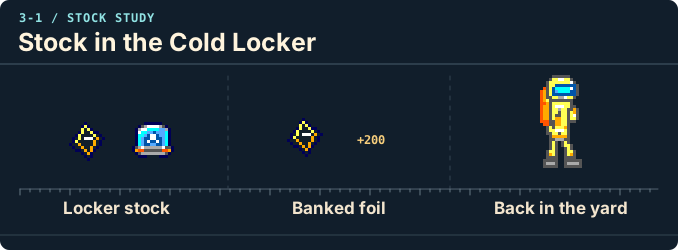
Locker stock. Twelve loose foils and a suit brick are stored in the Cold Locker.
Banked foil. Each foil pays once on this life. Break ordinary bricks with the equipped pilot to reach the arch.
Back in the yard. The locker outlet leaves you west of the checkpoint. Reaching it alone does not earn a halfway retry.
This link leads to an optional part of the flight. Open the section below to continue.Continue to the linked placeThis link leads to an optional part of the flight. Open the section below to continue.Continue to the linked placeThis link leads to an optional part of the flight. Open the section below to continue.Continue to the linked placeThis link leads to an optional part of the flight. Open the section below to continue.Continue to the linked placeThis link leads to an optional part of the flight. Open the section below to continue.Continue to the linked placeThis link leads to an optional part of the flight. Open the section below to continue.Continue to the linked placeThis link leads to an optional part of the flight. Open the section below to continue.Continue to the linked placeThis link leads to an optional part of the flight. Open the section below to continue.Continue to the linked placeThis link leads to an optional part of the flight. Open the section below to continue.Continue to the linked placeThis link leads to an optional part of the flight. Open the section below to continue.Continue to the linked placeThis link leads to an optional part of the flight. Open the section below to continue.Continue to the linked placeThis link leads to an optional part of the flight. Open the section below to continue.Continue to the linked placeThis link leads to an optional part of the flight. Open the section below to continue.Continue to the linked placeThis link leads to an optional part of the flight. Open the section below to continue.Continue to the linked placeThis link leads to an optional part of the flight. Open the section below to continue.Continue to the linked placeThis link leads to an optional part of the flight. Open the section below to continue.Continue to the linked placeThis link leads to an optional part of the flight. Open the section below to continue.Continue to the linked placeThis link leads to an optional part of the flight. Open the section below to continue.Continue to the linked placeThis link leads to an optional part of the flight. Open the section below to continue.Continue to the linked placeThis link leads to an optional part of the flight. Open the section below to continue.Continue to the linked placeThis link leads to an optional part of the flight. Open the section below to continue.Continue to the linked placeThis link leads to an optional part of the flight. Open the section below to continue.Continue to the linked placeThis link leads to an optional part of the flight. Open the section below to continue.Continue to the linked placeThis link leads to an optional part of the flight. Open the section below to continue.Continue to the linked placeThis link leads to an optional part of the flight. Open the section below to continue.Continue to the linked placeThis link leads to an optional part of the flight. Open the section below to continue.Continue to the linked placeThis link leads to an optional part of the flight. Open the section below to continue.Continue to the linked placeThis link leads to an optional part of the flight. Open the section below to continue.Continue to the linked placeThis link leads to an optional part of the flight. Open the section below to continue.Continue to the linked placeThis link leads to an optional part of the flight. Open the section below to continue.Continue to the linked placeThis link leads to an optional part of the flight. Open the section below to continue.Continue to the linked placeThis link leads to an optional part of the flight. Open the section below to continue.Continue to the linked placeThis link leads to an optional part of the flight. Open the section below to continue.Continue to the linked placeThis link leads to an optional part of the flight. Open the section below to continue.Continue to the linked placeThis link leads to an optional part of the flight. Open the section below to continue.Continue to the linked place
The boom lifts CoCoMan to a cableway strung high over the night yard. Foils gleam along the route. For a courier who has spent the shift dodging flying tools, a ride with a view is a pretty good perk.
Entry
Bump the loading-boom brick and climb. The freight deck waits until you land on it, then rolls beneath you as you jump for the foil bands.
Return or onward flight
Drop early or ride to the far drop while time remains. Both return you to the yard with halfway earned. Be ready to steer near the Spring Sail.
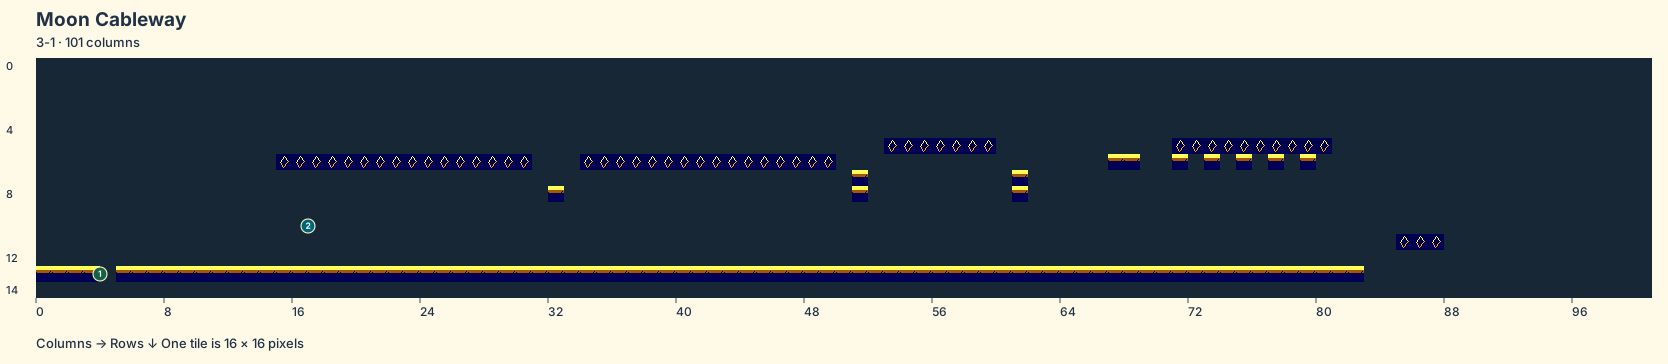
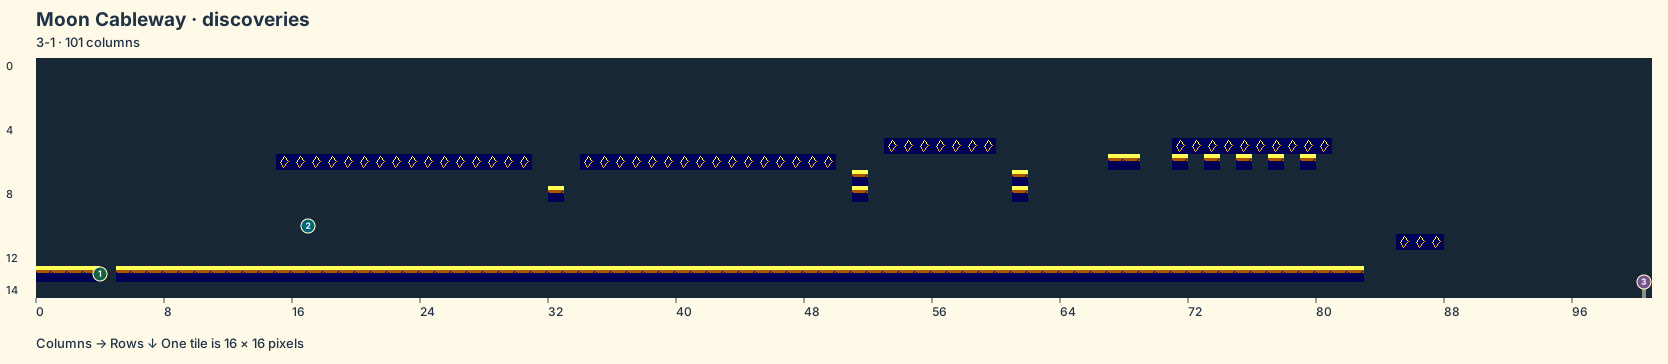
Boom sleeve. Column 3.5, row 13. The boom brings you up from below. Steering resumes after the pilot steps off. Locate landmark 1
Freight deck. Column 16.5, row 10. Drop onto the tread to start the motor. If you jump again, the deck keeps rolling beneath you. Locate landmark 2
Moon Cableway · panel 1 of 2 · columns 0–49
101 columns by 15 rows. Full room at the start of a flight. Brown tile marks soil, brick or steps. A gold-topped tread is a platform. Green mouths mark ducts. Amber dots mark encounters.
1. Boom sleeve · 2. Freight deck
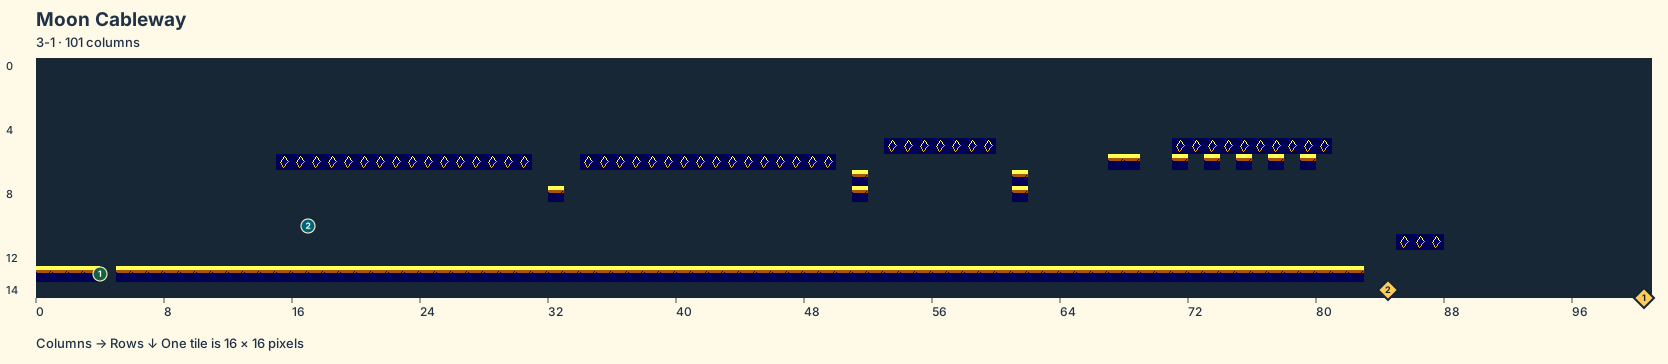
Moon Cableway · panel 2 of 2 · columns 49–100
101 columns by 15 rows. Full room at the start of a flight. Brown tile marks soil, brick or steps. A gold-topped tread is a platform. Green mouths mark ducts. Amber dots mark encounters.
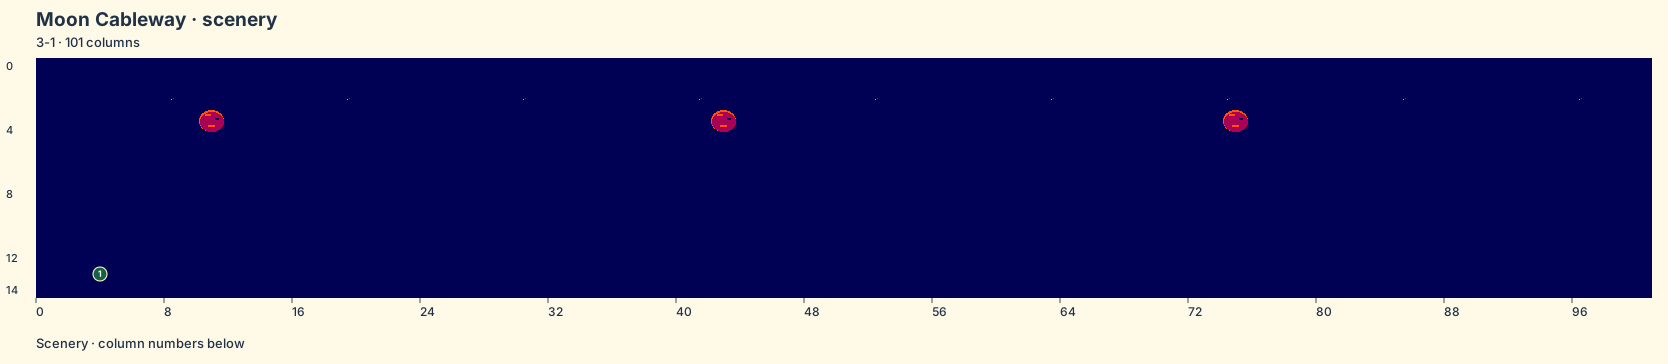
Open the scenery view
Moon Cableway · scenery
These room-local background columns come from the original Phobos and convoy art bank.
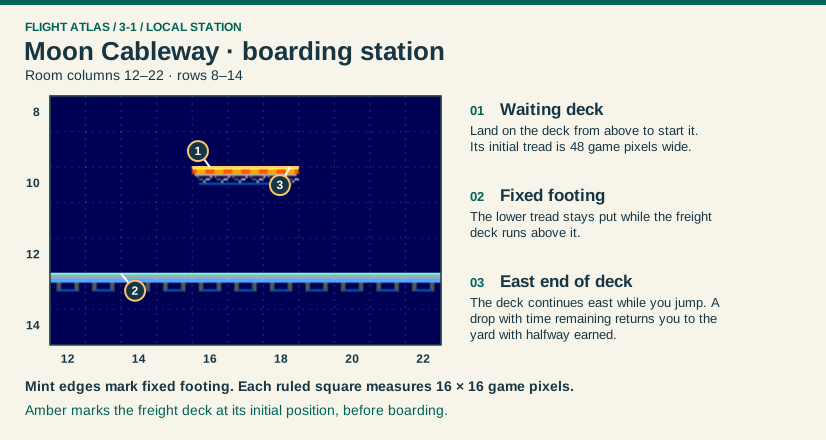
Waiting deck. Column 16, row 10. Land on the deck from above to start it. Its initial tread is 48 game pixels wide. Locate landmark 1
Fixed footing. Column 14, row 13. The lower tread stays put while the freight deck runs above it. Locate landmark 2
East end of deck. Column 18, row 10. The deck continues east while you jump. A drop with time remaining returns you to the yard with halfway earned. Locate landmark 3
Moon Cableway · boarding station · local map · panel 1 of 1
123
Moon Cableway · boarding station. Measured room excerpt, columns 12 to 22 and rows 8 to 14. Land on the deck from above to start it. Its initial tread is 48 game pixels wide. The lower tread stays put while the freight deck runs above it. The deck continues east while you jump. A drop with time remaining returns you to the yard with halfway earned.
1. Waiting deck · 2. Fixed footing · 3. East end of deck
Far drop. Column 100, row 14.5. Dropping here, or earlier in the run, returns you to the yard with halfway earned while time remains. Be ready to steer on arrival. Locate landmark 1
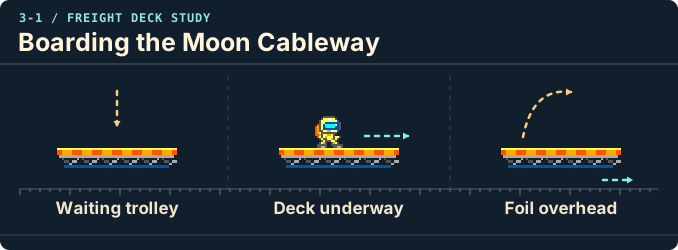
Waiting trolley. At the top of the loading boom, the freight deck waits for a landing from above.
Deck underway. The boarded deck advances one pixel per field. It continues under a jumping pilot.
Foil overhead. Jump for the cableway’s foil or drop back to the night yard. A drop with time left latches halfway.
This link leads to an optional part of the flight. Open the section below to continue.Continue to the linked placeThis link leads to an optional part of the flight. Open the section below to continue.Continue to the linked placeThis link leads to an optional part of the flight. Open the section below to continue.Continue to the linked placeThis link leads to an optional part of the flight. Open the section below to continue.Continue to the linked placeThis link leads to an optional part of the flight. Open the section below to continue.Continue to the linked placeThis link leads to an optional part of the flight. Open the section below to continue.Continue to the linked placeThis link leads to an optional part of the flight. Open the section below to continue.Continue to the linked placeThis link leads to an optional part of the flight. Open the section below to continue.Continue to the linked placeThis link leads to an optional part of the flight. Open the section below to continue.Continue to the linked placeThis link leads to an optional part of the flight. Open the section below to continue.Continue to the linked placeThis link leads to an optional part of the flight. Open the section below to continue.Continue to the linked placeThis link leads to an optional part of the flight. Open the section below to continue.Continue to the linked placeThis link leads to an optional part of the flight. Open the section below to continue.Continue to the linked placeThis link leads to an optional part of the flight. Open the section below to continue.Continue to the linked placeThis link leads to an optional part of the flight. Open the section below to continue.Continue to the linked placeThis link leads to an optional part of the flight. Open the section below to continue.Continue to the linked placeThis link leads to an optional part of the flight. Open the section below to continue.Continue to the linked placeThis link leads to an optional part of the flight. Open the section below to continue.Continue to the linked placeThis link leads to an optional part of the flight. Open the section below to continue.Continue to the linked placeThis link leads to an optional part of the flight. Open the section below to continue.Continue to the linked placeThis link leads to an optional part of the flight. Open the section below to continue.Continue to the linked placeThis link leads to an optional part of the flight. Open the section below to continue.Continue to the linked placeThis link leads to an optional part of the flight. Open the section below to continue.Continue to the linked placeThis link leads to an optional part of the flight. Open the section below to continue.Continue to the linked placeThis link leads to an optional part of the flight. Open the section below to continue.Continue to the linked placeThis link leads to an optional part of the flight. Open the section below to continue.Continue to the linked placeThis link leads to an optional part of the flight. Open the section below to continue.Continue to the linked placeThis link leads to an optional part of the flight. Open the section below to continue.Continue to the linked placeThis link leads to an optional part of the flight. Open the section below to continue.Continue to the linked placeThis link leads to an optional part of the flight. Open the section below to continue.Continue to the linked placeThis link leads to an optional part of the flight. Open the section below to continue.Continue to the linked placeThis link leads to an optional part of the flight. Open the section below to continue.Continue to the linked placeThis link leads to an optional part of the flight. Open the section below to continue.Continue to the linked placeThis link leads to an optional part of the flight. Open the section below to continue.Continue to the linked placeThis link leads to an optional part of the flight. Open the section below to continue.Continue to the linked placeThis link leads to an optional part of the flight. Open the section below to continue.Continue to the linked placeThis link leads to an optional part of the flight. Open the section below to continue.Continue to the linked placeThis link leads to an optional part of the flight. Open the section below to continue.Continue to the linked placeThis link leads to an optional part of the flight. Open the section below to continue.Continue to the linked placeThis link leads to an optional part of the flight. Open the section below to continue.Continue to the linked placeThis link leads to an optional part of the flight. Open the section below to continue.Continue to the linked placeThis link leads to an optional part of the flight. Open the section below to continue.Continue to the linked placeThis link leads to an optional part of the flight. Open the section below to continue.Continue to the linked placeThis link leads to an optional part of the flight. Open the section below to continue.Continue to the linked placeThis link leads to an optional part of the flight. Open the section below to continue.Continue to the linked placeThis link leads to an optional part of the flight. Open the section below to continue.Continue to the linked placeThis link leads to an optional part of the flight. Open the section below to continue.Continue to the linked placeThis link leads to an optional part of the flight. Open the section below to continue.Continue to the linked placeThis link leads to an optional part of the flight. Open the section below to continue.Continue to the linked placeThis link leads to an optional part of the flight. Open the section below to continue.Continue to the linked placeThis link leads to an optional part of the flight. Open the section below to continue.Continue to the linked placeThis link leads to an optional part of the flight. Open the section below to continue.Continue to the linked placeThis link leads to an optional part of the flight. Open the section below to continue.Continue to the linked placeThis link leads to an optional part of the flight. Open the section below to continue.Continue to the linked placeThis link leads to an optional part of the flight. Open the section below to continue.Continue to the linked placeThis link leads to an optional part of the flight. Open the section below to continue.Continue to the linked placeThis link leads to an optional part of the flight. Open the section below to continue.Continue to the linked place
Night shift begins. Column 2.5, row 12. The yard opens with a 400 clock. A paid retry starts Small at the entrance until you earn halfway. Locate landmark 1
Upper Spanner Rigger. Column 113.5, row 8.25. The jaw raises its fork before throwing it. A descending stomp on the jack earns 1,000. Locate landmark 2
Lower Spanner Rigger. Column 116.5, row 12.2. The second jack has its own timing. A fork that has left either jaw can still hit you after the jack falls. Locate landmark 3
Phobos relay. Column 200, row 10. A low grip works here, too. The pennant settles your clock before Shadow Convoy begins. Locate landmark 4
Spring Sail. Column 25, row 12. This marks an encounter position. Moving hazards can leave this point during play. Locate landmark 5
Spring Sail. Column 28, row 11. This marks an encounter position. Moving hazards can leave this point during play. Locate landmark 6
Duct Tap. Column 32, row 10. This marks an encounter position. Moving hazards can leave this point during play. Locate landmark 7
Parcel Roller. Column 37, row 12. This marks an encounter position. Moving hazards can leave this point during play. Locate landmark 8
Duct Tap. Column 38, row 9. This marks an encounter position. Moving hazards can leave this point during play. Locate landmark 9
Parcel Roller ×3. Column 56, row 12. This marks an encounter position. Moving hazards can leave this point during play. Locate landmark 10
Duct Tap. Column 57, row 10. This marks an encounter position. Moving hazards can leave this point during play. Locate landmark 11
Freight Drum. Column 65, row 12. This marks an encounter position. Moving hazards can leave this point during play. Locate landmark 12
Duct Tap. Column 67, row 11. This marks an encounter position. Moving hazards can leave this point during play. Locate landmark 13
Parcel Roller ×3. Column 85, row 8. This marks an encounter position. Moving hazards can leave this point during play. Locate landmark 14
Parcel Roller ×2. Column 97, row 12. This marks an encounter position. Moving hazards can leave this point during play. Locate landmark 15
Freight Drum. Column 101, row 12. This marks an encounter position. Moving hazards can leave this point during play. Locate landmark 16
Duct Tap. Column 103, row 9. This marks an encounter position. Moving hazards can leave this point during play. Locate landmark 17
Parcel Roller. Column 139, row 8. This marks an encounter position. Moving hazards can leave this point during play. Locate landmark 18
Parcel Roller. Column 140, row 7. This marks an encounter position. Moving hazards can leave this point during play. Locate landmark 19
Freight Drum. Column 149, row 12. This marks an encounter position. Moving hazards can leave this point during play. Locate landmark 20
Freight Drum. Column 152, row 4. This marks an encounter position. Moving hazards can leave this point during play. Locate landmark 21
Parcel Roller ×3. Column 157, row 12. This marks an encounter position. Moving hazards can leave this point during play. Locate landmark 22
Spring Sail. Column 165, row 12. This marks an encounter position. Moving hazards can leave this point during play. Locate landmark 23
Spring Sail. Column 168, row 11. This marks an encounter position. Moving hazards can leave this point during play. Locate landmark 24
Freight Drum. Column 170, row 7. This marks an encounter position. Moving hazards can leave this point during play. Locate landmark 25
Spring Sail. Column 171, row 12. This marks an encounter position. Moving hazards can leave this point during play. Locate landmark 26
Freight Drum. Column 188, row 6. This marks an encounter position. Moving hazards can leave this point during play. Locate landmark 27
Freight Drum. Column 191, row 4. This marks an encounter position. Moving hazards can leave this point during play. Locate landmark 28
Phobos night yard · discoveries · panel 1 of 5 · columns 0–40
209 columns by 15 rows. Full room with marked rewards and optional landmarks. Brown tile marks soil, brick or steps. A gold-topped tread is a platform. Green mouths mark ducts. Amber dots mark encounters.
1. Night shift begins · 5. Spring Sail · 6. Spring Sail · 7. Duct Tap · 8. Parcel Roller · 9. Duct Tap
Phobos night yard · discoveries · panel 2 of 5 · columns 40–82
209 columns by 15 rows. Full room with marked rewards and optional landmarks. Brown tile marks soil, brick or steps. A gold-topped tread is a platform. Green mouths mark ducts. Amber dots mark encounters.
10. Parcel Roller ×3 · 11. Duct Tap · 12. Freight Drum · 13. Duct Tap
Phobos night yard · discoveries · panel 3 of 5 · columns 82–125
209 columns by 15 rows. Full room with marked rewards and optional landmarks. Brown tile marks soil, brick or steps. A gold-topped tread is a platform. Green mouths mark ducts. Amber dots mark encounters.
Phobos night yard · discoveries · panel 4 of 5 · columns 125–167
209 columns by 15 rows. Full room with marked rewards and optional landmarks. Brown tile marks soil, brick or steps. A gold-topped tread is a platform. Green mouths mark ducts. Amber dots mark encounters.
Phobos night yard · discoveries · panel 5 of 5 · columns 167–208
209 columns by 15 rows. Full room with marked rewards and optional landmarks. Brown tile marks soil, brick or steps. A gold-topped tread is a platform. Green mouths mark ducts. Amber dots mark encounters.
This link leads to an optional part of the flight. Open the section below to continue.Continue to the linked placeThis link leads to an optional part of the flight. Open the section below to continue.Continue to the linked placeThis link leads to an optional part of the flight. Open the section below to continue.Continue to the linked placeThis link leads to an optional part of the flight. Open the section below to continue.Continue to the linked placeThis link leads to an optional part of the flight. Open the section below to continue.Continue to the linked place
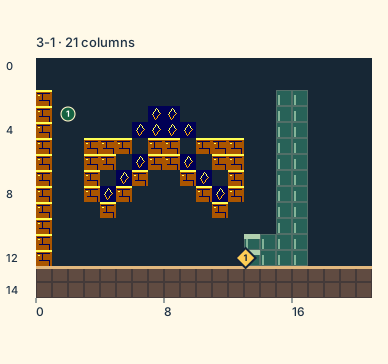
Locker drop. Column 1.5, row 3. You arrive already falling. Give yourself room to land before jumping for supplies. Locate landmark 1
Locker outlet. Column 12.6, row 12. Stand on the floor and walk Right into the open side. You rise in the yard west of halfway. The checkpoint is still ahead if this was your first detour. Locate landmark 2
21 columns by 15 rows. Full room with marked rewards and optional landmarks. Brown tile marks soil, brick or steps. A gold-topped tread is a platform. Green mouths mark ducts. Amber dots mark encounters.
1. Locker drop · 2. Locker outlet
This link leads to an optional part of the flight. Open the section below to continue.Continue to the linked placeThis link leads to an optional part of the flight. Open the section below to continue.Continue to the linked placeThis link leads to an optional part of the flight. Open the section below to continue.Continue to the linked placeThis link leads to an optional part of the flight. Open the section below to continue.Continue to the linked placeThis link leads to an optional part of the flight. Open the section below to continue.Continue to the linked placeThis link leads to an optional part of the flight. Open the section below to continue.Continue to the linked placeThis link leads to an optional part of the flight. Open the section below to continue.Continue to the linked place
Boom sleeve. Column 3.5, row 13. The boom brings you up from below. Steering resumes after the pilot steps off. Locate landmark 1
Freight deck. Column 16.5, row 10. Drop onto the tread to start the motor. If you jump again, the deck keeps rolling beneath you. Locate landmark 2
Far drop. Column 100, row 14.5. Dropping here, or earlier in the run, returns you to the yard with halfway earned while time remains. Be ready to steer on arrival. Locate landmark 3
101 columns by 15 rows. Full room with marked rewards and optional landmarks. Brown tile marks soil, brick or steps. A gold-topped tread is a platform. Green mouths mark ducts. Amber dots mark encounters.
101 columns by 15 rows. Full room with marked rewards and optional landmarks. Brown tile marks soil, brick or steps. A gold-topped tread is a platform. Green mouths mark ducts. Amber dots mark encounters.
 To Titan and Back