


Back to VCC Plus Games
CoCoManTo Titan and Back
Course 2-4

Pump Station Two

Pip is somewhere beyond a hall full of spinning heat arms. There’s a way over the gallery and a way underneath, and from the entrance both look just possible. CoCoMan picks his moment. He wants those pumps running and he'd like to keep the soles on his boots.

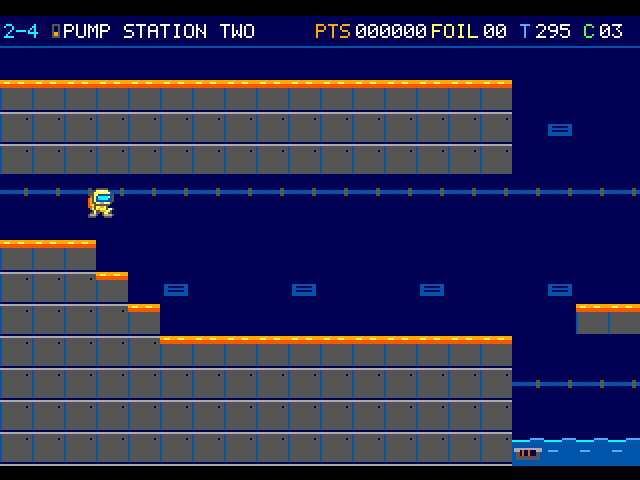
Gray panels frame the pump station. The courier descends along short orange-edged steps above the lower floor.

On the flight

Use a copper-topped island as a lookout for the broken orange vent rings. The paired grilles move through the shaft while a separate heat arm reverses over the far landing.

Course map

Pump Station Two

Read each moving part separately. A broken vent ring rises, a hot arm swings around its fixed socket, and a grille passes through the shaft. You can stand on the moving grille once your boots land on top.

Open the scenery view

Open the full-size illustration

  1. Pump intake. Column 2, row 6. You begin on the intake landing. A lost life before the dispatch brings you back here. Locate landmark 1
  2. Rotor socket. Column 49, row 9. Watch the hot beads turn around this mount. The upper gallery and lower lane meet again before the lift shaft. Locate landmark 2
  3. West lift shaft. Column 85.75, row 9. Watch the rising grilles from the fixed landing. Board from above and jump free when the next landing is in reach. The treads change height. Locate landmark 3
  4. Pump cutoff. Column 141, row 8. Use the carrier or cross the bridge past Backpressure to reach the physical cutoff. Both routes lead on to Pip. Locate landmark 4

    Follow the optional transfer

  5. Pip's dispatch. Column 153, row 11.5. Let both parts of Pip's message finish to continue to the Phobos night shift. Locate landmark 5

    Take Pip’s dispatch to the Phobos night yard. · Night shift begins

  6. Thermal rotor pivot. Column 55, row 5. This marks an encounter position. Moving hazards can leave this point during play. Locate landmark 6
  7. Thermal rotor pivot. Column 61, row 9. This marks an encounter position. Moving hazards can leave this point during play. Locate landmark 7
  8. Thermal rotor pivot. Column 73, row 9. This marks an encounter position. Moving hazards can leave this point during play. Locate landmark 8
  9. Thermal rotor pivot. Column 82, row 6. This marks an encounter position. Moving hazards can leave this point during play. Locate landmark 9
  10. Thermal rotor pivot. Column 92, row 10. This marks an encounter position. Moving hazards can leave this point during play. Locate landmark 10
Open the scenery view

Pump Station Two · scenery

The background shows the Pump Station’s recessed grilles, service conduits, lift guides and coolant. The wall pattern continues behind the machinery.

Open the terrain view

Open the full-size illustration

  1. Pump intake. Column 2, row 6. You begin on the intake landing. A lost life before the dispatch brings you back here. Locate landmark 1
  2. Pump cutoff. Column 141, row 8. Use the carrier or cross the bridge past Backpressure to reach the physical cutoff. Both routes lead on to Pip. Locate landmark 2
  3. Pip's dispatch. Column 153, row 11.5. Let both parts of Pip's message finish to continue to the Phobos night shift. Locate landmark 3

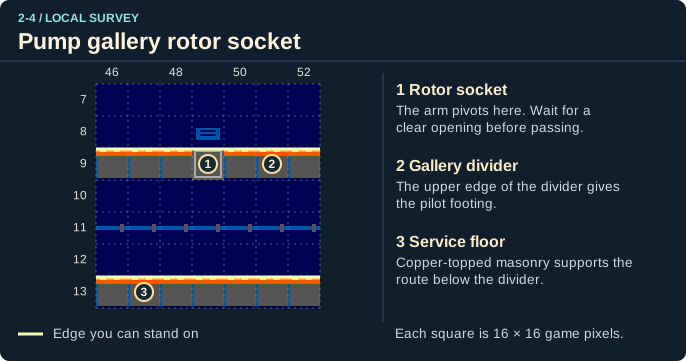
Pump gallery rotor socket

Local map · columns 46–52, rows 7–13.

Open the full-size illustration

  1. Rotor socket. Column 49, row 9. The arm pivots here. Wait for a clear opening before passing. Locate landmark 1
  2. Gallery divider. Column 51, row 9. The upper edge of the divider gives the pilot footing. Locate landmark 2
  3. Service floor. Column 47, row 13. Copper-topped masonry supports the route below the divider. Locate landmark 3

Landing on a pump grille

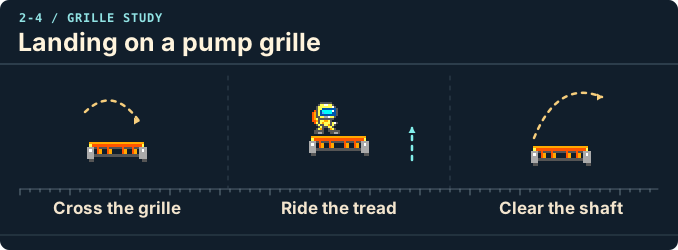
Cross the grille, Ride the tread, Clear the shaft.

Open the original-size illustration

  • Cross the grille. Move up through the open grille, then let your boots come down on the bright tread.
  • Ride the tread. The grille carries a rider as it travels. The two shafts move in opposite directions.
  • Clear the shaft. Jump off the tread and watch the far landing for the reversing heat arm.

Landmarks to recognize

Vent ring
Watch the broken orange ring rise and fall before leaving your island.
Moving grille
Land on the top tread to ride it. Check the far landing while you are still on the grille.
Give me a hint

There is more than one crossing at the bridge. Watch the overhead carrier, the Warden and the plasma as three separate movements.

Routes and discoveries

This link leads to an optional part of the flight. Open the section below to continue.Continue to the linked place

Pump Station Two

Entry

Choose the upper gallery or lower service lane, then ride a grille or take a running jump across the shaft. At the bridge, use the carrier or pass Backpressure on the direct line.

Return or onward flight

The east cutoff opens Pip's dispatch to Phobos. An Arc pilot can first earn 5,000 with five sparks. Before the cutoff you can turn back for loose foil. A lost life restarts at the intake.

This link leads to an optional part of the flight. Open the section below to continue.Continue to the linked placeThis link leads to an optional part of the flight. Open the section below to continue.Continue to the linked placeThis link leads to an optional part of the flight. Open the section below to continue.Continue to the linked placeThis link leads to an optional part of the flight. Open the section below to continue.Continue to the linked placeThis link leads to an optional part of the flight. Open the section below to continue.Continue to the linked placeThis link leads to an optional part of the flight. Open the section below to continue.Continue to the linked placeThis link leads to an optional part of the flight. Open the section below to continue.Continue to the linked placeThis link leads to an optional part of the flight. Open the section below to continue.Continue to the linked placeThis link leads to an optional part of the flight. Open the section below to continue.Continue to the linked placeThis link leads to an optional part of the flight. Open the section below to continue.Continue to the linked placeThis link leads to an optional part of the flight. Open the section below to continue.Continue to the linked placeThis link leads to an optional part of the flight. Open the section below to continue.Continue to the linked placeThis link leads to an optional part of the flight. Open the section below to continue.Continue to the linked placeThis link leads to an optional part of the flight. Open the section below to continue.Continue to the linked placeThis link leads to an optional part of the flight. Open the section below to continue.Continue to the linked placeThis link leads to an optional part of the flight. Open the section below to continue.Continue to the linked placeThis link leads to an optional part of the flight. Open the section below to continue.Continue to the linked placeThis link leads to an optional part of the flight. Open the section below to continue.Continue to the linked placeThis link leads to an optional part of the flight. Open the section below to continue.Continue to the linked placeThis link leads to an optional part of the flight. Open the section below to continue.Continue to the linked placeThis link leads to an optional part of the flight. Open the section below to continue.Continue to the linked placeThis link leads to an optional part of the flight. Open the section below to continue.Continue to the linked placeThis link leads to an optional part of the flight. Open the section below to continue.Continue to the linked place

Pump Station Two · discoveries

Read each moving part separately. A broken vent ring rises, a hot arm swings around its fixed socket, and a grille passes through the shaft. You can stand on the moving grille once your boots land on top.

Open the full-size illustration

  1. Pump intake. Column 2, row 6. You begin on the intake landing. A lost life before the dispatch brings you back here. Locate landmark 1
  2. Rotor socket. Column 49, row 9. Watch the hot beads turn around this mount. The upper gallery and lower lane meet again before the lift shaft. Locate landmark 2
  3. West lift shaft. Column 85.75, row 9. Watch the rising grilles from the fixed landing. Board from above and jump free when the next landing is in reach. The treads change height. Locate landmark 3
  4. Pump cutoff. Column 141, row 8. Use the carrier or cross the bridge past Backpressure to reach the physical cutoff. Both routes lead on to Pip. Locate landmark 4
  5. Arc finish. Column 141, row 8. You can land five Arc sparks before taking the cutoff. The defeat pays 5,000 and the relay still reaches Pip. Locate landmark 5
  6. Pip's dispatch. Column 153, row 11.5. Let both parts of Pip's message finish to continue to the Phobos night shift. Locate landmark 6
  7. Thermal rotor pivot. Column 55, row 5. This marks an encounter position. Moving hazards can leave this point during play. Locate landmark 7
  8. Thermal rotor pivot. Column 61, row 9. This marks an encounter position. Moving hazards can leave this point during play. Locate landmark 8
  9. Thermal rotor pivot. Column 73, row 9. This marks an encounter position. Moving hazards can leave this point during play. Locate landmark 9
  10. Thermal rotor pivot. Column 82, row 6. This marks an encounter position. Moving hazards can leave this point during play. Locate landmark 10
  11. Thermal rotor pivot. Column 92, row 10. This marks an encounter position. Moving hazards can leave this point during play. Locate landmark 11