The red yard outside the brineworks has enough pipes and lifting gear to keep a curious courier busy all afternoon. Unfortunately, the things patrolling it have the afternoon free too. CoCoMan sets off for the mast with one eye on the machinery and the other on anything shiny.
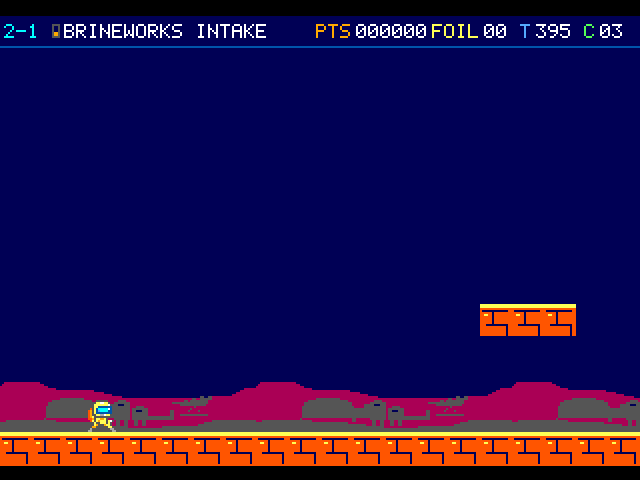
A broad, dark sky silhouettes the Mars yard. The courier moves along the metal deck beneath a short floating brick platform.
On the flight
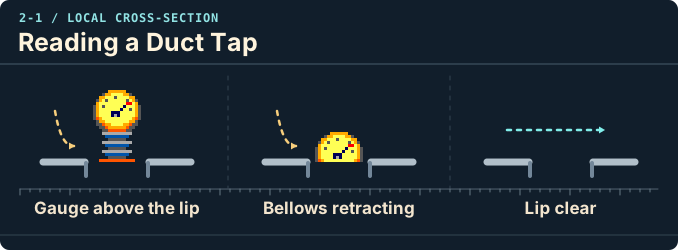
Watch each Duct Tap draw its gauge below the lip before stepping over it. At the yard wall, look for the moment the spring compresses under your boots.
Course map
Brineworks Intake
On the dry intake yard, watch a Duct Tap until its gauge retracts below the lip. A spring-mounted Sail tucks its piston on landing. Stomp it once and a walking Freight Drum remains.
Intake apron. Column 2, row 12. Mara's relay brings the courier to this dry apron. You can take the yard all the way to the mast. Locate landmark 1
Intake gauge. Column 46, row 9. The Duct Tap's bellows can still hurt while withdrawing. Wait until its face is below the rim. Locate landmark 2
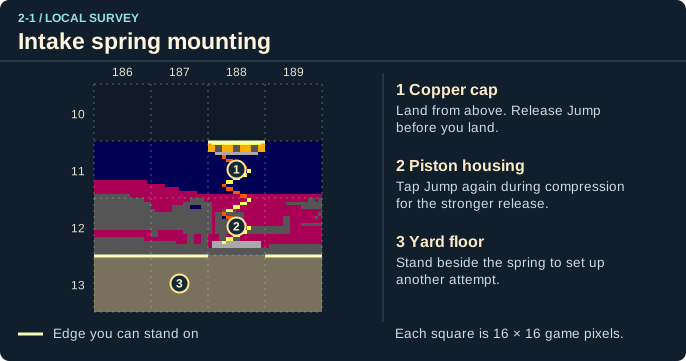
Yard spring. Column 188, row 11. Release Jump before landing, then press it again while the spring is compressed for a higher rebound. Locate landmark 3
Pressure Garden relay. Column 200, row 2. Catch the pennant to finish the intake run and head for the pressure lock. Locate landmark 4
Parcel Roller. Column 24, row 6. This marks an encounter position. Moving hazards can leave this point during play. Locate landmark 5
Freight Drum. Column 32, row 12. This marks an encounter position. Moving hazards can leave this point during play. Locate landmark 6
Freight Drum. Column 33, row 12. This marks an encounter position. Moving hazards can leave this point during play. Locate landmark 7
Parcel Roller ×2. Column 45, row 12. This marks an encounter position. Moving hazards can leave this point during play. Locate landmark 8
Freight Drum. Column 55, row 8. This marks an encounter position. Moving hazards can leave this point during play. Locate landmark 9
Parcel Roller ×2. Column 62, row 12. This marks an encounter position. Moving hazards can leave this point during play. Locate landmark 10
Freight Drum. Column 66, row 12. This marks an encounter position. Moving hazards can leave this point during play. Locate landmark 11
Parcel Roller ×3. Column 71, row 12. This marks an encounter position. Moving hazards can leave this point during play. Locate landmark 12
Duct Tap. Column 74, row 9. This marks an encounter position. Moving hazards can leave this point during play. Locate landmark 13
Parcel Roller ×3. Column 90, row 12. This marks an encounter position. Moving hazards can leave this point during play. Locate landmark 14
Parcel Roller. Column 103, row 8. This marks an encounter position. Moving hazards can leave this point during play. Locate landmark 15
Parcel Roller. Column 116, row 10. This marks an encounter position. Moving hazards can leave this point during play. Locate landmark 16
Parcel Roller. Column 120, row 12. This marks an encounter position. Moving hazards can leave this point during play. Locate landmark 17
Duct Tap. Column 122, row 9. This marks an encounter position. Moving hazards can leave this point during play. Locate landmark 18
Duct Tap. Column 126, row 10. This marks an encounter position. Moving hazards can leave this point during play. Locate landmark 19
Duct Tap. Column 130, row 8. This marks an encounter position. Moving hazards can leave this point during play. Locate landmark 20
Freight Drum. Column 137, row 12. This marks an encounter position. Moving hazards can leave this point during play. Locate landmark 21
Spring Sail. Column 151, row 12. This marks an encounter position. Moving hazards can leave this point during play. Locate landmark 22
Parcel Roller ×2. Column 165, row 12. This marks an encounter position. Moving hazards can leave this point during play. Locate landmark 23
Spring Sail. Column 169, row 12. This marks an encounter position. Moving hazards can leave this point during play. Locate landmark 24
Spring Sail. Column 171, row 12. This marks an encounter position. Moving hazards can leave this point during play. Locate landmark 25
Duct Tap. Column 176, row 10. This marks an encounter position. Moving hazards can leave this point during play. Locate landmark 26
Freight Drum. Column 185, row 12. This marks an encounter position. Moving hazards can leave this point during play. Locate landmark 27
Brineworks Intake · panel 1 of 5 · columns 0–40
209 columns by 15 rows. Full room at the start of a flight. Brown tile marks soil, brick or steps. A gold-topped tread is a platform. Green mouths mark ducts. Amber dots mark encounters.
209 columns by 15 rows. Full room at the start of a flight. Brown tile marks soil, brick or steps. A gold-topped tread is a platform. Green mouths mark ducts. Amber dots mark encounters.
209 columns by 15 rows. Full room at the start of a flight. Brown tile marks soil, brick or steps. A gold-topped tread is a platform. Green mouths mark ducts. Amber dots mark encounters.
Brineworks Intake · panel 4 of 5 · columns 125–167
209 columns by 15 rows. Full room at the start of a flight. Brown tile marks soil, brick or steps. A gold-topped tread is a platform. Green mouths mark ducts. Amber dots mark encounters.
19. Duct Tap · 20. Duct Tap · 21. Freight Drum · 22. Spring Sail · 23. Parcel Roller ×2
Brineworks Intake · panel 5 of 5 · columns 167–208
209 columns by 15 rows. Full room at the start of a flight. Brown tile marks soil, brick or steps. A gold-topped tread is a platform. Green mouths mark ducts. Amber dots mark encounters.
3. Yard spring · 4. Pressure Garden relay · 24. Spring Sail · 25. Spring Sail · 26. Duct Tap · 27. Freight Drum
Open the scenery view
Brineworks Intake · scenery
The native Martian horizon repeats along the two low rows behind the yard.
Copper cap. Column 188, row 11. Land from above. Release Jump before you land. Locate landmark 1
Piston housing. Column 188, row 12. Tap Jump again during compression for the stronger release. Locate landmark 2
Yard floor. Column 187, row 13. Stand beside the spring to set up another attempt. Locate landmark 3
Intake spring mounting · panel 1 of 1
123
Local section of surface, columns 186 to 189, rows 10 to 13. Column 188, row 11. Land from above. Release Jump before you land. Column 188, row 12. Tap Jump again during compression for the stronger release. Column 187, row 13. Stand beside the spring to set up another attempt.
This link leads to an optional part of the flight. Open the section below to continue.Continue to the linked placeThis link leads to an optional part of the flight. Open the section below to continue.Continue to the linked placeThis link leads to an optional part of the flight. Open the section below to continue.Continue to the linked placeThis link leads to an optional part of the flight. Open the section below to continue.Continue to the linked placeThis link leads to an optional part of the flight. Open the section below to continue.Continue to the linked placeThis link leads to an optional part of the flight. Open the section below to continue.Continue to the linked placeThis link leads to an optional part of the flight. Open the section below to continue.Continue to the linked placeThis link leads to an optional part of the flight. Open the section below to continue.Continue to the linked placeThis link leads to an optional part of the flight. Open the section below to continue.Continue to the linked placeThis link leads to an optional part of the flight. Open the section below to continue.Continue to the linked placeThis link leads to an optional part of the flight. Open the section below to continue.Continue to the linked placeThis link leads to an optional part of the flight. Open the section below to continue.Continue to the linked placeThis link leads to an optional part of the flight. Open the section below to continue.Continue to the linked placeThis link leads to an optional part of the flight. Open the section below to continue.Continue to the linked placeThis link leads to an optional part of the flight. Open the section below to continue.Continue to the linked placeThis link leads to an optional part of the flight. Open the section below to continue.Continue to the linked placeThis link leads to an optional part of the flight. Open the section below to continue.Continue to the linked placeThis link leads to an optional part of the flight. Open the section below to continue.Continue to the linked placeThis link leads to an optional part of the flight. Open the section below to continue.Continue to the linked placeThis link leads to an optional part of the flight. Open the section below to continue.Continue to the linked placeThis link leads to an optional part of the flight. Open the section below to continue.Continue to the linked placeThis link leads to an optional part of the flight. Open the section below to continue.Continue to the linked placeThis link leads to an optional part of the flight. Open the section below to continue.Continue to the linked placeThis link leads to an optional part of the flight. Open the section below to continue.Continue to the linked placeThis link leads to an optional part of the flight. Open the section below to continue.Continue to the linked placeThis link leads to an optional part of the flight. Open the section below to continue.Continue to the linked placeThis link leads to an optional part of the flight. Open the section below to continue.Continue to the linked placeThis link leads to an optional part of the flight. Open the section below to continue.Continue to the linked placeThis link leads to an optional part of the flight. Open the section below to continue.Continue to the linked placeThis link leads to an optional part of the flight. Open the section below to continue.Continue to the linked placeThis link leads to an optional part of the flight. Open the section below to continue.Continue to the linked placeThis link leads to an optional part of the flight. Open the section below to continue.Continue to the linked placeThis link leads to an optional part of the flight. Open the section below to continue.Continue to the linked placeThis link leads to an optional part of the flight. Open the section below to continue.Continue to the linked placeThis link leads to an optional part of the flight. Open the section below to continue.Continue to the linked place
Under the dusty yard sits a little room full of foils. Imagine being the worker who drew the job of stacking those. CoCoMan gets the fun half of the shift. He can gather an armful and ride the freight route back outside.
Entry
Wait for the Duct Tap to retract. Center your boots on the exposed seam and hold Down. Nineteen loose foils wait in the cellar.
Return or onward flight
Walk into the open side mouth to rise back into the yard. On a same-life return, only the missed foils remain.
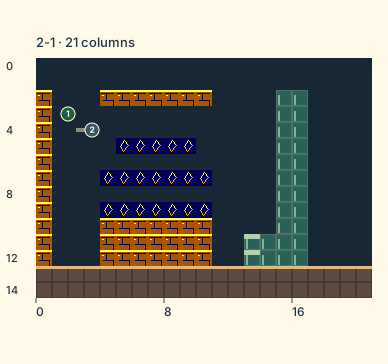
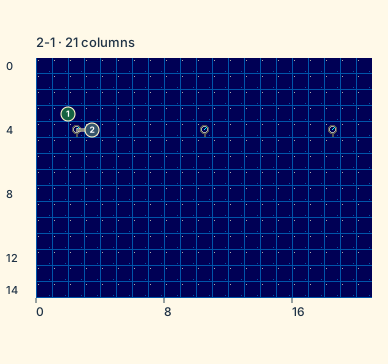
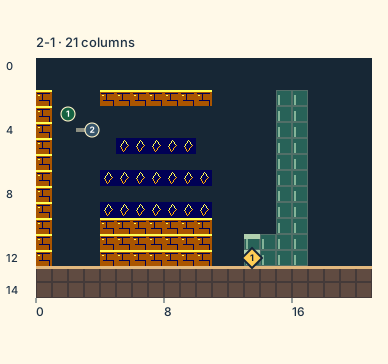
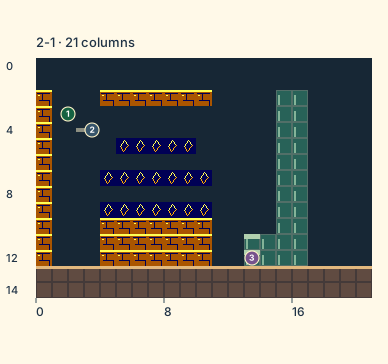
The cellar is a freight stop with nineteen loose foils. Its recessed pressure gauge belongs to the back wall. A free space in front of the dial is still part of the room you can move through.
Cellar arrival. Column 1.5, row 3. The inlet drops you near the west end. The suit, clock and bank from the yard travel with you. Locate landmark 1
Recessed dial. Column 2, row 4. Use the fixed wall gauge to get your bearings. Its panel has no foothold. Locate landmark 2
Pressure Cellar · panel 1 of 1 · columns 0–20
21 columns by 15 rows. Full room at the start of a flight. Brown tile marks soil, brick or steps. A gold-topped tread is a platform. Green mouths mark ducts. Amber dots mark encounters.
1. Cellar arrival · 2. Recessed dial
Open the scenery view
Pressure Cellar · scenery
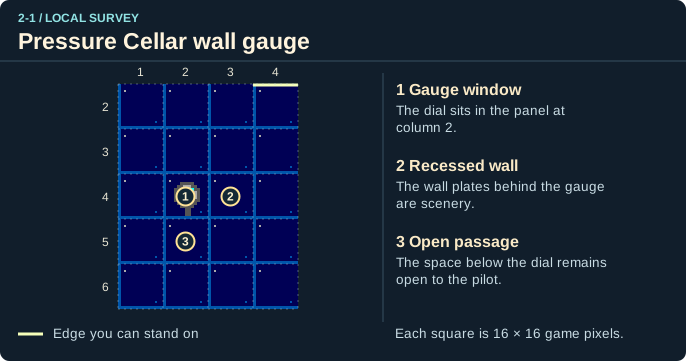
A pressure gauge breaks the repeating blue wall panels. Both are painted into the room behind the pilot.
Gauge window. Column 2, row 4. The dial sits in the panel at column 2. Locate landmark 1
Recessed wall. Column 3, row 4. The wall plates behind the gauge are scenery. Locate landmark 2
Open passage. Column 2, row 5. The space below the dial remains open to the pilot. Locate landmark 3
Pressure Cellar wall gauge · panel 1 of 1
123
Local section of cellar, columns 1 to 4, rows 2 to 6. Column 2, row 4. The dial sits in the panel at column 2. Column 3, row 4. The wall plates behind the gauge are scenery. Column 2, row 5. The space below the dial remains open to the pilot.
Pressure Cellar inlet. Column 103.5, row 9. Wait for the guard to clear. Center both boots over the lip seam and hold Down to take the freight detour. Locate landmark 1
Cellar return. Column 115.5, row 11. The cellar's side outlet brings the pilot up here with halfway earned. You can walk back to collect any foil you missed. Locate landmark 2
Brineworks Intake · transfer points · panel 1 of 5 · columns 0–40
Only the selected route’s transfer positions are marked with numbered amber diamonds.
Brineworks Intake · transfer points · panel 2 of 5 · columns 40–82
Only the selected route’s transfer positions are marked with numbered amber diamonds.
Brineworks Intake · transfer points · panel 3 of 5 · columns 82–125
12
Only the selected route’s transfer positions are marked with numbered amber diamonds.
1. Pressure Cellar inlet · 2. Cellar return
Brineworks Intake · transfer points · panel 4 of 5 · columns 125–167
Only the selected route’s transfer positions are marked with numbered amber diamonds.
Brineworks Intake · transfer points · panel 5 of 5 · columns 167–208
Only the selected route’s transfer positions are marked with numbered amber diamonds.
Surface outlet. Column 13, row 12. Get down to the floor and walk Right into the open side mouth. The pipe brings you up on the yard apron with the checkpoint earned. Locate landmark 1
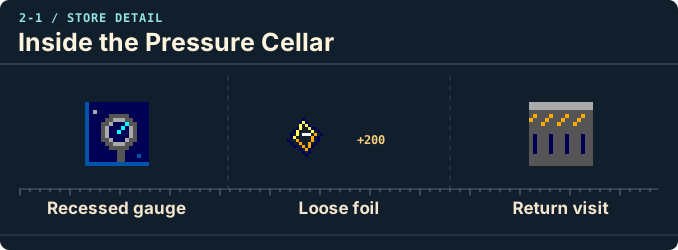
Recessed gauge. The pressure dial is part of the cellar wall. It gives you a fixed reference as you backtrack.
Loose foil. Each of the nineteen loose foils adds 200 points.
Return visit. The grate remains underfoot when you return. Only the foil you missed can pay again on this life.
This link leads to an optional part of the flight. Open the section below to continue.Continue to the linked placeThis link leads to an optional part of the flight. Open the section below to continue.Continue to the linked placeThis link leads to an optional part of the flight. Open the section below to continue.Continue to the linked placeThis link leads to an optional part of the flight. Open the section below to continue.Continue to the linked placeThis link leads to an optional part of the flight. Open the section below to continue.Continue to the linked placeThis link leads to an optional part of the flight. Open the section below to continue.Continue to the linked placeThis link leads to an optional part of the flight. Open the section below to continue.Continue to the linked placeThis link leads to an optional part of the flight. Open the section below to continue.Continue to the linked placeThis link leads to an optional part of the flight. Open the section below to continue.Continue to the linked placeThis link leads to an optional part of the flight. Open the section below to continue.Continue to the linked placeThis link leads to an optional part of the flight. Open the section below to continue.Continue to the linked placeThis link leads to an optional part of the flight. Open the section below to continue.Continue to the linked placeThis link leads to an optional part of the flight. Open the section below to continue.Continue to the linked placeThis link leads to an optional part of the flight. Open the section below to continue.Continue to the linked placeThis link leads to an optional part of the flight. Open the section below to continue.Continue to the linked placeThis link leads to an optional part of the flight. Open the section below to continue.Continue to the linked placeThis link leads to an optional part of the flight. Open the section below to continue.Continue to the linked placeThis link leads to an optional part of the flight. Open the section below to continue.Continue to the linked placeThis link leads to an optional part of the flight. Open the section below to continue.Continue to the linked placeThis link leads to an optional part of the flight. Open the section below to continue.Continue to the linked placeThis link leads to an optional part of the flight. Open the section below to continue.Continue to the linked placeThis link leads to an optional part of the flight. Open the section below to continue.Continue to the linked placeThis link leads to an optional part of the flight. Open the section below to continue.Continue to the linked placeThis link leads to an optional part of the flight. Open the section below to continue.Continue to the linked placeThis link leads to an optional part of the flight. Open the section below to continue.Continue to the linked placeThis link leads to an optional part of the flight. Open the section below to continue.Continue to the linked placeThis link leads to an optional part of the flight. Open the section below to continue.Continue to the linked placeThis link leads to an optional part of the flight. Open the section below to continue.Continue to the linked placeThis link leads to an optional part of the flight. Open the section below to continue.Continue to the linked placeThis link leads to an optional part of the flight. Open the section below to continue.Continue to the linked placeThis link leads to an optional part of the flight. Open the section below to continue.Continue to the linked placeThis link leads to an optional part of the flight. Open the section below to continue.Continue to the linked placeThis link leads to an optional part of the flight. Open the section below to continue.Continue to the linked placeThis link leads to an optional part of the flight. Open the section below to continue.Continue to the linked placeThis link leads to an optional part of the flight. Open the section below to continue.Continue to the linked placeThis link leads to an optional part of the flight. Open the section below to continue.Continue to the linked placeThis link leads to an optional part of the flight. Open the section below to continue.Continue to the linked placeThis link leads to an optional part of the flight. Open the section below to continue.Continue to the linked placeThis link leads to an optional part of the flight. Open the section below to continue.Continue to the linked place
Mars looks different from the top of a boom. Up here a trolley runs past strings of foils, high above the dusty boots-and-pipes part of the job. CoCoMan gets to be both passenger and parcel for a little while.
Entry
Hit the high boom housing from below, line up without sideways input, then climb with Up or Jump. Land on the freight deck to start it. The deck keeps moving while you jump for foils.
Return or onward flight
Leave at the far end or drop early while time remains. Both return you to the yard with the checkpoint earned.
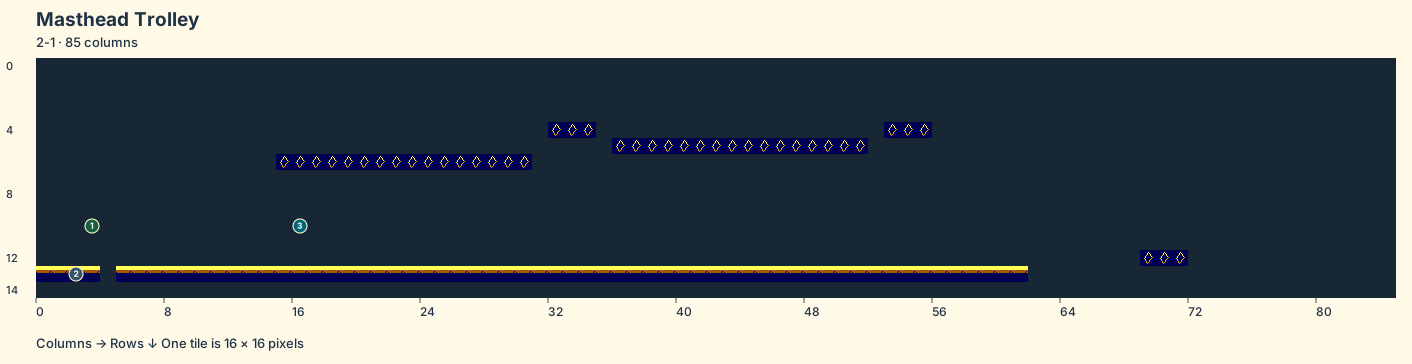
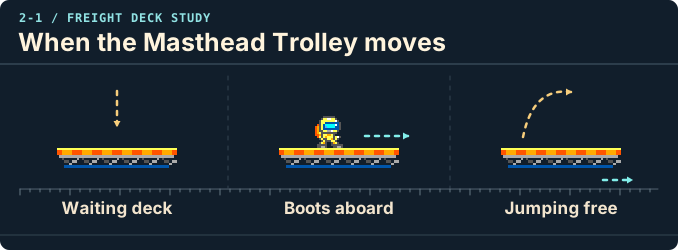
The loading boom carries the courier up into the gantry. The trolley waits for your boots. Its three-tile tread keeps moving once you have stepped aboard, even while you jump after the foil.
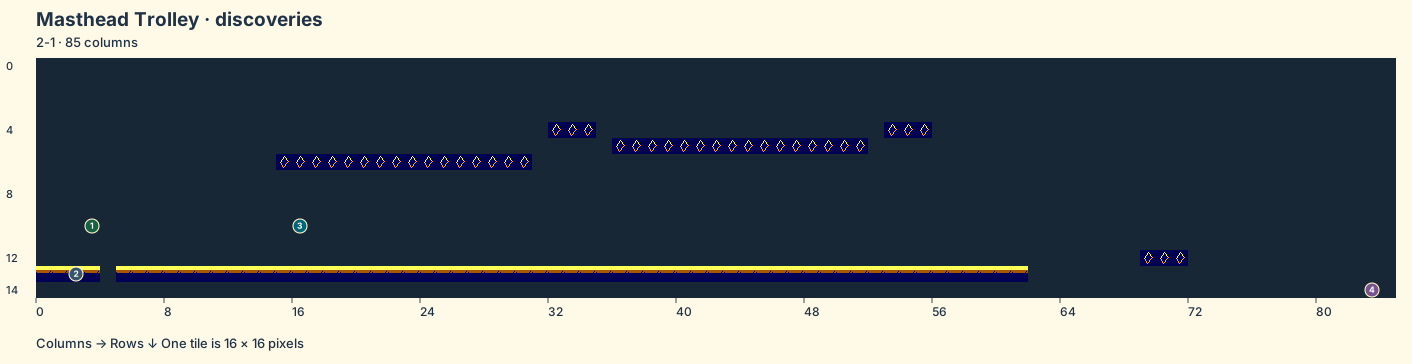
Arrival boom. Column 3, row 10. Let the boom carry you up through the mist. Take control when your boots reach the upper gantry. Locate landmark 1
Gantry footing. Column 2, row 13. Land on the bright fixed rail beside the shaft. It is separate from the moving freight deck. Locate landmark 2
Waiting freight deck. Column 16, row 10. Land from above to start the trolley. It will keep moving east while you jump and can catch you again on the way down. Locate landmark 3
Masthead Trolley · panel 1 of 2 · columns 0–41
85 columns by 15 rows. Full room at the start of a flight. Brown tile marks soil, brick or steps. A gold-topped tread is a platform. Green mouths mark ducts. Amber dots mark encounters.
85 columns by 15 rows. Full room at the start of a flight. Brown tile marks soil, brick or steps. A gold-topped tread is a platform. Green mouths mark ducts. Amber dots mark encounters.
Open the scenery view
Masthead Trolley · scenery
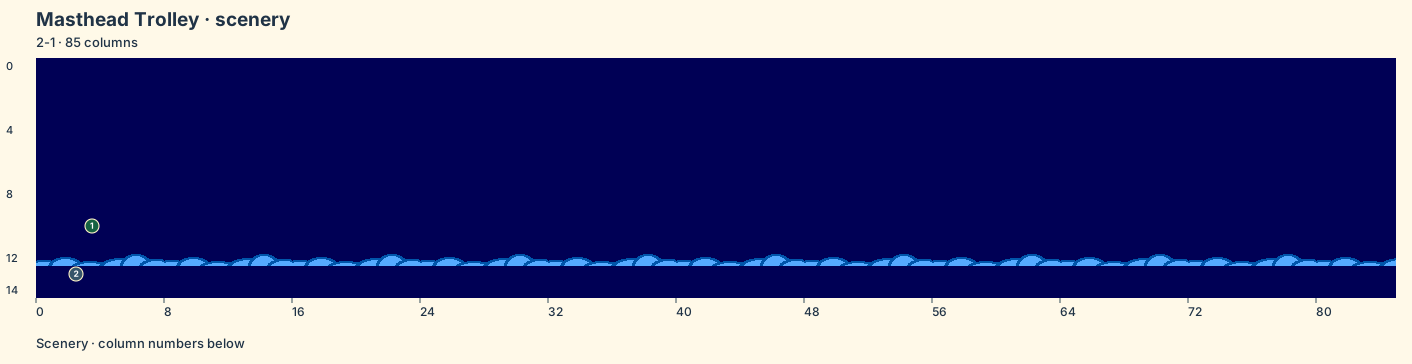
The cloud bank is a strip of eight native mist tiles. The boarding ladder and freight deck are separate equipment.
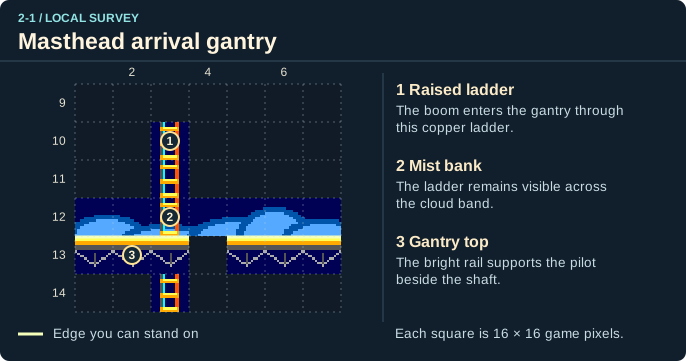
Raised ladder. Column 3, row 10. The boom enters the gantry through this copper ladder. Locate landmark 1
Mist bank. Column 3, row 12. The ladder remains visible across the cloud band. Locate landmark 2
Gantry top. Column 2, row 13. The bright rail supports the pilot beside the shaft. Locate landmark 3
Masthead arrival gantry · panel 1 of 1
123
Local section of trolley, columns 1 to 7, rows 9 to 14. Column 3, row 10. The boom enters the gantry through this copper ladder. Column 3, row 12. The ladder remains visible across the cloud band. Column 2, row 13. The bright rail supports the pilot beside the shaft.
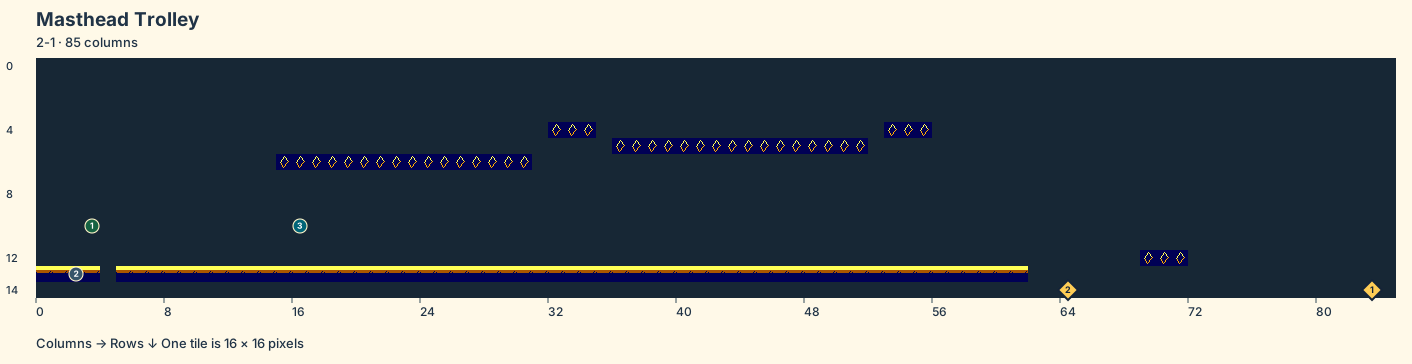
Loading boom. Column 83, row 5. Strike the housing from below to extend the boom. Line up on its rungs, climb with Up or Jump and wait for the pilot to dismount at the top. Locate landmark 1
Trolley return. Column 162.5, row 1. An early or far-end drop from the freight deck returns you above this part of the yard when time remains. Be ready to steer on the way down. Locate landmark 2
Brineworks Intake · transfer points · panel 1 of 5 · columns 0–40
Only the selected route’s transfer positions are marked with numbered amber diamonds.
Brineworks Intake · transfer points · panel 2 of 5 · columns 40–82
Only the selected route’s transfer positions are marked with numbered amber diamonds.
Brineworks Intake · transfer points · panel 3 of 5 · columns 82–125
1
Only the selected route’s transfer positions are marked with numbered amber diamonds.
1. Loading boom
Brineworks Intake · transfer points · panel 4 of 5 · columns 125–167
2
Only the selected route’s transfer positions are marked with numbered amber diamonds.
2. Trolley return
Brineworks Intake · transfer points · panel 5 of 5 · columns 167–208
Only the selected route’s transfer positions are marked with numbered amber diamonds.
Drop to the yard. Column 83, row 14. A fall with time on the clock returns you to the surface and earns halfway. An early drop and a drop past the far end return to the same yard landing. Locate landmark 1
Waiting deck. The empty freight deck waits for a landing from above.
Boots aboard. Your first landing starts the trolley. Keep your footing as its bright top moves.
Jumping free. The deck keeps moving while you jump for the overhead foil. A drop returns you to the yard.
This link leads to an optional part of the flight. Open the section below to continue.Continue to the linked placeThis link leads to an optional part of the flight. Open the section below to continue.Continue to the linked placeThis link leads to an optional part of the flight. Open the section below to continue.Continue to the linked placeThis link leads to an optional part of the flight. Open the section below to continue.Continue to the linked placeThis link leads to an optional part of the flight. Open the section below to continue.Continue to the linked placeThis link leads to an optional part of the flight. Open the section below to continue.Continue to the linked placeThis link leads to an optional part of the flight. Open the section below to continue.Continue to the linked placeThis link leads to an optional part of the flight. Open the section below to continue.Continue to the linked placeThis link leads to an optional part of the flight. Open the section below to continue.Continue to the linked placeThis link leads to an optional part of the flight. Open the section below to continue.Continue to the linked placeThis link leads to an optional part of the flight. Open the section below to continue.Continue to the linked placeThis link leads to an optional part of the flight. Open the section below to continue.Continue to the linked placeThis link leads to an optional part of the flight. Open the section below to continue.Continue to the linked placeThis link leads to an optional part of the flight. Open the section below to continue.Continue to the linked placeThis link leads to an optional part of the flight. Open the section below to continue.Continue to the linked placeThis link leads to an optional part of the flight. Open the section below to continue.Continue to the linked placeThis link leads to an optional part of the flight. Open the section below to continue.Continue to the linked placeThis link leads to an optional part of the flight. Open the section below to continue.Continue to the linked placeThis link leads to an optional part of the flight. Open the section below to continue.Continue to the linked placeThis link leads to an optional part of the flight. Open the section below to continue.Continue to the linked placeThis link leads to an optional part of the flight. Open the section below to continue.Continue to the linked placeThis link leads to an optional part of the flight. Open the section below to continue.Continue to the linked placeThis link leads to an optional part of the flight. Open the section below to continue.Continue to the linked placeThis link leads to an optional part of the flight. Open the section below to continue.Continue to the linked placeThis link leads to an optional part of the flight. Open the section below to continue.Continue to the linked placeThis link leads to an optional part of the flight. Open the section below to continue.Continue to the linked placeThis link leads to an optional part of the flight. Open the section below to continue.Continue to the linked placeThis link leads to an optional part of the flight. Open the section below to continue.Continue to the linked placeThis link leads to an optional part of the flight. Open the section below to continue.Continue to the linked placeThis link leads to an optional part of the flight. Open the section below to continue.Continue to the linked placeThis link leads to an optional part of the flight. Open the section below to continue.Continue to the linked placeThis link leads to an optional part of the flight. Open the section below to continue.Continue to the linked placeThis link leads to an optional part of the flight. Open the section below to continue.Continue to the linked placeThis link leads to an optional part of the flight. Open the section below to continue.Continue to the linked placeThis link leads to an optional part of the flight. Open the section below to continue.Continue to the linked placeThis link leads to an optional part of the flight. Open the section below to continue.Continue to the linked placeThis link leads to an optional part of the flight. Open the section below to continue.Continue to the linked placeThis link leads to an optional part of the flight. Open the section below to continue.Continue to the linked placeThis link leads to an optional part of the flight. Open the section below to continue.Continue to the linked placeThis link leads to an optional part of the flight. Open the section below to continue.Continue to the linked placeThis link leads to an optional part of the flight. Open the section below to continue.Continue to the linked placeThis link leads to an optional part of the flight. Open the section below to continue.Continue to the linked placeThis link leads to an optional part of the flight. Open the section below to continue.Continue to the linked placeThis link leads to an optional part of the flight. Open the section below to continue.Continue to the linked placeThis link leads to an optional part of the flight. Open the section below to continue.Continue to the linked placeThis link leads to an optional part of the flight. Open the section below to continue.Continue to the linked placeThis link leads to an optional part of the flight. Open the section below to continue.Continue to the linked placeThis link leads to an optional part of the flight. Open the section below to continue.Continue to the linked placeThis link leads to an optional part of the flight. Open the section below to continue.Continue to the linked placeThis link leads to an optional part of the flight. Open the section below to continue.Continue to the linked placeThis link leads to an optional part of the flight. Open the section below to continue.Continue to the linked placeThis link leads to an optional part of the flight. Open the section below to continue.Continue to the linked placeThis link leads to an optional part of the flight. Open the section below to continue.Continue to the linked placeThis link leads to an optional part of the flight. Open the section below to continue.Continue to the linked placeThis link leads to an optional part of the flight. Open the section below to continue.Continue to the linked placeThis link leads to an optional part of the flight. Open the section below to continue.Continue to the linked placeThis link leads to an optional part of the flight. Open the section below to continue.Continue to the linked placeThis link leads to an optional part of the flight. Open the section below to continue.Continue to the linked placeThis link leads to an optional part of the flight. Open the section below to continue.Continue to the linked placeThis link leads to an optional part of the flight. Open the section below to continue.Continue to the linked placeThis link leads to an optional part of the flight. Open the section below to continue.Continue to the linked placeThis link leads to an optional part of the flight. Open the section below to continue.Continue to the linked placeThis link leads to an optional part of the flight. Open the section below to continue.Continue to the linked place
On the dry intake yard, watch a Duct Tap until its gauge retracts below the lip. A spring-mounted Sail tucks its piston on landing. Stomp it once and a walking Freight Drum remains.
Intake apron. Column 2, row 12. Mara's relay brings the courier to this dry apron. You can take the yard all the way to the mast. Locate landmark 1
Intake gauge. Column 46, row 9. The Duct Tap's bellows can still hurt while withdrawing. Wait until its face is below the rim. Locate landmark 2
Loading boom. Column 83, row 5. Strike the housing from below to extend the boom. Line up on its rungs, climb with Up or Jump and wait for the pilot to dismount at the top. Locate landmark 3
Pressure Cellar inlet. Column 103.5, row 9. Wait for the guard to clear. Center both boots over the lip seam and hold Down to take the freight detour. Locate landmark 4
Cellar return. Column 115.5, row 11. The cellar's side outlet brings the pilot up here with halfway earned. You can walk back to collect any foil you missed. Locate landmark 5
Trolley return. Column 162.5, row 1. An early or far-end drop from the freight deck returns you above this part of the yard when time remains. Be ready to steer on the way down. Locate landmark 6
Yard spring. Column 188, row 11. Release Jump before landing, then press it again while the spring is compressed for a higher rebound. Locate landmark 7
Pressure Garden relay. Column 200, row 2. Catch the pennant to finish the intake run and head for the pressure lock. Locate landmark 8
Parcel Roller. Column 24, row 6. This marks an encounter position. Moving hazards can leave this point during play. Locate landmark 9
Freight Drum. Column 32, row 12. This marks an encounter position. Moving hazards can leave this point during play. Locate landmark 10
Freight Drum. Column 33, row 12. This marks an encounter position. Moving hazards can leave this point during play. Locate landmark 11
Parcel Roller ×2. Column 45, row 12. This marks an encounter position. Moving hazards can leave this point during play. Locate landmark 12
Freight Drum. Column 55, row 8. This marks an encounter position. Moving hazards can leave this point during play. Locate landmark 13
Parcel Roller ×2. Column 62, row 12. This marks an encounter position. Moving hazards can leave this point during play. Locate landmark 14
Freight Drum. Column 66, row 12. This marks an encounter position. Moving hazards can leave this point during play. Locate landmark 15
Parcel Roller ×3. Column 71, row 12. This marks an encounter position. Moving hazards can leave this point during play. Locate landmark 16
Duct Tap. Column 74, row 9. This marks an encounter position. Moving hazards can leave this point during play. Locate landmark 17
Parcel Roller ×3. Column 90, row 12. This marks an encounter position. Moving hazards can leave this point during play. Locate landmark 18
Parcel Roller. Column 103, row 8. This marks an encounter position. Moving hazards can leave this point during play. Locate landmark 19
Parcel Roller. Column 116, row 10. This marks an encounter position. Moving hazards can leave this point during play. Locate landmark 20
Parcel Roller. Column 120, row 12. This marks an encounter position. Moving hazards can leave this point during play. Locate landmark 21
Duct Tap. Column 122, row 9. This marks an encounter position. Moving hazards can leave this point during play. Locate landmark 22
Duct Tap. Column 126, row 10. This marks an encounter position. Moving hazards can leave this point during play. Locate landmark 23
Duct Tap. Column 130, row 8. This marks an encounter position. Moving hazards can leave this point during play. Locate landmark 24
Freight Drum. Column 137, row 12. This marks an encounter position. Moving hazards can leave this point during play. Locate landmark 25
Spring Sail. Column 151, row 12. This marks an encounter position. Moving hazards can leave this point during play. Locate landmark 26
Parcel Roller ×2. Column 165, row 12. This marks an encounter position. Moving hazards can leave this point during play. Locate landmark 27
Spring Sail. Column 169, row 12. This marks an encounter position. Moving hazards can leave this point during play. Locate landmark 28
Spring Sail. Column 171, row 12. This marks an encounter position. Moving hazards can leave this point during play. Locate landmark 29
Duct Tap. Column 176, row 10. This marks an encounter position. Moving hazards can leave this point during play. Locate landmark 30
Freight Drum. Column 185, row 12. This marks an encounter position. Moving hazards can leave this point during play. Locate landmark 31
209 columns by 15 rows. Full room with marked rewards and optional landmarks. Brown tile marks soil, brick or steps. A gold-topped tread is a platform. Green mouths mark ducts. Amber dots mark encounters.
209 columns by 15 rows. Full room with marked rewards and optional landmarks. Brown tile marks soil, brick or steps. A gold-topped tread is a platform. Green mouths mark ducts. Amber dots mark encounters.
209 columns by 15 rows. Full room with marked rewards and optional landmarks. Brown tile marks soil, brick or steps. A gold-topped tread is a platform. Green mouths mark ducts. Amber dots mark encounters.
209 columns by 15 rows. Full room with marked rewards and optional landmarks. Brown tile marks soil, brick or steps. A gold-topped tread is a platform. Green mouths mark ducts. Amber dots mark encounters.
6. Trolley return · 23. Duct Tap · 24. Duct Tap · 25. Freight Drum · 26. Spring Sail · 27. Parcel Roller ×2
209 columns by 15 rows. Full room with marked rewards and optional landmarks. Brown tile marks soil, brick or steps. A gold-topped tread is a platform. Green mouths mark ducts. Amber dots mark encounters.
7. Yard spring · 8. Pressure Garden relay · 28. Spring Sail · 29. Spring Sail · 30. Duct Tap · 31. Freight Drum
This link leads to an optional part of the flight. Open the section below to continue.Continue to the linked placeThis link leads to an optional part of the flight. Open the section below to continue.Continue to the linked placeThis link leads to an optional part of the flight. Open the section below to continue.Continue to the linked placeThis link leads to an optional part of the flight. Open the section below to continue.Continue to the linked placeThis link leads to an optional part of the flight. Open the section below to continue.Continue to the linked placeThis link leads to an optional part of the flight. Open the section below to continue.Continue to the linked placeThis link leads to an optional part of the flight. Open the section below to continue.Continue to the linked place
The cellar is a freight stop with nineteen loose foils. Its recessed pressure gauge belongs to the back wall. A free space in front of the dial is still part of the room you can move through.
Cellar arrival. Column 1.5, row 3. The inlet drops you near the west end. The suit, clock and bank from the yard travel with you. Locate landmark 1
Recessed dial. Column 2, row 4. Use the fixed wall gauge to get your bearings. Its panel has no foothold. Locate landmark 2
Surface outlet. Column 13, row 12. Get down to the floor and walk Right into the open side mouth. The pipe brings you up on the yard apron with the checkpoint earned. Locate landmark 3
21 columns by 15 rows. Full room with marked rewards and optional landmarks. Brown tile marks soil, brick or steps. A gold-topped tread is a platform. Green mouths mark ducts. Amber dots mark encounters.
This link leads to an optional part of the flight. Open the section below to continue.Continue to the linked placeThis link leads to an optional part of the flight. Open the section below to continue.Continue to the linked placeThis link leads to an optional part of the flight. Open the section below to continue.Continue to the linked placeThis link leads to an optional part of the flight. Open the section below to continue.Continue to the linked placeThis link leads to an optional part of the flight. Open the section below to continue.Continue to the linked placeThis link leads to an optional part of the flight. Open the section below to continue.Continue to the linked placeThis link leads to an optional part of the flight. Open the section below to continue.Continue to the linked placeThis link leads to an optional part of the flight. Open the section below to continue.Continue to the linked placeThis link leads to an optional part of the flight. Open the section below to continue.Continue to the linked place
The loading boom carries the courier up into the gantry. The trolley waits for your boots. Its three-tile tread keeps moving once you have stepped aboard, even while you jump after the foil.
Arrival boom. Column 3, row 10. Let the boom carry you up through the mist. Take control when your boots reach the upper gantry. Locate landmark 1
Gantry footing. Column 2, row 13. Land on the bright fixed rail beside the shaft. It is separate from the moving freight deck. Locate landmark 2
Waiting freight deck. Column 16, row 10. Land from above to start the trolley. It will keep moving east while you jump and can catch you again on the way down. Locate landmark 3
Drop to the yard. Column 83, row 14. A fall with time on the clock returns you to the surface and earns halfway. An early drop and a drop past the far end return to the same yard landing. Locate landmark 4
85 columns by 15 rows. Full room with marked rewards and optional landmarks. Brown tile marks soil, brick or steps. A gold-topped tread is a platform. Green mouths mark ducts. Amber dots mark encounters.
85 columns by 15 rows. Full room with marked rewards and optional landmarks. Brown tile marks soil, brick or steps. A gold-topped tread is a platform. Green mouths mark ducts. Amber dots mark encounters.
 To Titan and Back