


Back to VCC Plus Games
CoCoManTo Titan and Back
Course 1-4

Pad Zero Interlock

Mara's station sits on the far side of a launch pad hot enough to send a rocket into space. A heat arm swings past, leaves just enough room for a pair of boots, then comes around again. Somewhere past the Postmark Warden is the cutoff. Mara could really use a courier who knows when to jump.

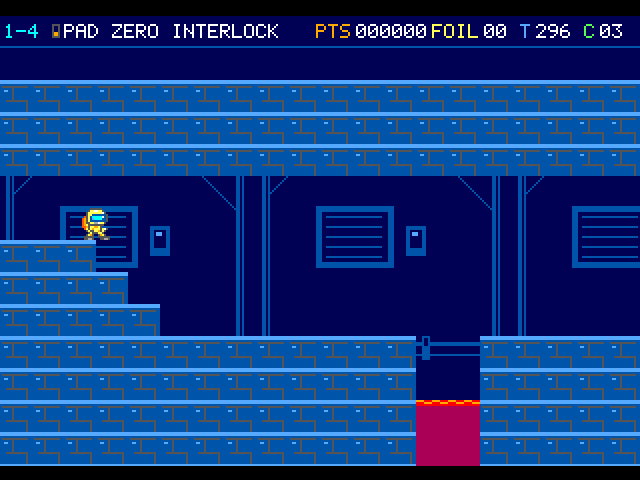
Blue masonry steps down toward the machinery bay. The pilot is mid-jump at the edge of a stepped landing.

On the flight

Pause on a solid tread long enough to see a complete turn of the heat arm. Cross during the gap in its sweep, then watch the Warden's stamp handle as you approach the bridge.

Course map

Pad Zero Interlock

Pause on a fixed tread to watch one revolution of the heat arm. The hot links are the danger around the socket. Near the bridge, watch the Warden’s stamp handle and the plasma crossing your lane.

Open the scenery view

Open the full-size illustration

  1. Interlock intake. Column 2, row 6. The station starts here. A paid retry also brings you back to this intake. Locate landmark 1
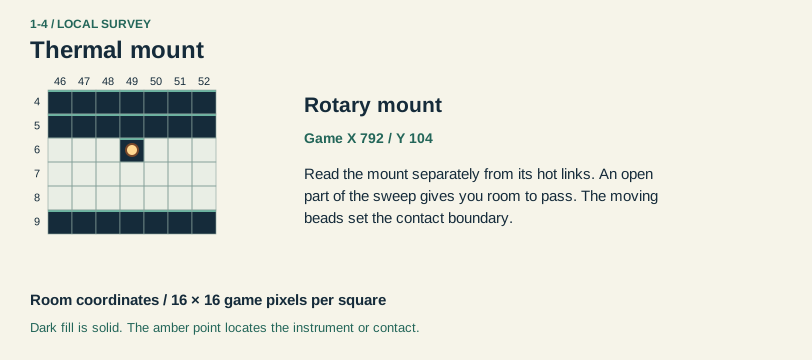
  2. Thermal mount. Column 49, row 6. Trace the moving links around the fixed pivot, then step through the opening between sweeps. Locate landmark 2
  3. Bridge cutoff. Column 141, row 8. Reach the cutoff while the Postmark Warden is live to release the bridge. Stay on the fixed footing beyond it. Locate landmark 3

    Follow the optional transfer

  4. Mara’s station. Column 153, row 11.5. Let the stamping-desk message finish. Mara dispatches the pilot to Brineworks Intake with the surviving equipment and bank. Locate landmark 4

    Leave Mara’s station for Brineworks Intake. · Intake apron

  5. Thermal rotor pivot. Column 30, row 10. This marks an encounter position. Moving hazards can leave this point during play. Locate landmark 5
  6. Thermal rotor pivot. Column 60, row 6. This marks an encounter position. Moving hazards can leave this point during play. Locate landmark 6
  7. Thermal rotor pivot. Column 67, row 6. This marks an encounter position. Moving hazards can leave this point during play. Locate landmark 7
  8. Thermal rotor pivot. Column 76, row 9. This marks an encounter position. Moving hazards can leave this point during play. Locate landmark 8
  9. Thermal rotor pivot. Column 84, row 9. This marks an encounter position. Moving hazards can leave this point during play. Locate landmark 9
  10. Thermal rotor pivot. Column 88, row 4. This marks an encounter position. Moving hazards can leave this point during play. Locate landmark 10
Open the scenery view

Pad Zero Interlock · scenery

Steel service bays repeat behind the tunnel. The native picture paints bright furnace liquid with a rippled edge beneath the machinery.

Open the terrain view

Open the full-size illustration

  1. Interlock intake. Column 2, row 6. The station starts here. A paid retry also brings you back to this intake. Locate landmark 1
  2. Bridge cutoff. Column 141, row 8. Reach the cutoff while the Postmark Warden is live to release the bridge. Stay on the fixed footing beyond it. Locate landmark 2
  3. Mara’s station. Column 153, row 11.5. Let the stamping-desk message finish. Mara dispatches the pilot to Brineworks Intake with the surviving equipment and bank. Locate landmark 3

Thermal mount · local section

Local map · columns 46–52, rows 4–9.

Open the full-size illustration

  1. Rotary mount. Read the mount separately from its hot links. An open part of the sweep gives you room to pass. The moving beads set the contact boundary. Locate landmark 1

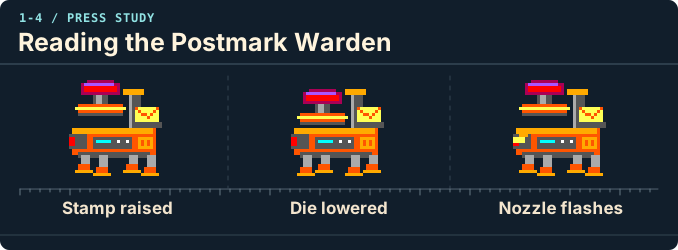
Reading the Postmark Warden

Stamp raised, Die lowered, Nozzle flashes.

Open the original-size illustration

  • Stamp raised. Use the tall red stamp handle and envelope feed to pick out the cancellation press.
  • Die lowered. When the square die descends, the dark nozzle stays at the front of the chassis.
  • Nozzle flashes. Leave room for the leading edge of the plasma and the feet of the press.

Landmarks to recognize

Rotary mount
Trace the hot links around the fixed pivot before stepping into their sweep.
Cancellation press
The stamp handle and envelope feed show which way the Postmark Warden is facing.
Give me a hint

Look past the press for the bridge cutoff. An equipped pilot has another way to deal with the Warden before using it.

Routes and discoveries

This link leads to an optional part of the flight. Open the section below to continue.Continue to the linked place

Pad Zero Interlock

Entry

Slip past the live press to the cutoff, or hit it with five Arc sparks to expose the Parcel Roller and earn 5,000. Use the fixed footing past the bridge.

Return or onward flight

Walk through to Mara's stamping desk. Her dispatch takes you to Brineworks Intake with your surviving suit, bank and any qualified reserve. A lost life before the crossing takes you back to the entrance.

This link leads to an optional part of the flight. Open the section below to continue.Continue to the linked placeThis link leads to an optional part of the flight. Open the section below to continue.Continue to the linked placeThis link leads to an optional part of the flight. Open the section below to continue.Continue to the linked placeThis link leads to an optional part of the flight. Open the section below to continue.Continue to the linked placeThis link leads to an optional part of the flight. Open the section below to continue.Continue to the linked placeThis link leads to an optional part of the flight. Open the section below to continue.Continue to the linked placeThis link leads to an optional part of the flight. Open the section below to continue.Continue to the linked placeThis link leads to an optional part of the flight. Open the section below to continue.Continue to the linked placeThis link leads to an optional part of the flight. Open the section below to continue.Continue to the linked placeThis link leads to an optional part of the flight. Open the section below to continue.Continue to the linked placeThis link leads to an optional part of the flight. Open the section below to continue.Continue to the linked placeThis link leads to an optional part of the flight. Open the section below to continue.Continue to the linked placeThis link leads to an optional part of the flight. Open the section below to continue.Continue to the linked placeThis link leads to an optional part of the flight. Open the section below to continue.Continue to the linked placeThis link leads to an optional part of the flight. Open the section below to continue.Continue to the linked placeThis link leads to an optional part of the flight. Open the section below to continue.Continue to the linked placeThis link leads to an optional part of the flight. Open the section below to continue.Continue to the linked placeThis link leads to an optional part of the flight. Open the section below to continue.Continue to the linked placeThis link leads to an optional part of the flight. Open the section below to continue.Continue to the linked placeThis link leads to an optional part of the flight. Open the section below to continue.Continue to the linked placeThis link leads to an optional part of the flight. Open the section below to continue.Continue to the linked placeThis link leads to an optional part of the flight. Open the section below to continue.Continue to the linked placeThis link leads to an optional part of the flight. Open the section below to continue.Continue to the linked place

Pad Zero Interlock · discoveries

Pause on a fixed tread to watch one revolution of the heat arm. The hot links are the danger around the socket. Near the bridge, watch the Warden’s stamp handle and the plasma crossing your lane.

Open the full-size illustration

  1. Interlock intake. Column 2, row 6. The station starts here. A paid retry also brings you back to this intake. Locate landmark 1
  2. Thermal mount. Column 49, row 6. Trace the moving links around the fixed pivot, then step through the opening between sweeps. Locate landmark 2
  3. Bridge cutoff. Column 141, row 8. Reach the cutoff while the Postmark Warden is live to release the bridge. Stay on the fixed footing beyond it. Locate landmark 3
  4. Arc approach. Column 141, row 8. Five accepted Arc sparks before the cutoff expose the Parcel Roller and earn 5,000. The cutoff still takes you through to Mara. Locate landmark 4
  5. Mara’s station. Column 153, row 11.5. Let the stamping-desk message finish. Mara dispatches the pilot to Brineworks Intake with the surviving equipment and bank. Locate landmark 5
  6. Thermal rotor pivot. Column 30, row 10. This marks an encounter position. Moving hazards can leave this point during play. Locate landmark 6
  7. Thermal rotor pivot. Column 60, row 6. This marks an encounter position. Moving hazards can leave this point during play. Locate landmark 7
  8. Thermal rotor pivot. Column 67, row 6. This marks an encounter position. Moving hazards can leave this point during play. Locate landmark 8
  9. Thermal rotor pivot. Column 76, row 9. This marks an encounter position. Moving hazards can leave this point during play. Locate landmark 9
  10. Thermal rotor pivot. Column 84, row 9. This marks an encounter position. Moving hazards can leave this point during play. Locate landmark 10
  11. Thermal rotor pivot. Column 88, row 4. This marks an encounter position. Moving hazards can leave this point during play. Locate landmark 11