


Back to VCC Plus Games
CoCoManTo Titan and Back
Course 1-3

Tracking Dishes

From down on Earth these dishes look like little teacups pointed at the sky. From up here the gaps between them look enormous. CoCoMan waits for an inspection deck to drift within reach. For a few good jumps, the courier who fixes the tracking array gets the best view on the planet.

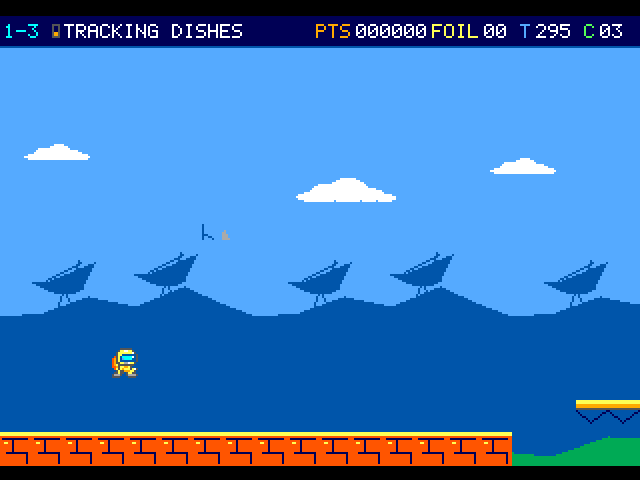
Dishes silhouette the hills beyond the launch deck. The courier is airborne above the first brick strip.

On the flight

The dishes have bright caps you can land on and thin machinery beneath them. Watch a moving bed come alongside a cap, then jump for the top.

Course map

Tracking Dishes

Use the bright dish caps and moving inspection beds for footing. The thin machinery under a cap lets you pass through. Look at the next landing while you are still standing on a supported tread.

Open the scenery view

Open the full-size illustration

  1. Tracking array arrival. Column 2, row 12. Begin on the west landing. Watch one cap and a moving tread before leaving solid footing. Locate landmark 1
  2. Vertical inspection deck. Column 55, row 6. Land on the bright surface from above. A standing pilot rides as the inspector changes height. Locate landmark 2
  3. Lift Sail. Column 74, row 3. The fan above the survey instrument comes away on the first stomp. Its walking chassis can still reach you. Locate landmark 3
  4. Interlock relay. Column 152, row 2. Take the mast to Pad Zero Interlock. Your current suit and bank travel with the pilot. Locate landmark 4

    Catch the relay to begin Pad Zero Interlock. · Interlock intake

  5. Rim Surveyor. Column 30, row 3. This marks an encounter position. Moving hazards can leave this point during play. Locate landmark 5
  6. Parcel Roller. Column 44, row 2. This marks an encounter position. Moving hazards can leave this point during play. Locate landmark 6
  7. Parcel Roller. Column 46, row 2. This marks an encounter position. Moving hazards can leave this point during play. Locate landmark 7
  8. Parcel Roller. Column 80, row 3. This marks an encounter position. Moving hazards can leave this point during play. Locate landmark 8
  9. Horizontal inspection deck. Column 86, row 8. Watch the surface move before boarding. Locate landmark 9
  10. Horizontal inspection deck. Column 94, row 9. Watch the surface move before boarding. Locate landmark 10
  11. Rim Surveyor. Column 110, row 5. This marks an encounter position. Moving hazards can leave this point during play. Locate landmark 11
  12. Lift Sail. Column 114, row 4. Watch the surface move before boarding. Locate landmark 12
  13. Horizontal inspection deck. Column 131, row 6. Watch the surface move before boarding. Locate landmark 13
  14. Rim Surveyor. Column 133, row 11. This marks an encounter position. Moving hazards can leave this point during play. Locate landmark 14
Open the scenery view

Tracking Dishes · scenery

Survey dishes rise behind the landing surfaces. Look for the difference between the dishes on the horizon and the bright caps underfoot.

Open the terrain view

Open the full-size illustration

  1. Tracking array arrival. Column 2, row 12. Begin on the west landing. Watch one cap and a moving tread before leaving solid footing. Locate landmark 1
  2. Interlock relay. Column 152, row 2. Take the mast to Pad Zero Interlock. Your current suit and bank travel with the pilot. Locate landmark 2

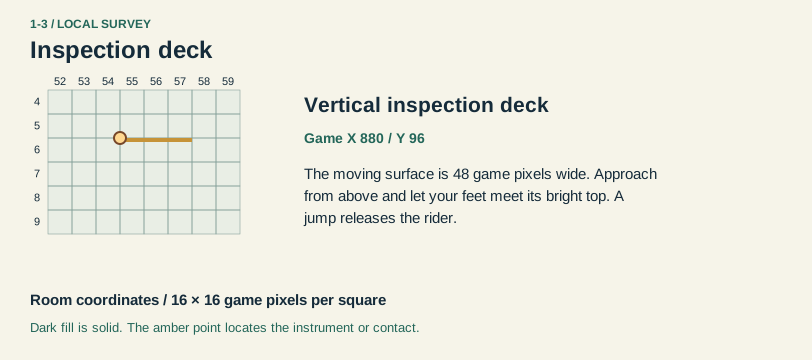
Inspection deck · local section

Local map · columns 52–59, rows 4–9.

Open the full-size illustration

  1. Vertical inspection deck. The moving surface is 48 game pixels wide. Approach from above and let your feet meet its bright top. A jump releases the rider. Locate landmark 1

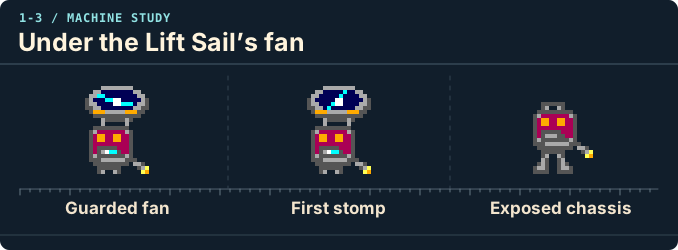
Under the Lift Sail’s fan

Guarded fan, First stomp, Exposed chassis.

Open the original-size illustration

  • Guarded fan. The Lift Sail’s guarded fan carries a claret survey case underneath.
  • First stomp. Descend onto the fan to strip it for 400 points.
  • Exposed chassis. The exposed case walks on, even off a ledge. Stomp it again to fold it for a kick.

Landmarks to recognize

Dish cap
The bright top supports your boots. You can pass through its thin supports.
Lift Sail
A fan turns above the claret instrument. The instrument can still walk after it loses the fan.
Give me a hint

If you want the next world's reserve, count loose foils on a single life. You can walk back for ones you passed.

Routes and discoveries

This link leads to an optional part of the flight. Open the section below to continue.Continue to the linked place

Tracking Dishes

Entry

Link the dish caps and moving beds. A first stomp knocks the fan off a Lift Sail. A second folds its walking chassis so it can be kicked.

Return or onward flight

Catch the mast to enter Pad Zero Interlock. At least 21 of the 23 loose foils in one life qualify a spare in Brineworks Intake after Mara's relay.

This link leads to an optional part of the flight. Open the section below to continue.Continue to the linked placeThis link leads to an optional part of the flight. Open the section below to continue.Continue to the linked placeThis link leads to an optional part of the flight. Open the section below to continue.Continue to the linked placeThis link leads to an optional part of the flight. Open the section below to continue.Continue to the linked placeThis link leads to an optional part of the flight. Open the section below to continue.Continue to the linked placeThis link leads to an optional part of the flight. Open the section below to continue.Continue to the linked placeThis link leads to an optional part of the flight. Open the section below to continue.Continue to the linked placeThis link leads to an optional part of the flight. Open the section below to continue.Continue to the linked placeThis link leads to an optional part of the flight. Open the section below to continue.Continue to the linked placeThis link leads to an optional part of the flight. Open the section below to continue.Continue to the linked placeThis link leads to an optional part of the flight. Open the section below to continue.Continue to the linked placeThis link leads to an optional part of the flight. Open the section below to continue.Continue to the linked placeThis link leads to an optional part of the flight. Open the section below to continue.Continue to the linked placeThis link leads to an optional part of the flight. Open the section below to continue.Continue to the linked placeThis link leads to an optional part of the flight. Open the section below to continue.Continue to the linked placeThis link leads to an optional part of the flight. Open the section below to continue.Continue to the linked placeThis link leads to an optional part of the flight. Open the section below to continue.Continue to the linked placeThis link leads to an optional part of the flight. Open the section below to continue.Continue to the linked placeThis link leads to an optional part of the flight. Open the section below to continue.Continue to the linked placeThis link leads to an optional part of the flight. Open the section below to continue.Continue to the linked placeThis link leads to an optional part of the flight. Open the section below to continue.Continue to the linked placeThis link leads to an optional part of the flight. Open the section below to continue.Continue to the linked placeThis link leads to an optional part of the flight. Open the section below to continue.Continue to the linked placeThis link leads to an optional part of the flight. Open the section below to continue.Continue to the linked placeThis link leads to an optional part of the flight. Open the section below to continue.Continue to the linked placeThis link leads to an optional part of the flight. Open the section below to continue.Continue to the linked placeThis link leads to an optional part of the flight. Open the section below to continue.Continue to the linked placeThis link leads to an optional part of the flight. Open the section below to continue.Continue to the linked placeThis link leads to an optional part of the flight. Open the section below to continue.Continue to the linked placeThis link leads to an optional part of the flight. Open the section below to continue.Continue to the linked placeThis link leads to an optional part of the flight. Open the section below to continue.Continue to the linked placeThis link leads to an optional part of the flight. Open the section below to continue.Continue to the linked placeThis link leads to an optional part of the flight. Open the section below to continue.Continue to the linked place

Tracking Dishes · discoveries

Use the bright dish caps and moving inspection beds for footing. The thin machinery under a cap lets you pass through. Look at the next landing while you are still standing on a supported tread.

Open the full-size illustration

  1. Tracking array arrival. Column 2, row 12. Begin on the west landing. Watch one cap and a moving tread before leaving solid footing. Locate landmark 1
  2. Vertical inspection deck. Column 55, row 6. Land on the bright surface from above. A standing pilot rides as the inspector changes height. Locate landmark 2
  3. Lift Sail. Column 74, row 3. The fan above the survey instrument comes away on the first stomp. Its walking chassis can still reach you. Locate landmark 3
  4. Upper suit supply. Column 59, row 10. The supply gives Small a Pressure Capsule and a suited courier an Arc Lens. Foils you collect stay spent on a same-life return. Locate landmark 4
  5. Interlock relay. Column 152, row 2. Take the mast to Pad Zero Interlock. Your current suit and bank travel with the pilot. Locate landmark 5
  6. Reserve qualification. Column 152, row 8. Reaching the relay after collecting at least 21 of the 23 loose foils in one life qualifies the spare for Brineworks Intake after Mara's dispatch. Locate landmark 6
  7. Rim Surveyor. Column 30, row 3. This marks an encounter position. Moving hazards can leave this point during play. Locate landmark 7
  8. Parcel Roller. Column 44, row 2. This marks an encounter position. Moving hazards can leave this point during play. Locate landmark 8
  9. Parcel Roller. Column 46, row 2. This marks an encounter position. Moving hazards can leave this point during play. Locate landmark 9
  10. Parcel Roller. Column 80, row 3. This marks an encounter position. Moving hazards can leave this point during play. Locate landmark 10
  11. Horizontal inspection deck. Column 86, row 8. Watch the surface move before boarding. Locate landmark 11
  12. Horizontal inspection deck. Column 94, row 9. Watch the surface move before boarding. Locate landmark 12
  13. Rim Surveyor. Column 110, row 5. This marks an encounter position. Moving hazards can leave this point during play. Locate landmark 13
  14. Lift Sail. Column 114, row 4. Watch the surface move before boarding. Locate landmark 14
  15. Horizontal inspection deck. Column 131, row 6. Watch the surface move before boarding. Locate landmark 15
  16. Rim Surveyor. Column 133, row 11. This marks an encounter position. Moving hazards can leave this point during play. Locate landmark 16