
Back to VCC Plus Games
CoCoManTo Titan and Back
Course 8-2

The Falling Spool

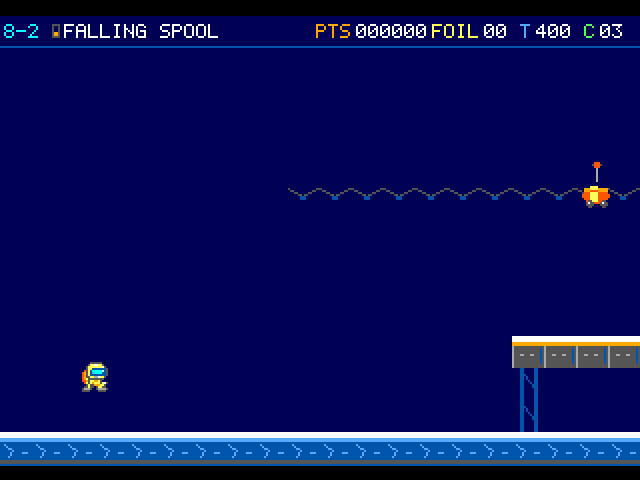
A shadow on the belt gives CoCoMan a moment to look up. That’s a spool coming loose from the overhead rail, and hitting the floor won’t stop it. He still has the rolling spool to deal with after it lands.

A suspended orange spool sits near the right end of an overhead line. The airborne courier is still well to its left.

On the flight

Watch the shadow on the belt and the axle above it. A released spool drops, lands and keeps rolling. Allow room for both parts of its travel before you step back onto the runway.

Course map

Return belt apron

Open the full-size illustration

  1. Arrival. Column 2, row 12. The pilot first takes control in this part of the room. Locate landmark 1
  2. Falling Spool. Column 18, row 5. The axle warns for 30 updates. The reel drops, lands, then rolls along the footing. Locate landmark 2
  3. Compression spring. Column 44, row 10. Watch the moving tread before boarding. Its position changes during play. Locate landmark 3

    Follow the optional transfer

  4. Falling Spool · 2. Column 72, row 6. The axle warns for 30 updates. The reel drops, lands, then rolls along the footing. Locate landmark 4
  5. Post-beacon restart. Column 76, row 12. A paid retry puts the pilot on the quiet side of the belt. Locate landmark 5
  6. Fixed dart launcher. Column 103, row 12. Encounter reference. A moving threat can leave this position during play. Locate landmark 6
  7. Parcel Roller. Column 115, row 12. Encounter reference. A moving threat can leave this position during play. Locate landmark 7
  8. Relay mast. Column 135, row 12. Approach this relay to finish the room. Locate landmark 8

    Continue to 8-3 · Arrival

Landmarks to recognize

Reel axle
The axle identifies the hanging reel. Its warning gives you time to leave the landing area.
Fixed breech
Look for the warning at the housing before you cross its shot lane. The collar above that lane offers a safe return.
Give me a hint

The first recoil of the spring does something up on the belt. If you choose the upper way, keep looking east when you land.

Routes and discoveries

This link leads to an optional part of the flight. Open the section below to continue.Continue to the linked place

Return belt apron

Entry

Give each falling spool room to land and roll, then cross the firing lane on its warning. You can follow the ordinary floor route through the whole course.

Return or onward flight

After the belt beacon, a paid retry starts on its quiet side. Follow the runway to the mast for Wall of Returned Signals.

This link leads to an optional part of the flight. Open the section below to continue.Continue to the linked placeThis link leads to an optional part of the flight. Open the section below to continue.Continue to the linked placeThis link leads to an optional part of the flight. Open the section below to continue.Continue to the linked placeThis link leads to an optional part of the flight. Open the section below to continue.Continue to the linked placeThis link leads to an optional part of the flight. Open the section below to continue.Continue to the linked placeThis link leads to an optional part of the flight. Open the section below to continue.Continue to the linked placeThis link leads to an optional part of the flight. Open the section below to continue.Continue to the linked placeThis link leads to an optional part of the flight. Open the section below to continue.Continue to the linked placeThis link leads to an optional part of the flight. Open the section below to continue.Continue to the linked place

High Return Belt

The compression spring gives CoCoMan a chance to reach the high deck. Its first recoil sends a spare core rolling along the belt as if it has somewhere else to be. CoCoMan will need to catch up before it gets there.

Entry

Land on the compression spring. Its first recoil releases a spare core onto the high deck. Go up after it and catch it as it rolls east.

Return or onward flight

Leave the deck to rejoin the floor route. A visit to the Reel Vault preserves a waiting, rolling or already collected core.

Return belt apron · transfer points

Open the full-size illustration

  1. High return deck. Column 52, row 7. This is the transfer position on this route. Locate landmark 1
  2. East return deck. Column 56, row 7. This is the transfer position on this route. Locate landmark 2

    Rejoin the ordinary floor · East footing

  3. East footing. Column 61, row 12. This is the transfer position on this route. Locate landmark 3
This link leads to an optional part of the flight. Open the section below to continue.Continue to the linked placeThis link leads to an optional part of the flight. Open the section below to continue.Continue to the linked placeThis link leads to an optional part of the flight. Open the section below to continue.Continue to the linked placeThis link leads to an optional part of the flight. Open the section below to continue.Continue to the linked placeThis link leads to an optional part of the flight. Open the section below to continue.Continue to the linked placeThis link leads to an optional part of the flight. Open the section below to continue.Continue to the linked placeThis link leads to an optional part of the flight. Open the section below to continue.Continue to the linked placeThis link leads to an optional part of the flight. Open the section below to continue.Continue to the linked placeThis link leads to an optional part of the flight. Open the section below to continue.Continue to the linked placeThis link leads to an optional part of the flight. Open the section below to continue.Continue to the linked placeThis link leads to an optional part of the flight. Open the section below to continue.Continue to the linked placeThis link leads to an optional part of the flight. Open the section below to continue.Continue to the linked place

Reel Vault

The little vault off the return belt has a solid floor and foils waiting in the quiet. For a moment CoCoMan gets to walk, pick up the foils and leave the rolling machinery to itself.

Entry

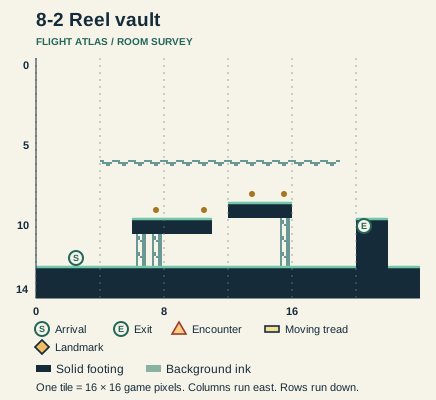
Hold Down on the intake collar to enter and gather the four loose foils.

Return or onward flight

Move Right into the open side mouth. You rise to the safe collar above the Dart lane with the reels and supplies as you left them.

Read this room’s map

Reel vault

Open the full-size illustration

  1. Arrival. Column 2, row 12. Step onto the west floor. Locate landmark 1
  2. Apron return. Column 20, row 10. Hold Right into the mouth to rise at the safe surface collar at X1568. Locate landmark 2

    Return to the surface · Vault return

Return belt apron · transfer points

Open the full-size illustration

  1. Vault inlet. Column 85.5, row 10. Down on the seam opens the short reel vault. Locate landmark 1

    Enter the side room · Arrival

  2. Vault return. Column 97.5, row 10. The east side mouth in the vault returns above the dart lane. Locate landmark 2

    Revisit from the surface · Vault inlet

This link leads to an optional part of the flight. Open the section below to continue.Continue to the linked placeThis link leads to an optional part of the flight. Open the section below to continue.Continue to the linked placeThis link leads to an optional part of the flight. Open the section below to continue.Continue to the linked placeThis link leads to an optional part of the flight. Open the section below to continue.Continue to the linked placeThis link leads to an optional part of the flight. Open the section below to continue.Continue to the linked placeThis link leads to an optional part of the flight. Open the section below to continue.Continue to the linked placeThis link leads to an optional part of the flight. Open the section below to continue.Continue to the linked placeThis link leads to an optional part of the flight. Open the section below to continue.Continue to the linked placeThis link leads to an optional part of the flight. Open the section below to continue.Continue to the linked placeThis link leads to an optional part of the flight. Open the section below to continue.Continue to the linked placeThis link leads to an optional part of the flight. Open the section below to continue.Continue to the linked placeThis link leads to an optional part of the flight. Open the section below to continue.Continue to the linked placeThis link leads to an optional part of the flight. Open the section below to continue.Continue to the linked placeThis link leads to an optional part of the flight. Open the section below to continue.Continue to the linked placeThis link leads to an optional part of the flight. Open the section below to continue.Continue to the linked placeThis link leads to an optional part of the flight. Open the section below to continue.Continue to the linked placeThis link leads to an optional part of the flight. Open the section below to continue.Continue to the linked placeThis link leads to an optional part of the flight. Open the section below to continue.Continue to the linked placeThis link leads to an optional part of the flight. Open the section below to continue.Continue to the linked placeThis link leads to an optional part of the flight. Open the section below to continue.Continue to the linked placeThis link leads to an optional part of the flight. Open the section below to continue.Continue to the linked place

Return belt apron · detour entries and returns

Open the full-size illustration

  1. Arrival. Column 2, row 12. The pilot first takes control in this part of the room. Locate landmark 1
  2. Falling Spool. Column 18, row 5. The axle warns for 30 updates. The reel drops, lands, then rolls along the footing. Locate landmark 2
  3. Compression spring. Column 44, row 10. Watch the moving tread before boarding. Its position changes during play. Locate landmark 3
  4. Falling Spool · 2. Column 72, row 6. The axle warns for 30 updates. The reel drops, lands, then rolls along the footing. Locate landmark 4
  5. Post-beacon restart. Column 76, row 12. A paid retry puts the pilot on the quiet side of the belt. Locate landmark 5
  6. Vault inlet. Column 85.5, row 10. Down on the seam opens the short reel vault. Locate landmark 6
  7. Vault return. Column 97.5, row 10. The east side mouth in the vault returns above the dart lane. Locate landmark 7
  8. Fixed dart launcher. Column 103, row 12. Encounter reference. A moving threat can leave this position during play. Locate landmark 8
  9. Parcel Roller. Column 115, row 12. Encounter reference. A moving threat can leave this position during play. Locate landmark 9
  10. Relay mast. Column 135, row 12. Approach this relay to finish the room. Locate landmark 10