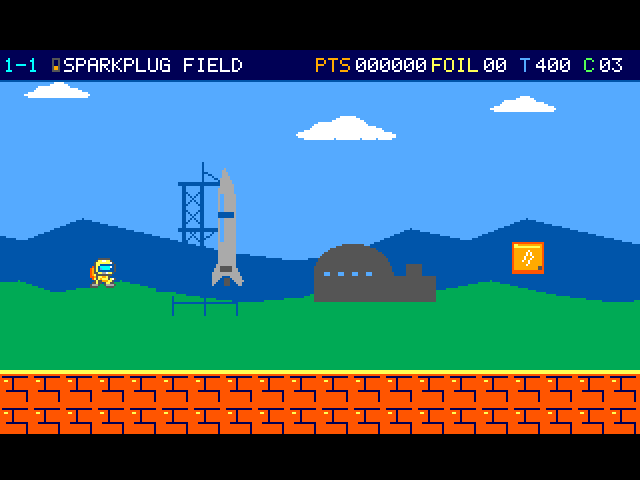
A Parcel Roller comes rattling down the old launch rail. Apparently nobody told it the Cape was closed. CoCoMan has room to try his boots, chase a shiny foil and see how high he can jump. The relay mast sticks up at the far end of the field. First delivery of the day!
The courier stands on green ground under a blue sky. A launch tower and distant hills break the horizon.
On the flight
This is the place to learn what changes when the courier puts on a suit. Try steering, jumping and braking on clear ground before going after anything that rolls.
Course map
Sparkplug Field
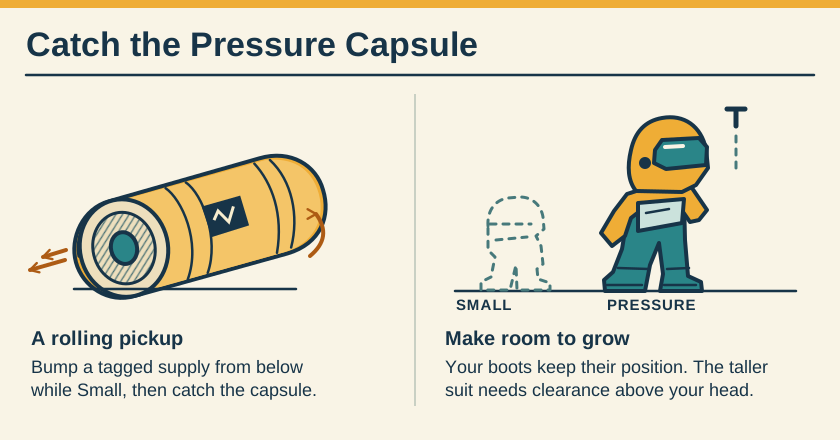
Start on the launch rail and let your boots settle. Try releasing Right on clear ground to feel the stopping distance. When a Pressure Capsule rolls away, follow it and touch it to put on the suit.
Launch rail. Column 2, row 12. You begin Small. Try a standing jump here before combining a direction with Jump. Locate landmark 1
Freight Drum. Column 107, row 12. The flanged drum folds when stomped. A folded drum can be kicked, and its moving chassis can come back towards you. Locate landmark 2
Relay pennant. Column 198, row 2. Grab the mast to bank the finish. The pilot lowers the pennant, walks to the station and heads for Undercity Switchyard. Locate landmark 3
Parcel Roller. Column 22, row 12. This marks an encounter position. Moving hazards can leave this point during play. Locate landmark 4
Parcel Roller. Column 40, row 12. This marks an encounter position. Moving hazards can leave this point during play. Locate landmark 5
Parcel Roller. Column 54, row 12. This marks an encounter position. Moving hazards can leave this point during play. Locate landmark 6
Parcel Roller. Column 55, row 12. This marks an encounter position. Moving hazards can leave this point during play. Locate landmark 7
Parcel Roller. Column 80, row 4. This marks an encounter position. Moving hazards can leave this point during play. Locate landmark 8
Parcel Roller. Column 82, row 4. This marks an encounter position. Moving hazards can leave this point during play. Locate landmark 9
Parcel Roller. Column 100, row 12. This marks an encounter position. Moving hazards can leave this point during play. Locate landmark 10
Parcel Roller. Column 101, row 12. This marks an encounter position. Moving hazards can leave this point during play. Locate landmark 11
Parcel Roller. Column 117, row 12. This marks an encounter position. Moving hazards can leave this point during play. Locate landmark 12
Parcel Roller. Column 118, row 12. This marks an encounter position. Moving hazards can leave this point during play. Locate landmark 13
Parcel Roller. Column 127, row 12. This marks an encounter position. Moving hazards can leave this point during play. Locate landmark 14
Parcel Roller. Column 128, row 12. This marks an encounter position. Moving hazards can leave this point during play. Locate landmark 15
Parcel Roller. Column 131, row 12. This marks an encounter position. Moving hazards can leave this point during play. Locate landmark 16
Parcel Roller. Column 132, row 12. This marks an encounter position. Moving hazards can leave this point during play. Locate landmark 17
Parcel Roller. Column 177, row 12. This marks an encounter position. Moving hazards can leave this point during play. Locate landmark 18
Parcel Roller. Column 178, row 12. This marks an encounter position. Moving hazards can leave this point during play. Locate landmark 19
Sparkplug Field · panel 1 of 5 · columns 0–40
209 columns by 15 rows. Full room at the start of a flight. Brown tile marks soil, brick or steps. A gold-topped tread is a platform. Green mouths mark ducts. Amber dots mark encounters.
1. Launch rail · 4. Parcel Roller
Sparkplug Field · panel 2 of 5 · columns 40–82
209 columns by 15 rows. Full room at the start of a flight. Brown tile marks soil, brick or steps. A gold-topped tread is a platform. Green mouths mark ducts. Amber dots mark encounters.
209 columns by 15 rows. Full room at the start of a flight. Brown tile marks soil, brick or steps. A gold-topped tread is a platform. Green mouths mark ducts. Amber dots mark encounters.
209 columns by 15 rows. Full room at the start of a flight. Brown tile marks soil, brick or steps. A gold-topped tread is a platform. Green mouths mark ducts. Amber dots mark encounters.
209 columns by 15 rows. Full room at the start of a flight. Brown tile marks soil, brick or steps. A gold-topped tread is a platform. Green mouths mark ducts. Amber dots mark encounters.
Launch rail. Column 2, row 12. You begin Small. Try a standing jump here before combining a direction with Jump. Locate landmark 1
Relay pennant. Column 198, row 2. Grab the mast to bank the finish. The pilot lowers the pennant, walks to the station and heads for Undercity Switchyard. Locate landmark 2
Sparkplug Field · scenery · panel 1 of 5 · columns 0–40
The launch grounds use a repeating native horizon of clouds, access arms and distant buildings.
1. Launch rail
Sparkplug Field · scenery · panel 2 of 5 · columns 40–82
The launch grounds use a repeating native horizon of clouds, access arms and distant buildings.
Sparkplug Field · scenery · panel 3 of 5 · columns 82–125
The launch grounds use a repeating native horizon of clouds, access arms and distant buildings.
Sparkplug Field · scenery · panel 4 of 5 · columns 125–167
The launch grounds use a repeating native horizon of clouds, access arms and distant buildings.
Sparkplug Field · scenery · panel 5 of 5 · columns 167–208
The launch grounds use a repeating native horizon of clouds, access arms and distant buildings.
2. Relay pennant
Catch the Pressure Capsule
Equipment study. A ribbed capsule rolls free. A dashed small suit and a solid taller suit share one boot line, with room above the helmet for the change.
Get comfortable with a fresh press of Jump and with releasing the direction to slow down. A descending stomp folds a Freight Drum. Touching the folded Drum can set it moving again.
Return or onward flight
Use the relay mast when you are ready to leave. Your equipment and bank go with you to the Switchyard.
Follow this transfer
Catch the relay pennant to begin the Switchyard Approach.
This link leads to an optional part of the flight. Open the section below to continue.Continue to the linked placeThis link leads to an optional part of the flight. Open the section below to continue.Continue to the linked placeThis link leads to an optional part of the flight. Open the section below to continue.Continue to the linked placeThis link leads to an optional part of the flight. Open the section below to continue.Continue to the linked placeThis link leads to an optional part of the flight. Open the section below to continue.Continue to the linked placeThis link leads to an optional part of the flight. Open the section below to continue.Continue to the linked placeThis link leads to an optional part of the flight. Open the section below to continue.Continue to the linked placeThis link leads to an optional part of the flight. Open the section below to continue.Continue to the linked placeThis link leads to an optional part of the flight. Open the section below to continue.Continue to the linked placeThis link leads to an optional part of the flight. Open the section below to continue.Continue to the linked placeThis link leads to an optional part of the flight. Open the section below to continue.Continue to the linked placeThis link leads to an optional part of the flight. Open the section below to continue.Continue to the linked placeThis link leads to an optional part of the flight. Open the section below to continue.Continue to the linked placeThis link leads to an optional part of the flight. Open the section below to continue.Continue to the linked placeThis link leads to an optional part of the flight. Open the section below to continue.Continue to the linked placeThis link leads to an optional part of the flight. Open the section below to continue.Continue to the linked placeThis link leads to an optional part of the flight. Open the section below to continue.Continue to the linked placeThis link leads to an optional part of the flight. Open the section below to continue.Continue to the linked placeThis link leads to an optional part of the flight. Open the section below to continue.Continue to the linked placeThis link leads to an optional part of the flight. Open the section below to continue.Continue to the linked placeThis link leads to an optional part of the flight. Open the section below to continue.Continue to the linked placeThis link leads to an optional part of the flight. Open the section below to continue.Continue to the linked place
Whoever packed this locker believed in using every shelf. Bright foils hang in rows all the way up, and CoCoMan has the place to himself. The question is how many he can stuff in his pockets before he takes the duct back to daylight.
Entry
The optional freight room is a chance to collect loose foil. Pick up whatever you can on this visit.
Return or onward flight
Its outlet brings you back into the yard with the checkpoint earned. Foils already collected stay spent if you revisit the locker in the same life.
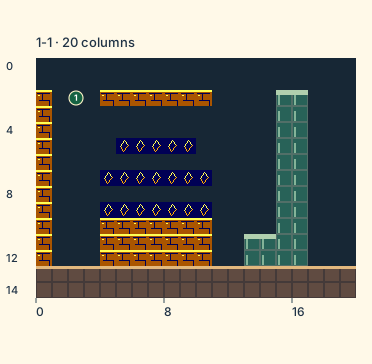
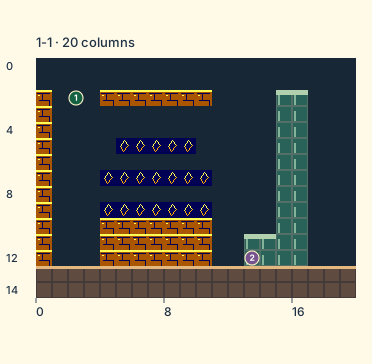
Locker arrival. Column 2, row 2. Let the pilot drop to the floor after the duct transfer. The suit and foil bank came with you. Locate landmark 1
Copper Locker · panel 1 of 1 · columns 0–19
20 columns by 15 rows. Full room at the start of a flight. Brown tile marks soil, brick or steps. A gold-topped tread is a platform. Green mouths mark ducts. Amber dots mark encounters.
1. Locker arrival
Open the scenery view
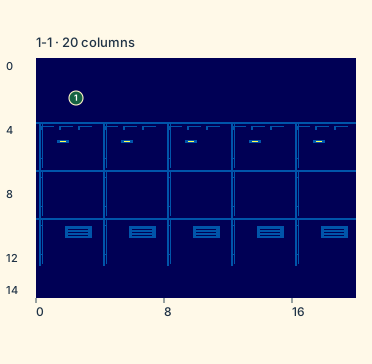
Copper Locker · scenery
The Copper Locker wall has recessed bulkheads, scuffed trays and a small service light.
Copper Locker inlet. Column 57.5, row 9. With the pilot centered and grounded on the compressor, hold Down to enter the optional freight room. Locate landmark 1
Locker return. Column 163.5, row 11. The outlet brings you up into the yard with the checkpoint earned. Resume steering once the rise finishes. Locate landmark 2
Sparkplug Field · transfer points · panel 1 of 5 · columns 0–40
Only the selected route’s transfer positions are marked with numbered amber diamonds.
Sparkplug Field · transfer points · panel 2 of 5 · columns 40–82
1
Only the selected route’s transfer positions are marked with numbered amber diamonds.
1. Copper Locker inlet
Sparkplug Field · transfer points · panel 3 of 5 · columns 82–125
Only the selected route’s transfer positions are marked with numbered amber diamonds.
Sparkplug Field · transfer points · panel 4 of 5 · columns 125–167
2
Only the selected route’s transfer positions are marked with numbered amber diamonds.
2. Locker return
Sparkplug Field · transfer points · panel 5 of 5 · columns 167–208
Only the selected route’s transfer positions are marked with numbered amber diamonds.
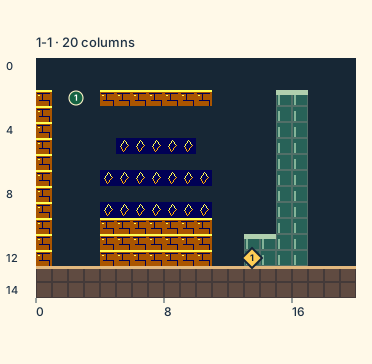
Return mouth. Column 13, row 12. On the floor, walk Right into the open side of the mouth. You rise back into Sparkplug Field with the checkpoint earned. Locate landmark 1
Copper Locker · transfer points · panel 1 of 1 · columns 0–19
1
Only the selected route’s transfer positions are marked with numbered amber diamonds.
1. Return mouth
Count the Copper Locker foils
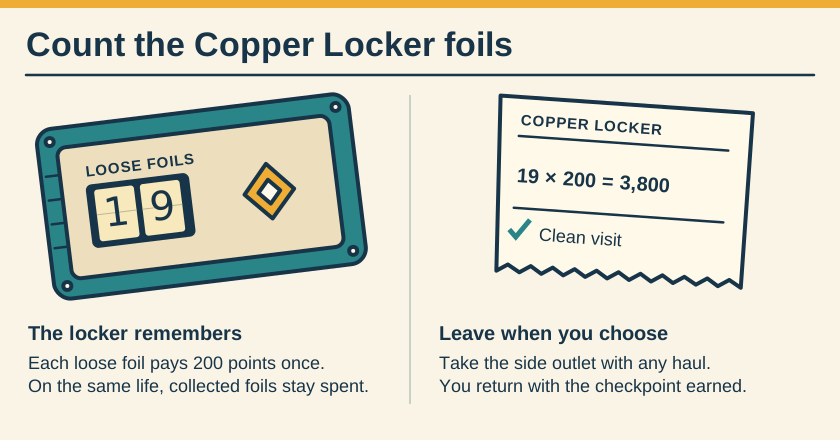
A mechanical counter records nineteen loose foils. A ledger shows that collecting all nineteen pays 3,800 points. This drawing records rewards, not foil positions.
Foil counter. A clean locker holds 19 loose foils. Collect all of them for 3,800 points.
Paid ledger. Revisit on the same life and only the foils you left remain. The outlet activates the checkpoint even if you leave some behind.
This link leads to an optional part of the flight. Open the section below to continue.Continue to the linked placeThis link leads to an optional part of the flight. Open the section below to continue.Continue to the linked placeThis link leads to an optional part of the flight. Open the section below to continue.Continue to the linked placeThis link leads to an optional part of the flight. Open the section below to continue.Continue to the linked placeThis link leads to an optional part of the flight. Open the section below to continue.Continue to the linked placeThis link leads to an optional part of the flight. Open the section below to continue.Continue to the linked placeThis link leads to an optional part of the flight. Open the section below to continue.Continue to the linked placeThis link leads to an optional part of the flight. Open the section below to continue.Continue to the linked placeThis link leads to an optional part of the flight. Open the section below to continue.Continue to the linked placeThis link leads to an optional part of the flight. Open the section below to continue.Continue to the linked placeThis link leads to an optional part of the flight. Open the section below to continue.Continue to the linked placeThis link leads to an optional part of the flight. Open the section below to continue.Continue to the linked placeThis link leads to an optional part of the flight. Open the section below to continue.Continue to the linked placeThis link leads to an optional part of the flight. Open the section below to continue.Continue to the linked placeThis link leads to an optional part of the flight. Open the section below to continue.Continue to the linked placeThis link leads to an optional part of the flight. Open the section below to continue.Continue to the linked placeThis link leads to an optional part of the flight. Open the section below to continue.Continue to the linked placeThis link leads to an optional part of the flight. Open the section below to continue.Continue to the linked placeThis link leads to an optional part of the flight. Open the section below to continue.Continue to the linked placeThis link leads to an optional part of the flight. Open the section below to continue.Continue to the linked placeThis link leads to an optional part of the flight. Open the section below to continue.Continue to the linked placeThis link leads to an optional part of the flight. Open the section below to continue.Continue to the linked placeThis link leads to an optional part of the flight. Open the section below to continue.Continue to the linked placeThis link leads to an optional part of the flight. Open the section below to continue.Continue to the linked placeThis link leads to an optional part of the flight. Open the section below to continue.Continue to the linked placeThis link leads to an optional part of the flight. Open the section below to continue.Continue to the linked placeThis link leads to an optional part of the flight. Open the section below to continue.Continue to the linked placeThis link leads to an optional part of the flight. Open the section below to continue.Continue to the linked placeThis link leads to an optional part of the flight. Open the section below to continue.Continue to the linked placeThis link leads to an optional part of the flight. Open the section below to continue.Continue to the linked placeThis link leads to an optional part of the flight. Open the section below to continue.Continue to the linked placeThis link leads to an optional part of the flight. Open the section below to continue.Continue to the linked placeThis link leads to an optional part of the flight. Open the section below to continue.Continue to the linked placeThis link leads to an optional part of the flight. Open the section below to continue.Continue to the linked placeThis link leads to an optional part of the flight. Open the section below to continue.Continue to the linked placeThis link leads to an optional part of the flight. Open the section below to continue.Continue to the linked placeThis link leads to an optional part of the flight. Open the section below to continue.Continue to the linked placeThis link leads to an optional part of the flight. Open the section below to continue.Continue to the linked placeThis link leads to an optional part of the flight. Open the section below to continue.Continue to the linked placeThis link leads to an optional part of the flight. Open the section below to continue.Continue to the linked placeThis link leads to an optional part of the flight. Open the section below to continue.Continue to the linked placeThis link leads to an optional part of the flight. Open the section below to continue.Continue to the linked placeThis link leads to an optional part of the flight. Open the section below to continue.Continue to the linked placeThis link leads to an optional part of the flight. Open the section below to continue.Continue to the linked placeThis link leads to an optional part of the flight. Open the section below to continue.Continue to the linked place
Start on the launch rail and let your boots settle. Try releasing Right on clear ground to feel the stopping distance. When a Pressure Capsule rolls away, follow it and touch it to put on the suit.
Launch rail. Column 2, row 12. You begin Small. Try a standing jump here before combining a direction with Jump. Locate landmark 1
Suit supply. Column 21, row 9. Bump the tagged supply from below. Follow the pickup until you touch it and the pilot changes size. Locate landmark 2
Freight Drum. Column 107, row 12. The flanged drum folds when stomped. A folded drum can be kicked, and its moving chassis can come back towards you. Locate landmark 3
Copper Locker inlet. Column 57.5, row 9. With the pilot centered and grounded on the compressor, hold Down to enter the optional freight room. Locate landmark 4
Locker return. Column 163.5, row 11. The outlet brings you up into the yard with the checkpoint earned. Resume steering once the rise finishes. Locate landmark 5
Relay pennant. Column 198, row 2. Grab the mast to bank the finish. The pilot lowers the pennant, walks to the station and heads for Undercity Switchyard. Locate landmark 6
Parcel Roller. Column 22, row 12. This marks an encounter position. Moving hazards can leave this point during play. Locate landmark 7
Parcel Roller. Column 40, row 12. This marks an encounter position. Moving hazards can leave this point during play. Locate landmark 8
Parcel Roller. Column 54, row 12. This marks an encounter position. Moving hazards can leave this point during play. Locate landmark 9
Parcel Roller. Column 55, row 12. This marks an encounter position. Moving hazards can leave this point during play. Locate landmark 10
Parcel Roller. Column 80, row 4. This marks an encounter position. Moving hazards can leave this point during play. Locate landmark 11
Parcel Roller. Column 82, row 4. This marks an encounter position. Moving hazards can leave this point during play. Locate landmark 12
Parcel Roller. Column 100, row 12. This marks an encounter position. Moving hazards can leave this point during play. Locate landmark 13
Parcel Roller. Column 101, row 12. This marks an encounter position. Moving hazards can leave this point during play. Locate landmark 14
Parcel Roller. Column 117, row 12. This marks an encounter position. Moving hazards can leave this point during play. Locate landmark 15
Parcel Roller. Column 118, row 12. This marks an encounter position. Moving hazards can leave this point during play. Locate landmark 16
Parcel Roller. Column 127, row 12. This marks an encounter position. Moving hazards can leave this point during play. Locate landmark 17
Parcel Roller. Column 128, row 12. This marks an encounter position. Moving hazards can leave this point during play. Locate landmark 18
Parcel Roller. Column 131, row 12. This marks an encounter position. Moving hazards can leave this point during play. Locate landmark 19
Parcel Roller. Column 132, row 12. This marks an encounter position. Moving hazards can leave this point during play. Locate landmark 20
Parcel Roller. Column 177, row 12. This marks an encounter position. Moving hazards can leave this point during play. Locate landmark 21
Parcel Roller. Column 178, row 12. This marks an encounter position. Moving hazards can leave this point during play. Locate landmark 22
Sparkplug Field · discoveries · panel 1 of 5 · columns 0–40
209 columns by 15 rows. Full room with marked rewards and optional landmarks. Brown tile marks soil, brick or steps. A gold-topped tread is a platform. Green mouths mark ducts. Amber dots mark encounters.
Sparkplug Field · discoveries · panel 2 of 5 · columns 40–82
209 columns by 15 rows. Full room with marked rewards and optional landmarks. Brown tile marks soil, brick or steps. A gold-topped tread is a platform. Green mouths mark ducts. Amber dots mark encounters.
Sparkplug Field · discoveries · panel 3 of 5 · columns 82–125
209 columns by 15 rows. Full room with marked rewards and optional landmarks. Brown tile marks soil, brick or steps. A gold-topped tread is a platform. Green mouths mark ducts. Amber dots mark encounters.
Sparkplug Field · discoveries · panel 4 of 5 · columns 125–167
209 columns by 15 rows. Full room with marked rewards and optional landmarks. Brown tile marks soil, brick or steps. A gold-topped tread is a platform. Green mouths mark ducts. Amber dots mark encounters.
Sparkplug Field · discoveries · panel 5 of 5 · columns 167–208
209 columns by 15 rows. Full room with marked rewards and optional landmarks. Brown tile marks soil, brick or steps. A gold-topped tread is a platform. Green mouths mark ducts. Amber dots mark encounters.
This link leads to an optional part of the flight. Open the section below to continue.Continue to the linked placeThis link leads to an optional part of the flight. Open the section below to continue.Continue to the linked placeThis link leads to an optional part of the flight. Open the section below to continue.Continue to the linked placeThis link leads to an optional part of the flight. Open the section below to continue.Continue to the linked placeThis link leads to an optional part of the flight. Open the section below to continue.Continue to the linked place
Locker arrival. Column 2, row 2. Let the pilot drop to the floor after the duct transfer. The suit and foil bank came with you. Locate landmark 1
Return mouth. Column 13, row 12. On the floor, walk Right into the open side of the mouth. You rise back into Sparkplug Field with the checkpoint earned. Locate landmark 2
20 columns by 15 rows. Full room with marked rewards and optional landmarks. Brown tile marks soil, brick or steps. A gold-topped tread is a platform. Green mouths mark ducts. Amber dots mark encounters.
 To Titan and Back