Inside the last relay, signal lamps and branching valves stand between CoCoMan and the return bridge. Orchard is waiting there. So is Aster, if the trail across Titan leads where CoCoMan hopes it does.
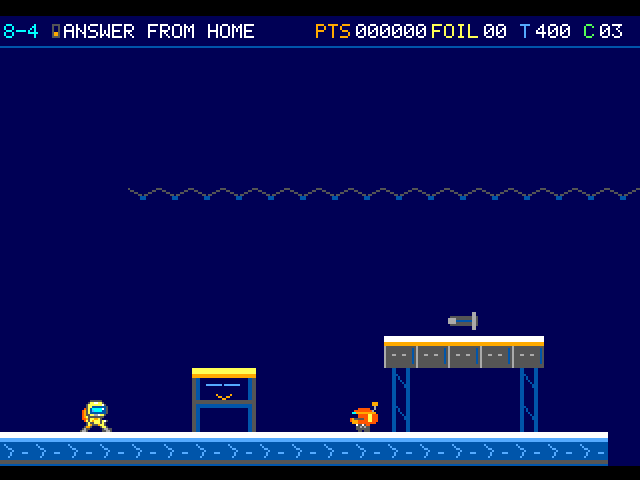
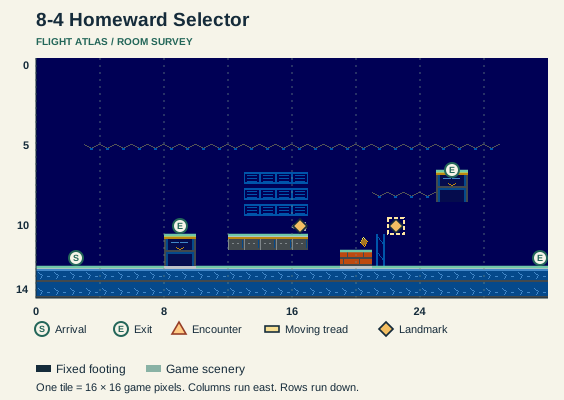
The courier stands near the first yellow-rimmed opening in the array. A machine and a gray-topped platform are visible farther right.
On the flight
Read the lamps as you travel. Their light tells you what the receiver has accepted, and the amber marks help you recognize a place you have seen before. Even a Small pilot can finish the flight.
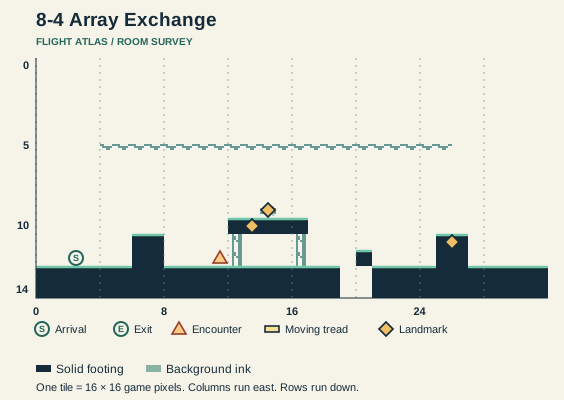
32 columns by 15 rows. Dark blue is fixed footing; pale green follows the game’s background ink. Orange triangles locate encounters; mobile actors can move. See the linked landmarks for directions.
1. Arrival · 2. Parcel Roller · 3. Inspection shelf · 4. Trace lamp · 5. East service iris
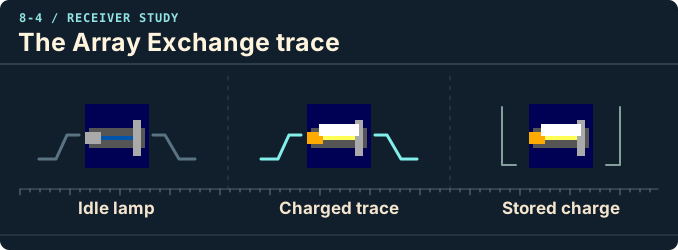
Idle lamp. Look for the dark lamp beside the Array Exchange trace.
Charged trace. Moving past the trace lights the first lamp. You can read the change on the lamp face.
Stored charge. Your saved flight retains that charge. Returning through the room leaves the lamp on.
Landmarks to recognize
Receiver lamps
Read their glow after a crossing or a change of room. A lit lamp stays lit on a return visit.
Duct mouths
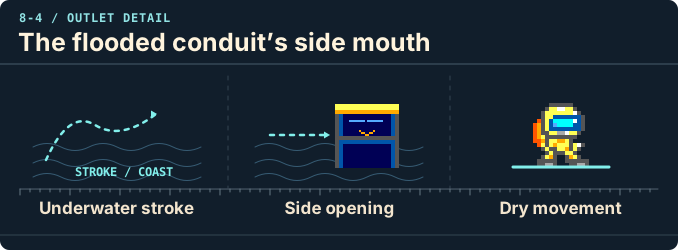
Look for the open face. A floor iris takes a grounded entry, while a flooded side mouth takes a swimming approach.
Give me a hint
If you find yourself back at an entrance, check which lamps stayed lit. Look under a gap in the Selector and under the receiver in the Checksum Chamber before trying the next duct.
Routes and discoveries
This link leads to an optional part of the flight. Open the section below to continue.Continue to the linked placeThis link leads to an optional part of the flight. Open the section below to continue.Continue to the linked placeThis link leads to an optional part of the flight. Open the section below to continue.Continue to the linked placeThis link leads to an optional part of the flight. Open the section below to continue.Continue to the linked placeThis link leads to an optional part of the flight. Open the section below to continue.Continue to the linked placeThis link leads to an optional part of the flight. Open the section below to continue.Continue to the linked placeThis link leads to an optional part of the flight. Open the section below to continue.Continue to the linked place
A Parcel Roller rattles along under the cables, carrying on with its shift. CoCoMan has a different job. He needs to find which of the exchange valves will take him deeper into the station.
Entry
Cross the first bright trace, then stand centered on the service iris near the far end and hold Down for the Selector.
Return or onward flight
The earlier bypass returns you to the Array entrance. You keep the lamp you charged.
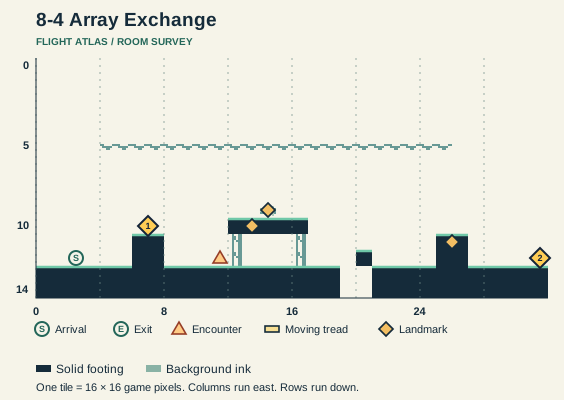
Array Exchange · transfer points · panel 1 of 1 · columns 0–31
12
Only the selected route’s transfer positions are marked with numbered amber diamonds.
1. Western bypass · 2. Far edge
This link leads to an optional part of the flight. Open the section below to continue.Continue to the linked placeThis link leads to an optional part of the flight. Open the section below to continue.Continue to the linked placeThis link leads to an optional part of the flight. Open the section below to continue.Continue to the linked placeThis link leads to an optional part of the flight. Open the section below to continue.Continue to the linked placeThis link leads to an optional part of the flight. Open the section below to continue.Continue to the linked placeThis link leads to an optional part of the flight. Open the section below to continue.Continue to the linked placeThis link leads to an optional part of the flight. Open the section below to continue.Continue to the linked placeThis link leads to an optional part of the flight. Open the section below to continue.Continue to the linked placeThis link leads to an optional part of the flight. Open the section below to continue.Continue to the linked placeThis link leads to an optional part of the flight. Open the section below to continue.Continue to the linked placeThis link leads to an optional part of the flight. Open the section below to continue.Continue to the linked placeThis link leads to an optional part of the flight. Open the section below to continue.Continue to the linked placeThis link leads to an optional part of the flight. Open the section below to continue.Continue to the linked placeThis link leads to an optional part of the flight. Open the section below to continue.Continue to the linked placeThis link leads to an optional part of the flight. Open the section below to continue.Continue to the linked placeThis link leads to an optional part of the flight. Open the section below to continue.Continue to the linked placeThis link leads to an optional part of the flight. Open the section below to continue.Continue to the linked placeThis link leads to an optional part of the flight. Open the section below to continue.Continue to the linked placeThis link leads to an optional part of the flight. Open the section below to continue.Continue to the linked placeThis link leads to an optional part of the flight. Open the section below to continue.Continue to the linked placeThis link leads to an optional part of the flight. Open the section below to continue.Continue to the linked placeThis link leads to an optional part of the flight. Open the section below to continue.Continue to the linked place
The opening CoCoMan wants is hanging above the floor, well out of reach. The selector has a signal lamp to mind too. He’ll need to work out what the room is keeping out of sight.
Entry
Cross the trace to charge the Selector lamp. Jump under the cable gap, climb onto the tread you exposed, then land on the floating nozzle and press Down.
Return or onward flight
The amber-marked duct takes you back to the Array. The foothold remains when you return on the same flight.
Selector trace. Column 16, row 10. Cross X256 to charge the selector lamp. A second visit keeps the lamp charged. Locate landmark 3
Cable-gap tread. Column 22, row 10. Jump into the cable gap from below. The first hit pays one foil and exposes a foothold that remains on a revisit. Locate landmark 4
Floating nozzle. Column 25.5, row 6.5. From the raised tread, land on the nozzle and hold Down. The next room is the Checksum Chamber. Locate landmark 5
32 columns by 15 rows. The game’s scenery is shown at its native proportions. Turquoise edges mark fixed treads. The revealed foothold and both outgoing valves are marked in this opt-in guide.
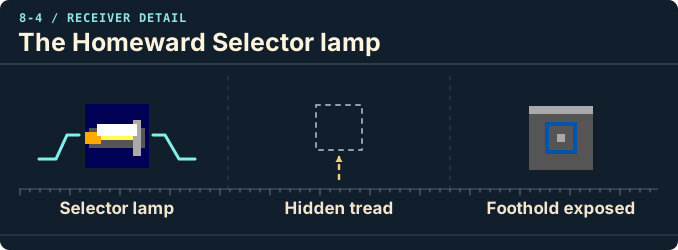
Selector lamp. Crossing the selector trace lights its own lamp. The array charge stays on.
Hidden tread. Bump upward under the gap in the cable to expose a foothold. The first bump pays one foil.
Foothold exposed. Land on the tread, then jump to the floating nozzle. Center over its mouth and hold Down.
This link leads to an optional part of the flight. Open the section below to continue.Continue to the linked placeThis link leads to an optional part of the flight. Open the section below to continue.Continue to the linked placeThis link leads to an optional part of the flight. Open the section below to continue.Continue to the linked placeThis link leads to an optional part of the flight. Open the section below to continue.Continue to the linked placeThis link leads to an optional part of the flight. Open the section below to continue.Continue to the linked placeThis link leads to an optional part of the flight. Open the section below to continue.Continue to the linked placeThis link leads to an optional part of the flight. Open the section below to continue.Continue to the linked placeThis link leads to an optional part of the flight. Open the section below to continue.Continue to the linked placeThis link leads to an optional part of the flight. Open the section below to continue.Continue to the linked placeThis link leads to an optional part of the flight. Open the section below to continue.Continue to the linked placeThis link leads to an optional part of the flight. Open the section below to continue.Continue to the linked placeThis link leads to an optional part of the flight. Open the section below to continue.Continue to the linked placeThis link leads to an optional part of the flight. Open the section below to continue.Continue to the linked placeThis link leads to an optional part of the flight. Open the section below to continue.Continue to the linked placeThis link leads to an optional part of the flight. Open the section below to continue.Continue to the linked placeThis link leads to an optional part of the flight. Open the section below to continue.Continue to the linked placeThis link leads to an optional part of the flight. Open the section below to continue.Continue to the linked placeThis link leads to an optional part of the flight. Open the section below to continue.Continue to the linked placeThis link leads to an optional part of the flight. Open the section below to continue.Continue to the linked placeThis link leads to an optional part of the flight. Open the section below to continue.Continue to the linked placeThis link leads to an optional part of the flight. Open the section below to continue.Continue to the linked placeThis link leads to an optional part of the flight. Open the section below to continue.Continue to the linked placeThis link leads to an optional part of the flight. Open the section below to continue.Continue to the linked placeThis link leads to an optional part of the flight. Open the section below to continue.Continue to the linked placeThis link leads to an optional part of the flight. Open the section below to continue.Continue to the linked place
A warning lens lights up, and the Checksum Sail springs into the passage. Somewhere in the chamber is the last dry signal lamp. CoCoMan needs to leave it shining before he goes any farther.
Entry
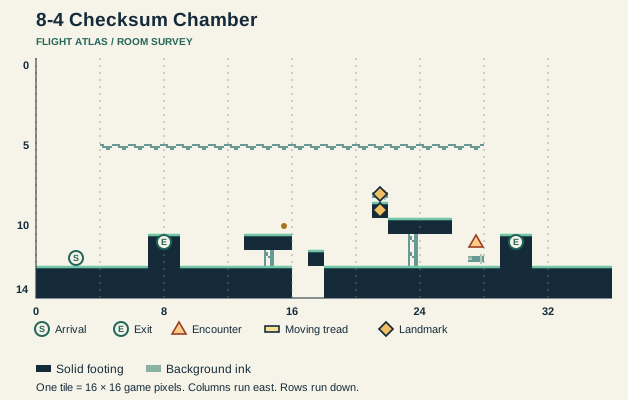
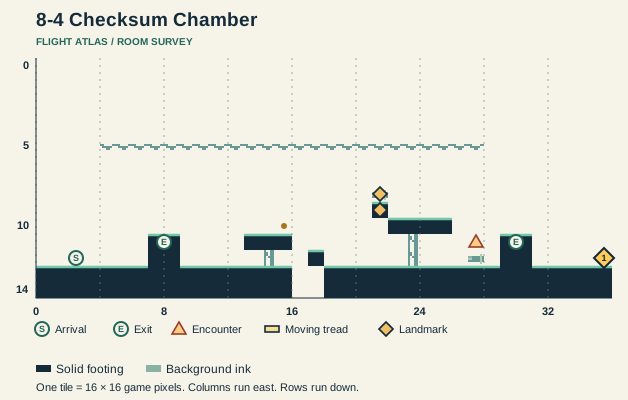
Bump the receiver from below. Cross the intermittent Sail lane, then use Down on the far duct with all three lamps charged.
Return or onward flight
An uncharged far duct loops back into this room. The early duct takes you back to the Selector.
36 columns by 15 rows. Dark blue is fixed footing; pale green follows the game’s background ink. Orange triangles locate encounters; mobile actors can move. See the linked landmarks for directions.
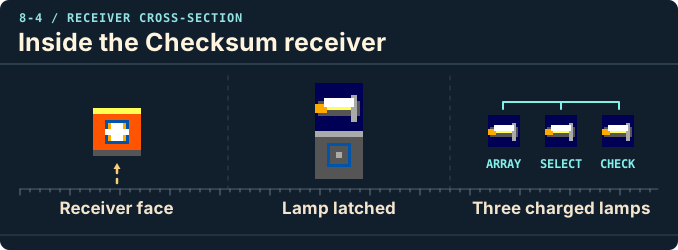
Receiver face. Hit the receiver from below. Its face sits immediately under the indicator lamp.
Lamp latched. The indicator above the struck face lights. The receiver stays spent on return.
Three charged lamps. The outlet accepts a flooded transfer when the array, selector and checksum lamps are all charged.
This link leads to an optional part of the flight. Open the section below to continue.Continue to the linked placeThis link leads to an optional part of the flight. Open the section below to continue.Continue to the linked placeThis link leads to an optional part of the flight. Open the section below to continue.Continue to the linked placeThis link leads to an optional part of the flight. Open the section below to continue.Continue to the linked placeThis link leads to an optional part of the flight. Open the section below to continue.Continue to the linked placeThis link leads to an optional part of the flight. Open the section below to continue.Continue to the linked placeThis link leads to an optional part of the flight. Open the section below to continue.Continue to the linked placeThis link leads to an optional part of the flight. Open the section below to continue.Continue to the linked placeThis link leads to an optional part of the flight. Open the section below to continue.Continue to the linked placeThis link leads to an optional part of the flight. Open the section below to continue.Continue to the linked placeThis link leads to an optional part of the flight. Open the section below to continue.Continue to the linked placeThis link leads to an optional part of the flight. Open the section below to continue.Continue to the linked placeThis link leads to an optional part of the flight. Open the section below to continue.Continue to the linked placeThis link leads to an optional part of the flight. Open the section below to continue.Continue to the linked placeThis link leads to an optional part of the flight. Open the section below to continue.Continue to the linked placeThis link leads to an optional part of the flight. Open the section below to continue.Continue to the linked placeThis link leads to an optional part of the flight. Open the section below to continue.Continue to the linked placeThis link leads to an optional part of the flight. Open the section below to continue.Continue to the linked placeThis link leads to an optional part of the flight. Open the section below to continue.Continue to the linked placeThis link leads to an optional part of the flight. Open the section below to continue.Continue to the linked placeThis link leads to an optional part of the flight. Open the section below to continue.Continue to the linked placeThis link leads to an optional part of the flight. Open the section below to continue.Continue to the linked placeThis link leads to an optional part of the flight. Open the section below to continue.Continue to the linked placeThis link leads to an optional part of the flight. Open the section below to continue.Continue to the linked placeThis link leads to an optional part of the flight. Open the section below to continue.Continue to the linked placeThis link leads to an optional part of the flight. Open the section below to continue.Continue to the linked placeThis link leads to an optional part of the flight. Open the section below to continue.Continue to the linked placeThis link leads to an optional part of the flight. Open the section below to continue.Continue to the linked placeThis link leads to an optional part of the flight. Open the section below to continue.Continue to the linked place
A Gauge Minnow patrols the passage, and a Thermal Rotor sweeps through the liquid. The baffles keep breaking up the lane, so every time CoCoMan finds room to swim, he has to make the most of it.
Entry
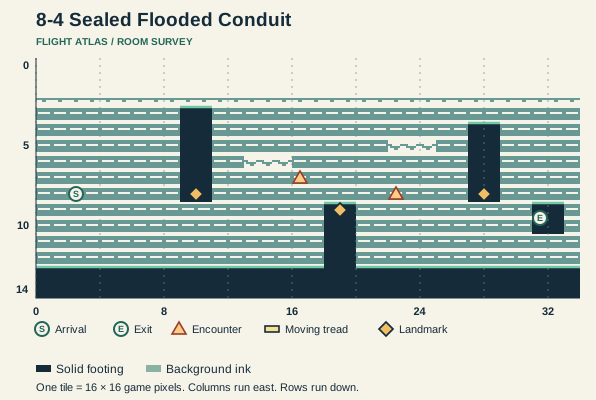
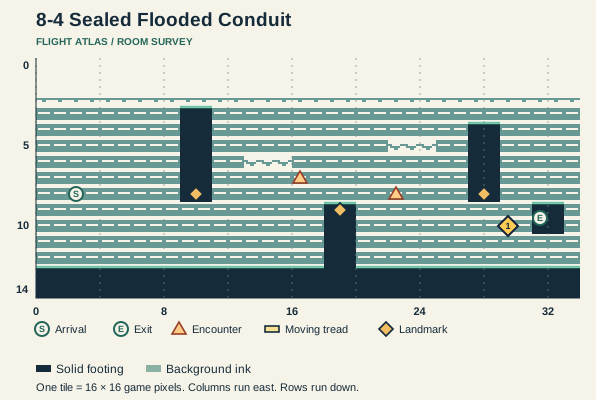
Swim under the first baffle, over the low second one, then under the third. Line up with the side mouth and hold Right to enter the Uplink.
Return or onward flight
If you miss the mouth, swim left to the quiet pocket and line up for another try.
34 columns by 15 rows. Dark blue is fixed footing; pale green follows the game’s background ink. Orange triangles locate encounters; mobile actors can move. See the linked landmarks for directions.
 To Titan and Back